Picture this: It’s Sunday morning, and you’re planning a special Italian brunch for your family. You reach for that store-bought ricotta container, only to discover it’s past its prime. But here’s where the magic happens – with just three simple ingredients and 30 minutes, you can create the most luxuriously creamy, fresh ricotta cheese that puts any store-bought version to shame.
I’ll never forget the first time I made homemade ricotta during a cooking class in Tuscany. As the warm milk transformed before my eyes into silky white curds, I realized I was witnessing one of cooking’s most beautiful transformations. The instructor, nonna Maria, smiled knowingly as I tasted the warm, cloud-like ricotta fresh from the pot. “This,” she said in broken English, “is how my nonna taught me, and her nonna before that.”
That moment changed everything for me. Store-bought ricotta, with its often grainy texture and sometimes sour aftertaste, suddenly seemed like a pale imitation. Fresh homemade ricotta is a revelation – it’s incredibly creamy, naturally sweet, and has a clean, pure flavor that elevates everything it touches.
The beauty of making ricotta at home lies not just in its superior taste, but in its incredible simplicity. While the word “ricotta” literally means “recooked” in Italian (referring to the traditional method of using leftover whey from other cheese-making processes), our home version uses fresh whole milk, heavy cream, and an acid like lemon juice or white vinegar to create those magical curds.
Whether you’re planning to stuff it into cannoli, layer it in lasagna, spread it on toast with honey, or simply eat it warm with a drizzle of olive oil and black pepper, homemade ricotta transforms ordinary dishes into extraordinary experiences. Plus, you’ll save money – homemade ricotta costs about half the price of premium store-bought versions and tastes infinitely better.
Why This Homemade Ricotta Recipe Works Every Time
The secret to perfect homemade ricotta lies in understanding the simple science behind curd formation. When we gently heat milk and cream to the precise temperature (around 200°F), the proteins become more receptive to coagulation. Adding acid at this critical moment causes the milk proteins to clump together, forming curds while separating from the liquid whey.
My recipe uses a foolproof 4:1 ratio of whole milk to heavy cream, which creates the ideal balance of richness and texture. The heavy cream contributes essential fat content that makes the ricotta incredibly creamy and prevents it from becoming grainy – a common problem with milk-only recipes.

The key temperature range is crucial: too low, and the curds won’t form properly; too high, and you’ll create tough, rubbery curds. By bringing the mixture to a gentle boil and immediately removing it from heat before adding the acid, we ensure perfect curd formation every single time.
Using fresh lemon juice rather than bottled provides the right acidity level while adding a subtle brightness that enhances the ricotta’s natural sweetness. The citric acid in fresh lemons is more potent and reliable than aged bottled versions.
The straining process is where texture preference comes into play. A shorter strain (10-15 minutes) yields creamier, spreadable ricotta perfect for desserts, while longer straining (30+ minutes) creates firmer ricotta ideal for stuffing pasta or making ricotta gnocchi.
Essential Ingredients & Equipment for Perfect Ricotta
The Holy Trinity of Ingredients
1. Whole Milk (4 cups) The foundation of great ricotta starts with high-quality whole milk. The fat content is essential – skim or low-fat milk simply won’t produce the rich, creamy texture we’re after. I recommend organic, grass-fed milk when possible, as it has superior flavor and higher nutritional content. Avoid ultra-pasteurized milk, which has been heated to such high temperatures that the proteins won’t coagulate properly.
Substitution Options:
- Organic valley or local dairy whole milk (preferred)
- Non-homogenized milk for even richer flavor
- In a pinch: 2% milk + 1 cup heavy cream (adjust ratios)

2. Heavy Cream (1 cup) Heavy cream (36% fat content) is what transforms ordinary homemade ricotta into something truly special. It adds richness, improves texture, and helps create those perfectly smooth curds. Don’t substitute with half-and-half or light cream – the fat content is crucial for proper curd formation.
Where to Source: Most grocery stores carry heavy cream, but for the best flavor, seek out local dairy products or organic brands without stabilizers or additives.
3. Fresh Lemon Juice (3-4 tablespoons) Freshly squeezed lemon juice is your coagulation agent and flavor enhancer. The natural citric acid causes the milk proteins to separate while adding a subtle brightness. Always use fresh lemons – bottled lemon juice can be inconsistent and may contain preservatives that interfere with curd formation.
Alternative Acids:
- White vinegar (3 tablespoons): Creates neutral-flavored ricotta
- White wine vinegar: Adds subtle complexity
- Citric acid powder (1/2 teaspoon): Professional cheesemaker’s choice
Essential Equipment
Heavy-Bottom Saucepan or Dutch Oven: Prevents hot spots and scorching. A 4-6 quart capacity is ideal.
Fine-Mesh Strainer: For initial straining. A 6-inch diameter works perfectly.
Cheesecloth or Fine Cotton Kitchen Towel: Creates the smooth texture. Avoid paper towels or regular dish towels.
Wooden Spoon: For gentle stirring without scratching your pan.
Instant-Read Thermometer: Optional but helpful for precision (target: 200°F).
Large Bowl: To catch the whey during straining.
Step-by-Step Instructions for Foolproof Ricotta
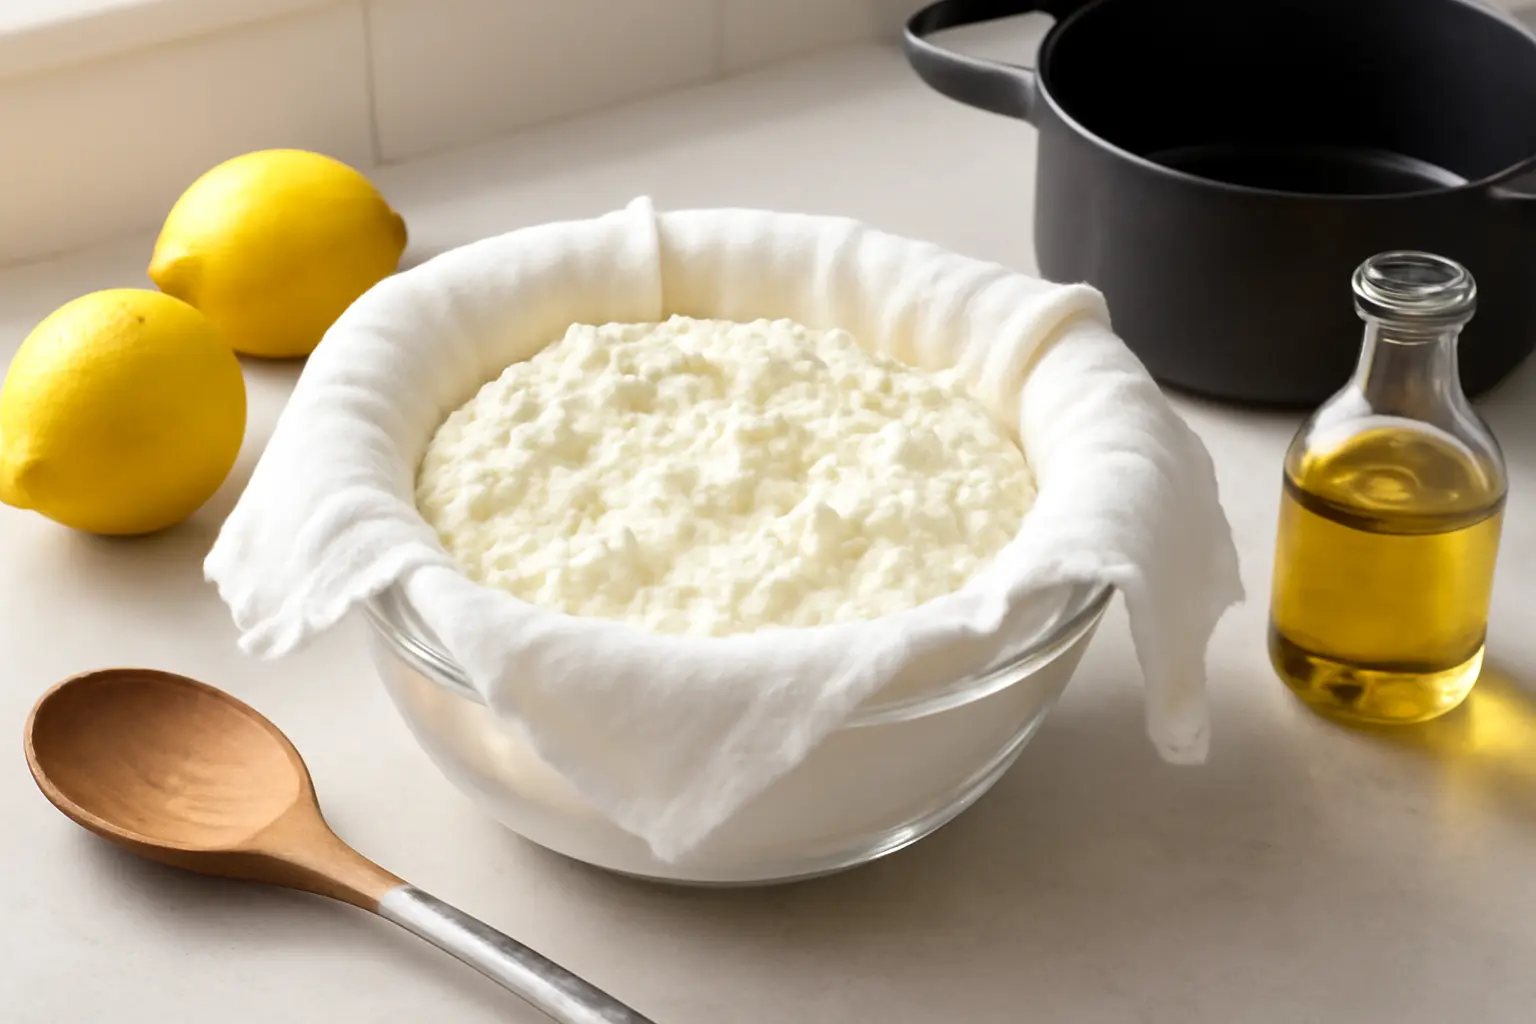
Step 1: Prepare Your Straining Setup (2 minutes)
Line a fine-mesh strainer with 2-3 layers of cheesecloth or a clean cotton kitchen towel. Place this over a large bowl to catch the whey. Having this ready before you start cooking prevents any scrambling later when timing is crucial.
Pro Tip: Wet the cheesecloth with cool water and wring out excess. This prevents the ricotta from sticking and makes cleanup easier.
Step 2: Combine and Heat the Dairy (8-10 minutes)
In your heavy-bottom saucepan, combine 4 cups whole milk, 1 cup heavy cream, and 1 teaspoon kosher salt. Heat over medium heat, stirring occasionally with a wooden spoon in a figure-8 pattern to prevent sticking and ensure even heating.
Visual Cues: Watch for small bubbles forming around the edges. The mixture should reach a gentle rolling boil – not a vigorous, aggressive boil that could make the ricotta tough.
Temperature Guide: If using a thermometer, aim for 200-206°F. Without a thermometer, look for the milk mixture to foam up slightly and begin bubbling around the edges.
Step 3: Add the Acid and Watch the Magic (1 minute)
The moment your milk mixture reaches a gentle boil, immediately remove it from heat. Add 3 tablespoons of fresh lemon juice and give it one gentle stir. Then step back and watch the transformation – within 30 seconds, you’ll see white curds forming and separating from the pale yellow whey.
Critical Timing: Don’t add the lemon juice while still on heat, as this can create tough curds. The residual heat is perfect for gentle coagulation.
Troubleshooting: If curds don’t form within 2 minutes, add another tablespoon of lemon juice and wait. Very fresh milk sometimes needs extra acid.
Step 4: Rest and Separate (5-10 minutes)
Let the mixture sit undisturbed for 5-10 minutes. This allows maximum curd formation and ensures you get the highest yield from your milk. You’ll notice the separation becoming more pronounced during this time.

What to Look For: Clear separation between white curds and pale yellow whey. The whey should look relatively clear, not milky.
Step 5: Strain to Your Desired Texture (10-30 minutes)
Carefully pour the entire mixture into your prepared cheesecloth-lined strainer. For creamy ricotta (perfect for desserts), strain for 10-15 minutes. For firmer ricotta (ideal for cooking), strain for 20-30 minutes.
Texture Control:
- 10 minutes: Creamy, spreadable consistency
- 20 minutes: Perfect for most recipes
- 30+ minutes: Firm enough for ricotta gnocchi
Step 6: Final Seasoning and Storage
Transfer your fresh ricotta to a container. Taste and adjust seasoning with a pinch more salt if desired. Your homemade ricotta is now ready to use immediately or can be refrigerated for up to one week.
Immediate Use Ideas: Try it warm with a drizzle of honey, or spread on toasted bread with cracked black pepper and olive oil.
Pro Tips & Advanced Troubleshooting Techniques
Temperature Mastery
The most critical factor in ricotta success is temperature control. If your burner runs hot, use a heat diffuser or lower the flame. Overheated milk creates tough, grainy curds that no amount of straining can fix. If you accidentally overheat, remove from heat immediately and add an ice cube to cool it down before adding acid.
Maximizing Yield
Save that precious whey! It’s packed with protein and makes an excellent addition to smoothies, bread recipes, or even as a substitute for buttermilk in pancakes. Refrigerate whey for up to 5 days. Some Italian grandmothers even drink it warm with a touch of honey – it’s surprisingly refreshing and nutritious.
Flavor Enhancement Secrets
- Herb-Infused Ricotta: Add fresh herbs like basil, thyme, or oregano during the final straining
- Lemon Zest Ricotta: Add finely grated lemon zest with the juice for extra brightness
- Vanilla Ricotta: Add 1 teaspoon vanilla extract after straining for dessert applications
- Honey Ricotta: Drizzle honey over finished ricotta and fold gently
Common Problems Solved
Grainy Texture: Usually caused by overheating or boiling too vigorously. Prevention is key, but if it happens, pass through a fine-mesh sieve twice.
Low Yield: Often indicates the milk wasn’t hot enough or needs more acid. Fresh, high-quality milk typically yields more ricotta.
Too Salty: Rinse the ricotta gently with cool water in the strainer, then continue draining.
Curds Won’t Form: Add more acid, one tablespoon at a time, waiting 2 minutes between additions.
Professional Cheesemaker Secrets
Use a technique called “testing the break” – lift some curds with a spoon. Perfect ricotta curds should hold together but still look moist and tender. If they’re dry and crumbly, you’ve over-coagulated.
For restaurant-quality presentation, pass the finished ricotta through a tamis or fine drum sieve for ultra-smooth texture. This extra step is worth it for dessert applications.
Recipe Variations & Dietary Modifications
Classic Italian Regional Variations
Sicilian-Style Sweet Ricotta: Add 2 tablespoons sugar and 1 teaspoon vanilla extract after straining. Perfect for cannoli filling or eating with fresh berries.
Tuscan Herb Ricotta: Fold in 2 tablespoons fresh chopped herbs (basil, oregano, parsley) and a crack of fresh black pepper. Ideal for savory applications.
Roman-Style Ricotta Salata: After basic straining, press the ricotta between clean towels weighted with heavy plates for 2-4 hours. Creates a firm, sliceable cheese perfect for grating.

Modern Dietary Adaptations
Keto-Friendly High-Fat Ricotta: Replace 1 cup of milk with an additional cup of heavy cream. Results in higher fat content and lower carbs while maintaining creamy texture.
Reduced-Fat Version: Use 2% milk with 1/2 cup heavy cream instead of whole milk. Yields slightly less rich ricotta but still far superior to store-bought low-fat versions.
Lactose-Reduced Ricotta: Use lactose-free milk and cream. The process remains identical, and the flavor is virtually indistinguishable from regular ricotta.
Vegan & Plant-Based Alternatives
While true ricotta requires dairy, you can create similar textures using:
Cashew “Ricotta”: Soak 2 cups raw cashews overnight, drain, then blend with 3/4 cup water, 3 tablespoons lemon juice, and 1 teaspoon salt until smooth.
Tofu Ricotta: Crumble firm tofu, then season with lemon juice, nutritional yeast, and salt. Lacks the creamy richness but works well in cooked applications.
Seasonal & Holiday Variations
Holiday Spiced Ricotta: Add 1/4 teaspoon each of cinnamon and nutmeg with a pinch of ground cloves. Perfect for Christmas desserts.
Spring Garden Ricotta: Fold in finely chopped chives, dill, and lemon zest. Beautiful for Easter brunch spreads.
Summer Berry Ricotta: Gently fold in fresh berries and a drizzle of honey after straining. Serve with shortbread cookies.
Nutritional Benefits & Health Information
Powerhouse Protein Profile
Homemade ricotta is a nutritional superstar, delivering approximately 14 grams of complete protein per half-cup serving. This protein comes primarily from whey proteins, which are easily absorbed by the body and contain all nine essential amino acids. For athletes and active individuals, ricotta provides an excellent source of branched-chain amino acids (BCAAs) that support muscle recovery and growth.
Per 1/2 Cup Serving (approximately 125g):
- Calories: 180-200
- Protein: 14g
- Fat: 12g
- Carbohydrates: 6g
- Calcium: 20% Daily Value
- Phosphorus: 18% Daily Value
- Riboflavin (B2): 15% Daily Value
Bone Health & Calcium Content
Ricotta cheese nutrition could potentially help boost bone health due to its impressive calcium and phosphorus content. The calcium in ricotta is highly bioavailable, meaning your body can efficiently absorb and utilize it for bone maintenance and growth. This makes ricotta an excellent choice for growing children, teenagers, and older adults at risk for osteoporosis.
Weight Management Benefits
Despite its creamy richness, ricotta can be part of a healthy weight management plan. The high protein content promotes satiety, helping you feel fuller longer and potentially reducing overall calorie intake. According to research published in the American Journal of Clinical Nutrition, protein has a higher thermic effect than carbohydrates or fats, meaning your body burns more calories digesting and metabolizing it. For those interested in natural weight management approaches, ricotta pairs excellently with healthy smoothie recipes as a protein boost.
Heart Health Considerations
Ricotta contains beneficial fatty acids, particularly when made from grass-fed dairy. While it does contain saturated fat, recent research published in the Journal of the American College of Cardiology suggests that dairy-based saturated fats may not have the same negative impacts as previously thought, especially when consumed as part of a balanced diet rich in vegetables and whole grains. Consider incorporating ricotta into anti-inflammatory meals for optimal heart health benefits.
Digestive Health & Probiotics
While ricotta itself isn’t a probiotic food, the fermentation process during cheese-making creates compounds that support digestive health. Additionally, some people with mild lactose sensitivity find ricotta easier to digest than fluid milk, as much of the lactose is removed during the whey separation process.
Micronutrient Density
Beyond protein and calcium, ricotta provides valuable B vitamins, particularly riboflavin (B2), which supports energy metabolism and cellular function. It also contains phosphorus for bone health, selenium as an antioxidant, and zinc for immune function.
Storage & Meal Prep Guide
Proper Storage Techniques
Fresh homemade ricotta is more perishable than store-bought versions because it lacks preservatives. Store in an airtight container in the refrigerator for up to 7 days. The key is keeping it cold and preventing contamination.
Best Storage Practices:
- Use glass or food-grade plastic containers with tight-fitting lids
- Place a paper towel on top of the ricotta to absorb excess moisture
- Keep in the coldest part of your refrigerator (usually the back)
- Never leave at room temperature for more than 2 hours
Freezing Guidelines
While fresh ricotta freezes well for up to 3 months, the texture changes slightly upon thawing. Frozen and thawed ricotta is best used in cooked applications like lasagna, stuffed shells, or baked desserts rather than fresh applications.
Freezing Method: Divide into portion-sized containers, leaving 1/2 inch headspace for expansion. Label with date and contents. Thaw in refrigerator overnight before using.
Meal Prep Applications
Homemade ricotta is a meal-prepper’s dream ingredient. Make a large batch on Sunday and use throughout the week in various applications following these meal planning tips:
Monday: Ricotta toast with honey and berries Tuesday: Stuffed shells with ricotta mixture
Wednesday: Ricotta pancakes for breakfast Thursday: Lasagna prep with fresh ricotta layer Friday: Ricotta-filled ravioli for date night
Quality Indicators
Fresh ricotta should smell clean and slightly sweet. Any sour, sharp, or off odors indicate spoilage. The texture should be creamy and slightly grainy, not slimy or separated. When properly stored, homemade ricotta maintains its quality for 5-7 days.
Extending Shelf Life
To maximize freshness, always use clean utensils when scooping ricotta, and return unused portions to the refrigerator promptly. Some cooks add a pinch of salt to help preserve the ricotta naturally, though this is optional for short-term storage.
Creative Ways to Use Your Homemade Ricotta
Breakfast Applications
Start your morning with ricotta-stuffed French toast, where the cheese creates pockets of creamy richness. Blend ricotta into anti-inflammatory smoothies for extra protein and wellness benefits, or create quick ricotta pancakes by mixing ricotta with eggs, a touch of flour, and vanilla.

Savory Dinner Solutions
Beyond classic lasagna, try ricotta-stuffed chicken breasts, ricotta gnocchi, or a simple ricotta and herb pasta sauce. Mix with roasted vegetables for a protein-rich side dish, or use as a base for creamy risottos. For a Mediterranean twist, combine ricotta with lemon-herb seasonings for an elegant protein-packed meal.

Dessert Transformations
Homemade ricotta elevates desserts to restaurant quality. Create classic cannoli filling, ricotta cheesecake, or simple ricotta mousse with berries. For an elegant finish to dinner parties, serve ricotta with honey, toasted pistachios (try making your own pistachio butter for extra richness), and a drizzle of balsamic reduction.
International Inspirations
Explore global applications: Indian-style paneer dishes (ricotta works as a substitute), Middle Eastern ricotta-filled pastries, or Greek-inspired ricotta with olives and herbs. For those following specialized diets, ricotta pairs beautifully with keto-friendly ingredients and works wonderfully in low-carb pasta dishes.
Comprehensive FAQ Section
How long does homemade ricotta last?
Fresh homemade ricotta stays good for 5-7 days when properly stored in the refrigerator. Always check for signs of spoilage like sour smell or slimy texture before using.
Can I make ricotta without heavy cream?
Yes, but the texture will be less rich. Use all whole milk (5 cups total) or substitute with half-and-half. The yield may be slightly lower, and the ricotta won’t be quite as creamy.
Why didn’t my ricotta form curds?
Common causes include insufficient heat (milk wasn’t hot enough), old or ultra-pasteurized milk, or insufficient acid. Try adding more lemon juice one tablespoon at a time, or increase the heat if the mixture wasn’t properly heated.
Can I use bottled lemon juice instead of fresh?
Fresh lemon juice is strongly recommended for best results. Bottled lemon juice can work but may require slightly more (up to 4-5 tablespoons) and can affect flavor.
Is the leftover whey useful?
Absolutely! Whey is protein-rich and can be used in smoothies, bread baking, or as a buttermilk substitute. Some people drink it as a protein beverage. Store refrigerated for up to 5 days.
Can I make ricotta with different acids?
Yes. White vinegar works well (use 3 tablespoons), as does citric acid powder (1/2 teaspoon). Each creates slightly different flavor profiles, with lemon juice providing the most traditional taste.
How do I make my ricotta less salty?
If you accidentally over-salted, rinse the ricotta gently with cool water in the strainer, then continue draining. For future batches, reduce salt to 1/2 teaspoon or omit entirely.
Can pregnant women eat homemade ricotta?
Homemade ricotta made from pasteurized milk is generally safe for pregnant women. However, consult with your healthcare provider, as recommendations may vary based on individual circumstances.
What’s the best milk to use?
Whole milk from grass-fed, organic sources produces the best flavor and highest nutritional content. Avoid ultra-pasteurized milk, which won’t coagulate properly due to altered protein structures.
How can I make my ricotta smoother?
For ultra-smooth ricotta, pass it through a fine-mesh sieve or tamis after the initial straining. Some chefs blend it briefly with an immersion blender, though this can make it slightly denser.
Can I double or halve the recipe?
Yes, this recipe scales well. For larger batches, use a bigger pot and ensure even heating. For smaller batches, watch timing more carefully as smaller quantities heat faster.
Why is my homemade ricotta grainy?
Grainy texture usually results from overheating or boiling too vigorously. The proteins coagulate too quickly, creating tough curds. Always use gentle heat and remove from burner before adding acid.
Related Recipes & Perfect Pairings
Classic Italian Companions
Transform your fresh ricotta into Ricotta Gnocchi for an elegant dinner, or create traditional Cannoli Filling by mixing with powdered sugar, vanilla, and mini chocolate chips. For breakfast, try Ricotta Pancakes that are incredibly fluffy and protein-rich.
Seasonal Recipe Suggestions
Spring calls for Ricotta and Pea Crostini, while summer begs for Grilled Peach and Ricotta Salad. Fall brings opportunities for Ricotta Stuffed Butternut Squash, and winter warmth comes from Ricotta Hot Chocolate – an indulgent treat that showcases ricotta’s versatility.
Perfect Wine and Beverage Pairings
Fresh ricotta pairs beautifully with light, crisp white wines like Pinot Grigio or Sauvignon Blanc. For sweeter applications, try with Prosecco or light dessert wines. Coffee and espresso complement ricotta’s mild flavor wonderfully, making it perfect for Italian-style breakfast spreads.


1 thought on “The Magic of Fresh Homemade Ricotta: Your Kitchen’s Best-Kept Secret”