Recipe Summary Box
⏱️ Prep Time: 15 minutes
🔥 Cook Time: 55-60 minutes
⏳ Total Time: 1 hour 15 minutes
🍰 Servings: 10-12 slices
👨🍳 Difficulty: Easy
📊 Calories: 285 per slice
Picture this: It’s a crisp Saturday morning in October. You’ve just returned from the farmers market with a gallon of fresh apple cider, and your kitchen is calling for something that captures the essence of fall. Not just any fall recipe, but one that transports you to those magical moments at the apple orchard—warm cider donuts fresh from the fryer, coated in cinnamon sugar, melting in your mouth.
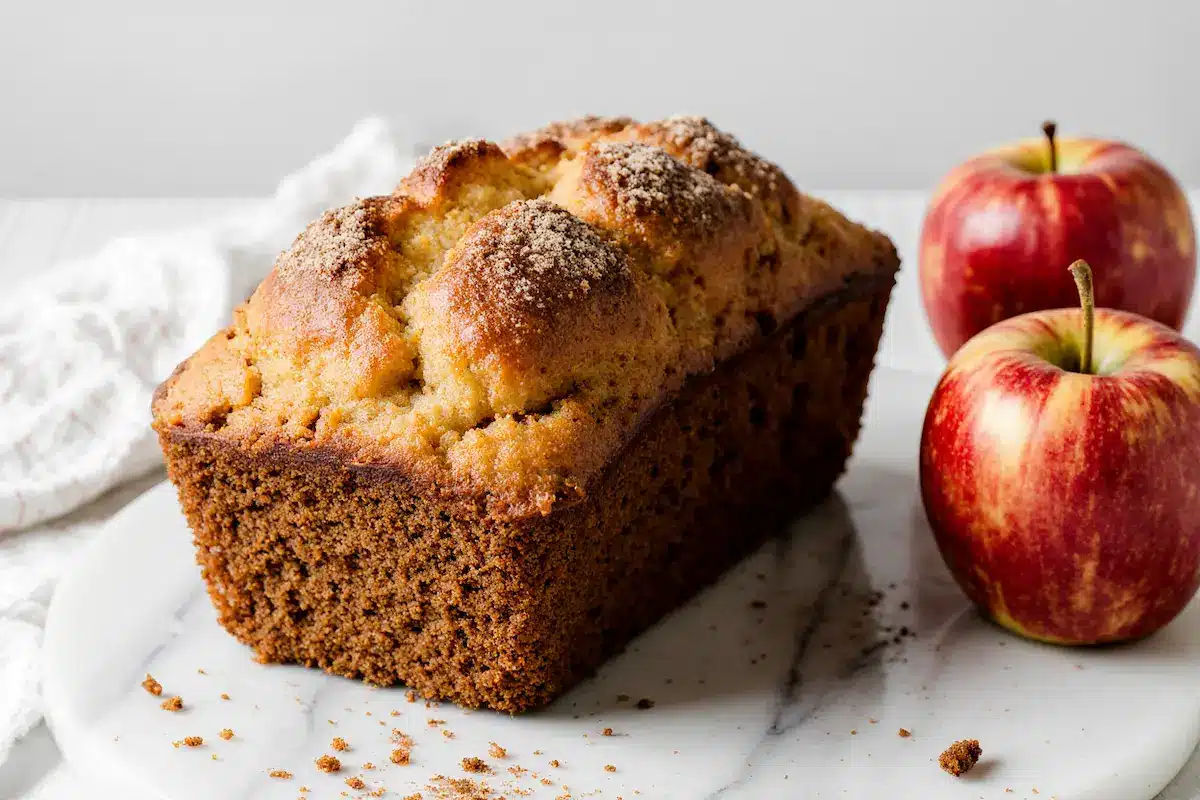
That’s exactly what this recipe delivers, except you’re making it in your own kitchen with zero deep-frying involved. This isn’t your standard quick bread. It’s a revelation—a tender, supremely moist loaf infused with concentrated cider flavor, wrapped in a buttery cinnamon-sugar coating that crackles gently when you bite through. Each slice tastes like autumn bottled up in baked form.
I developed this recipe after countless attempts to recreate those iconic apple orchard donuts without the hassle of yeast, proofing, or standing over a pot of hot oil. The secret? Reducing fresh cider to concentrate its flavor and creating a texture so soft and pillowy that it rivals any bakery creation. Whether you’re looking for a cozy breakfast loaf, an afternoon snack with hot coffee, or a show-stopping addition to your fall brunch spread, this recipe checks every box.
The best part? This comes together in one bowl with ingredients you likely have in your pantry right now. No mixer required, no complicated techniques—just straightforward baking that yields extraordinary results. And unlike actual donuts that are best consumed within hours, this loaf stays incredibly moist for days, making it perfect for meal prep or gift-giving.
Why This Apple Cider Donut Bread Recipe Works
This isn’t just another quick bread with cider thrown in. Every element has been carefully calibrated to deliver authentic donut-stand flavor in an easy-to-make loaf form. Here’s the science and strategy behind what makes this extraordinary:
The Reduced Apple Cider Technique
The game-changing step happens before you even mix your batter: reducing 2 cups of apple cider down to ½ cup. This 10-15 minute simmering process evaporates water content while concentrating the sugars and apple flavors by roughly 400%. You’re left with an intensely apple-flavored syrup that permeates every bite of the bread. Skip this step, and you’ll have apple-flavored bread. Include it, and you’ll have apple cider donut bread that tastes like it came from a New England orchard.

The Buttermilk Magic
Buttermilk serves three critical functions in this recipe. First, its acidity reacts with the baking soda to create tiny air pockets, yielding a tender, light crumb. Second, the tangy flavor balances the sweetness and complements the spices beautifully. Third, buttermilk’s proteins contribute to moisture retention, keeping your bread soft for days. The result is a texture that’s closer to pound cake than standard quick bread—dense enough to be satisfying, but light enough to feel indulgent.
The Double-Sugar Coating
Here’s where the “donut” element comes alive. After baking, you brush the hot loaf with melted butter, then generously coat it with cinnamon sugar. The heat causes the butter to soak in slightly while the sugar creates a delicate crust. This two-step coating process mimics the exact experience of biting into a fresh cider donut—that initial sweet crunch giving way to pillowy softness.
The Spice Blend Balance
Rather than relying solely on cinnamon, this recipe employs a careful blend of cinnamon, nutmeg, and allspice (or apple pie spice). These warm spices work synergistically with the reduced cider to create a flavor profile that’s complex and layered. Too much spice overwhelms the apple flavor; too little, and it tastes generic. This recipe hits the sweet spot that screams “apple cider donut.”
Essential Ingredients (and Why Each One Matters)
Understanding your ingredients transforms you from a recipe-follower into a confident baker who can troubleshoot and adapt. Here’s everything you need to know about what goes into this apple cider donut bread:
For the Bread:
Apple Cider (2 cups, reduced to ½ cup)
Why it matters: This is your flavor foundation. Use actual apple cider, not apple juice. Cider is unfiltered and contains more apple solids, giving you deeper flavor. Look for fresh cider from local farms or quality brands like Martinelli’s.
Substitutions: In a pinch, use unfiltered apple juice reduced to ½ cup. Add ½ teaspoon apple cider vinegar to mimic cider’s tanginess. You can also use hard apple cider (alcohol cooks off) for a more complex flavor.
All-Purpose Flour (2 cups / 250g)
Why it matters: All-purpose flour provides the perfect protein content (10-12%) for tender quick bread. Too much protein (bread flour) creates a tough crumb; too little (cake flour) makes it too delicate.
Substitutions: Use 1¾ cups all-purpose + ¼ cup whole wheat flour for nuttier flavor. For gluten-free, use a 1:1 gluten-free baking blend (Cup4Cup or Bob’s Red Mill) plus 1 teaspoon xanthan gum if your blend doesn’t include it.
Granulated Sugar (¾ cup / 150g)
Why it matters: Sugar doesn’t just sweeten—it tenderizes by interfering with gluten formation and helps retain moisture. This amount creates a breakfast-appropriate sweetness without veering into dessert territory.
Substitutions: Swap up to half with light brown sugar for deeper molasses notes. Coconut sugar works 1:1 but adds caramel undertones. For lower sugar, use ½ cup granulated + ¼ cup unsweetened applesauce (reduces calories by about 50).
Buttermilk (½ cup / 120ml)
Why it matters: The acidity activates baking soda for superior rise and creates that signature tangy richness that makes quick breads irresistible.
Substitutions: DIY buttermilk by mixing ½ cup milk + 1½ teaspoons lemon juice or white vinegar; let sit 5 minutes. Full-fat Greek yogurt thinned with 2 tablespoons milk also works. For dairy-free, use canned coconut milk + 1½ teaspoons apple cider vinegar.
Eggs (2 large)
Why it matters: Eggs provide structure, richness, and emulsification. They bind ingredients while keeping the crumb tender and moist.
Substitutions: For vegan bread, use 2 flax eggs (2 tablespoons ground flaxseed + 6 tablespoons water, let sit 5 minutes) or ½ cup unsweetened applesauce. Note: Flax eggs create a slightly denser texture.
Unsalted Butter (½ cup / 115g, melted)
Why it matters: Butter contributes flavor, moisture, and tenderness. Using melted butter in quick breads creates a more uniform crumb than solid butter.
Substitutions: Use melted coconut oil for dairy-free (adds subtle coconut flavor). Vegetable oil works but produces slightly less flavor. For lower fat, substitute ¼ cup butter + ¼ cup unsweetened applesauce.
Vanilla Extract (2 teaspoons)
Why it matters: Vanilla enhances and rounds out all the other flavors, making the sweetness more complex.
Substitutions: Use vanilla bean paste for more visual appeal (those little flecks!). Maple extract adds a lovely fall twist. In a pinch, omit entirely—the bread will still be delicious.
Baking Powder (1½ teaspoons)
Why it matters: This double-acting leavener creates lift through two releases—once when wet, once when heated.
Substitutions: None really. Make sure yours is fresh (test by mixing ½ teaspoon with hot water—it should bubble vigorously).
Baking Soda (½ teaspoon)
Why it matters: Works with buttermilk’s acidity to create additional rise and browning.
Substitutions: Cannot be substituted. The baking powder alone won’t provide enough lift or the proper pH balance.
Salt (½ teaspoon)
Why it matters: Salt amplifies flavors and balances sweetness. Without it, the bread tastes flat.
Substitutions: Use fine sea salt at same measurement. Table salt works; reduce to scant ½ teaspoon as it’s denser.
Ground Cinnamon (1½ teaspoons)
Why it matters: Cinnamon is the signature donut spice that pairs perfectly with apple cider.
Substitutions: Use 2 teaspoons apple pie spice in place of cinnamon + nutmeg + allspice for convenience.
Ground Nutmeg (¼ teaspoon)
Why it matters: Nutmeg adds warmth and complexity without being identifiable on its own.
Substitutions: Freshly grated nutmeg is superior. Can substitute with extra cinnamon in a pinch.
Ground Allspice (¼ teaspoon)
Why it matters: Allspice bridges cinnamon and nutmeg with notes of cloves, creating depth.
Substitutions: Use ⅛ teaspoon ground cloves or simply increase cinnamon by ¼ teaspoon.
For the Cinnamon Sugar Coating:
Melted Butter (3 tablespoons)
Why it matters: Creates the adhesive layer for cinnamon sugar while adding richness.
Substitutions: Melted coconut oil works. For lower calories, use 2 tablespoons butter + 1 tablespoon milk.
Granulated Sugar (⅓ cup / 65g)
Why it matters: Provides that satisfying sweet crunch on the exterior.
Substitutions: Turbinado sugar creates extra crunch. Coconut sugar works but browns faster.
Ground Cinnamon (1½ tablespoons)
Why it matters: Delivers concentrated donut-stand flavor in every bite of the coating.
Substitutions: None—this is where you want pure cinnamon flavor.
Equipment Needed (and Alternatives)
Essential Tools:
9×5-inch Loaf Pan
This standard size creates the perfect bread shape. Metal pans conduct heat better than glass (which can cause over-browning). If using glass, reduce oven temperature by 25°F.
Alternatives: 8×4-inch pan (reduce baking time by 5-10 minutes), three mini loaf pans (6×3-inch, bake 30-35 minutes), or a muffin tin (makes 12-14 muffins, bake 18-22 minutes).
Medium Saucepan
For reducing the apple cider. Use a wide pan with more surface area to speed evaporation.
Alternatives: Any pot works; wider = faster reduction.
Large Mixing Bowl
For combining dry ingredients and mixing batter.
Alternatives: Any large bowl. No stand mixer needed—this is a one-bowl, hand-mixed recipe.
Whisk and Rubber Spatula
Whisk for combining dry ingredients; spatula for folding batter gently.
Alternatives: A fork works in place of a whisk. A large spoon can substitute for a spatula.
Measuring Cups and Spoons
Accurate measurements ensure consistent results.
Alternatives: Use a kitchen scale for precision (recommended): 1 cup flour = 125g, 1 cup sugar = 200g.
Pastry Brush
For applying melted butter to the baked loaf.
Alternatives: Use a spoon to drizzle butter, then spread with the back of the spoon.
Cooling Rack
Allows air circulation for even cooling and prevents soggy bottoms.
Alternatives: Flip the loaf pan on its side on a kitchen towel.
Optional but Helpful:
- Instant-read thermometer: Bread is done at 200-205°F internal temperature
- Parchment paper: Create a sling for easy loaf removal
- Small bowl: For mixing cinnamon sugar coating
- Timer: For tracking reducing time and baking
Step-by-Step Instructions (with Pro Tips)
Step 1: Reduce the Apple Cider (10-15 minutes)
Pour 2 cups of apple cider into a medium saucepan over medium-high heat. Bring to a gentle boil, then reduce heat to medium. Simmer, stirring occasionally, until reduced to ½ cup. This takes 10-15 minutes depending on your pan’s width and heat level.
Visual cues: The cider will darken from golden to amber, become syrupy, and leave a coating on the spoon. When you drag a spatula across the bottom, it should leave a temporary trail.
Pro tip: Watch carefully in the final 2-3 minutes—the cider can burn quickly once it’s highly concentrated. If you overshoot and reduce too much, add a tablespoon of fresh cider at a time to reach ½ cup. Let cool for 10 minutes before using (it doesn’t need to be completely cool, just not scalding).
Troubleshooting: Reduced too fast and burned? Start over—burned cider will ruin your bread’s flavor. Reduced to only ⅔ cup? Still use it; just know the flavor will be slightly less intense.
Step 2: Prepare Your Pan and Preheat Oven (5 minutes)
Position your oven rack in the center and preheat to 350°F (175°C). Generously grease your 9×5-inch loaf pan with butter or non-stick spray, making sure to get into all corners. For insurance against sticking, line the bottom and up two sides with parchment paper, leaving overhang for handles.
Pro tip: Even with non-stick pans, butter the parchment paper. The bread’s sugars can cause sticking as they caramelize against the paper.
Make-ahead point: You can reduce the cider and prep your pan up to 24 hours ahead. Store cooled reduced cider in the fridge in an airtight container.
Step 3: Mix the Dry Ingredients (2 minutes)
In your large mixing bowl, whisk together:
- 2 cups all-purpose flour
- 1½ teaspoons baking powder
- ½ teaspoon baking soda
- ½ teaspoon salt
- 1½ teaspoons ground cinnamon
- ¼ teaspoon ground nutmeg
- ¼ teaspoon ground allspice
Whisk for 30 seconds to ensure the leaveners and spices are evenly distributed throughout the flour. This prevents pockets of spice or baking soda in your finished bread.
Pro tip: Sift your flour if it’s been sitting for a while. Compacted flour can throw off your measurements and create a denser bread.
Science note: Mixing dry ingredients first ensures even distribution before liquids activate the leavening agents.
Step 4: Combine the Wet Ingredients (3 minutes)
In a separate medium bowl or large measuring cup, whisk together:
- ¾ cup granulated sugar
- ½ cup melted butter (cooled slightly)
- 2 eggs
- ½ cup buttermilk
- ½ cup reduced apple cider (cooled)
- 2 teaspoons vanilla extract
Whisk vigorously for about 30 seconds until the mixture is smooth, emulsified, and slightly frothy. The eggs should be completely incorporated with no streaks.
Pro tip: Make sure your melted butter isn’t too hot (under 120°F), or it can scramble the eggs. If it’s hot, whisk it with the buttermilk first to temper it.
Visual cue: The mixture should be a uniform light brown color with a sheen from the butter.
Step 5: Combine Wet and Dry (The Critical Step)
Pour the wet ingredients into the bowl with dry ingredients. Using a rubber spatula, fold the mixture together with broad, gentle strokes. Stop mixing as soon as no flour streaks remain. The batter should be thick, glossy, and slightly lumpy—this is perfect.
CRITICAL PRO TIP: This is where most people go wrong. Overmixing develops gluten, which creates tunnels, tough texture, and a dense crumb. Mix until JUST combined, about 15-20 gentle folds. Some small lumps are fine and will bake out.
Visual cues: You should still see some texture in the batter. If it looks completely smooth and you’ve been stirring more than 30 seconds, you’ve overmixed. It will still bake, but the texture won’t be as tender.
Troubleshooting: If batter seems too thick to pour, that’s normal for this recipe. It should be thick like brownie batter, not thin like pancake batter.

Step 6: Pour and Smooth Batter (1 minute)
Scrape the batter into your prepared loaf pan. Use your spatula to spread it evenly, pushing batter into corners and smoothing the top. Give the pan a gentle tap on the counter 2-3 times to release any air bubbles.
Pro tip: Use the spatula to create a very slight depression down the center lengthwise. This helps the bread rise evenly instead of creating a large dome.
Step 7: Bake to Perfection (55-60 minutes)
Place the pan in your preheated 350°F oven on the center rack. Bake for 55-60 minutes, rotating the pan 180 degrees halfway through (at the 27-28 minute mark) for even browning.
Doneness tests:
- The top should be deep golden brown and spring back when gently pressed
- A toothpick inserted in the center comes out with just a few moist crumbs (not wet batter)
- Internal temperature reads 200-205°F on an instant-read thermometer
- The edges should pull away slightly from the pan sides
Pro tip: If the top is browning too quickly (check at 40 minutes), tent loosely with aluminum foil for the remaining baking time.
Troubleshooting: Toothpick comes out wet at 60 minutes? Bake 5-10 minutes longer. Every oven is different. If the top is getting too dark, tent with foil and continue baking until the center is done.
Time variance factors: Altitude, oven calibration, pan material, and even humidity affect baking time. Use doneness tests rather than relying solely on time.
Step 8: Cool Slightly (10 minutes)
Remove the pan from the oven and place on a cooling rack. Let the bread cool in the pan for exactly 10 minutes. This brief cooling period allows the structure to set while keeping the bread warm enough for the butter coating to soak in properly.
Pro tip: Use this time to melt your coating butter and mix your cinnamon sugar so everything’s ready when the bread comes out.

Step 9: Apply the Cinnamon Sugar Coating (5 minutes)
After 10 minutes, carefully remove the bread from the pan using your parchment sling (or run a knife around the edges and invert). Place the bread on your cooling rack with a large plate or parchment underneath to catch excess sugar.
The coating process:
- Brush all sides of the warm bread generously with 3 tablespoons melted butter. Don’t be shy—you want complete coverage.
- Mix ⅓ cup sugar with 1½ tablespoons cinnamon in a small bowl.
- Sprinkle the cinnamon sugar mixture liberally over all surfaces of the buttered bread. Use your hands to gently press the coating into the sides.
- Let any excess sugar fall onto the plate below (save it for oatmeal or coffee!).
Pro tip: Work quickly while the bread is still warm. The heat helps the butter soak in and the sugar adhere. If the bread cools too much, the coating won’t stick as well.
Visual goal: The entire loaf should be evenly coated with a visible layer of cinnamon sugar, creating that signature donut appearance.

Step 10: Final Cooling and Slicing (30-45 minutes)
Let the coated bread cool on the rack for at least 30-45 minutes before slicing. This allows the interior crumb to set fully and prevents gummy slices.
Pro tip for clean slices: Use a sharp serrated bread knife with a gentle sawing motion. Wipe the blade between cuts for the cleanest slices.
Warm serving option: For ultimate indulgence, slice after 30 minutes while still slightly warm. The texture is incredible at this stage—soft, yielding, and aromatic.
Expert Tips & Techniques for Perfect Results
1. The Reduced Cider Game-Changer
Don’t skip or shortcut the cider reduction. This single step is responsible for 70% of the authentic donut flavor. Mark your measuring cup at the ½ cup line before you start so you know exactly when you’ve reached the right concentration.
2. Room Temperature Matters
While this recipe uses melted butter, your eggs and buttermilk should still be room temperature. Cold eggs can cause the melted butter to seize and create lumps. Remove from fridge 30 minutes before baking.
3. The Gentle Fold Technique
Professional bakers fold rather than stir quick bread batter. Insert your spatula at the center, scrape along the bottom, and bring the batter up and over. Rotate the bowl 90 degrees and repeat until just mixed.
4. Pan Prep Excellence
Even non-stick pans benefit from butter or spray plus parchment. The sugars in this bread can cause sticking. A parchment sling (two strips crossing like a + sign) makes removal foolproof.
5. Test for Doneness Accurately
Don’t rely on time alone. Ovens vary by 25°F or more. An instant-read thermometer is foolproof: 200-205°F = perfectly done. Under 200°F = needs more time. Over 210°F = starting to dry out.
6. The Secret Cinnamon Sugar Timing
Apply your butter coating while the bread is still warm (but not hot). Between 100-110°F is ideal. Too hot, and the butter just melts off. Too cool, and it won’t soak in properly.
7. Proper Storage Maximizes Shelf Life
Quick breads actually improve after 12-24 hours as flavors meld and the crumb settles. Store at room temperature, wrapped tightly in plastic wrap, for maximum moisture retention.
8. Slice Thickness Matters
Cut slices about ¾-inch thick. Thinner slices dry out quickly; thicker slices can feel dense. A ¾-inch slice provides the perfect balance of crispy coating and soft interior.
9. Revive Day-Old Bread
Wrap individual slices in a damp paper towel and microwave for 10-15 seconds. The steam refreshes the crumb, making day-old bread taste freshly baked.
10. Altitude Adjustments
Above 3,000 feet: Reduce baking powder to 1 teaspoon and baking soda to ¼ teaspoon. Increase oven temperature by 15-25°F. The bread may need 5-10 minutes less baking time.
Recipe Variations & Dietary Modifications
1. Glazed Apple Cider Donut Bread
Skip the cinnamon sugar coating. Instead, make a glaze: Mix 1 cup powdered sugar + 2-3 tablespoons reduced apple cider + ½ teaspoon vanilla. Drizzle over completely cooled bread. Let set 15 minutes before slicing.
2. Maple Apple Cider Donut Bread
Replace ¼ cup of the granulated sugar with ¼ cup pure maple syrup. Reduce buttermilk to 6 tablespoons. Add ½ teaspoon maple extract. Top with maple glaze instead of cinnamon sugar (powdered sugar + maple syrup + dash of cinnamon).
3. Apple Chunk Cider Bread
Fold 1 cup finely diced peeled apple (Granny Smith or Honeycrisp) tossed with 1 tablespoon flour into the finished batter. The flour coating prevents the apples from sinking. Adds fresh fruit texture and extra moisture.
4. Bourbon-Spiked Version (Adults Only)
Add 2 tablespoons bourbon to the reduced cider (add after reducing, don’t reduce with alcohol). The bourbon enhances the apple and spice flavors with oaky depth. Alcohol mostly bakes off but some flavor remains.
5. Streusel-Topped Apple Cider Bread
Before baking, top with streusel: Mix ¼ cup flour + ¼ cup brown sugar + 3 tablespoons cold butter (cubed) + ½ teaspoon cinnamon. Rub together until crumbly, sprinkle over batter. Skip the exterior coating. Bake as directed.
6. Gluten-Free Apple Cider Donut Bread
Use 2 cups gluten-free 1:1 baking flour (like Cup4Cup) plus 1 teaspoon xanthan gum (if not included in your blend). Add an extra egg (3 total) for structure. Let batter rest 10 minutes before baking. Expect slightly denser texture but great flavor.
7. Vegan Apple Cider Donut Bread
Replace eggs with 2 flax eggs (2 tablespoons ground flaxseed + 6 tablespoons water, let sit 5 minutes). Use ½ cup melted coconut oil instead of butter. Replace buttermilk with ½ cup non-dairy milk + 1½ teaspoons apple cider vinegar. For the coating, use melted vegan butter or coconut oil. The texture will be slightly denser but flavor remains excellent.
8. Keto/Low-Carb Apple Cider Bread
Use 2 cups almond flour + ½ cup coconut flour instead of all-purpose. Replace sugar with 1 cup granulated erythritol or monk fruit sweetener. Use ¾ cup reduced apple cider (the natural sugars are minimal after reducing). Add 1 extra egg for structure. Expect a different texture—more crumbly, less fluffy—but the flavor profile stays true. Net carbs: approximately 6g per slice.
9. Mini Muffin Version
Divide batter among 24 mini muffin cups (fill ¾ full). Bake at 350°F for 12-15 minutes. Brush warm muffins with butter and roll in cinnamon sugar. Perfect for parties, lunch boxes, or portion control.
10. Cream Cheese Swirl Bread
Beat 4 oz softened cream cheese + 3 tablespoons sugar + 1 egg yolk until smooth. Pour half the batter into the pan, dollop cream cheese mixture on top, add remaining batter. Swirl with a knife. Bake 5-10 minutes longer. Skip cinnamon sugar coating; dust with powdered sugar instead.
Comprehensive FAQ Section
How long does apple cider donut bread last?
Properly stored at room temperature in an airtight container or wrapped tightly in plastic wrap, this quick bread stays fresh for 5-6 days. The high moisture content from the reduced cider and buttermilk keeps it from drying out. For longer storage, refrigerate for up to 10 days or freeze for up to 3 months.
Can I freeze apple cider donut bread?
Absolutely! This freezes beautifully. Wrap the completely cooled, uncoated loaf tightly in plastic wrap, then in aluminum foil. Freeze for up to 3 months. Thaw overnight in the refrigerator or at room temperature for 3-4 hours. Apply the butter and cinnamon sugar coating after thawing and warming slightly (microwave 20-30 seconds). For individual slices, freeze wrapped separately for easy grab-and-go portions.
What’s the difference between apple cider and apple juice?
Apple cider is unfiltered, unpasteurized (or minimally processed) pressed apple juice that contains more apple solids and pulp, giving it a cloudier appearance and more robust flavor. Apple juice is filtered, clarified, and often has a longer shelf life. For this recipe, cider is essential—the solids contribute depth and complexity that juice simply can’t match. If you can only find juice, look for unfiltered organic versions.
Can I make this without buttermilk?
Yes! Create a buttermilk substitute by mixing ½ cup regular milk (dairy or non-dairy) with 1½ teaspoons white vinegar or lemon juice. Let it sit for 5 minutes until slightly curdled. You can also use plain full-fat yogurt thinned with 2 tablespoons milk. According to King Arthur Baking, these substitutions work by providing the same acidity needed to activate baking soda and create tender texture.
Why is my bread dense and heavy?
The most common culprit is overmixing the batter. When you mix too vigorously or too long after adding wet to dry ingredients, you develop gluten strands that create a tough, dense crumb. Mix until JUST combined—some lumps are fine. Other causes: old baking powder/soda (check freshness), measuring flour incorrectly (too much flour), or oven temperature too low. Use the spoon-and-level method for flour or weigh it (1 cup = 125g).
Can I reduce the sugar?
You can reduce the granulated sugar in the batter to ½ cup (from ¾ cup) without major texture changes, though it will be less sweet and slightly less moist. Going below ½ cup affects texture since sugar tenderizes and retains moisture. For healthier versions, replace up to ¼ cup sugar with unsweetened applesauce. You can also skip the cinnamon sugar coating to save approximately 50 calories and 13g sugar per slice.
What if I don’t have apple cider?
In a pinch, use unfiltered apple juice and add 2 tablespoons apple cider vinegar to mimic cider’s tang. Reduce the juice the same way. The flavor won’t be quite as deep, but it still works. Another option: use regular apple juice and add ½ teaspoon apple pie spice to boost the apple flavor profile. Fresh-pressed cider from farmers markets or orchards yields the absolute best results.
How do I know when it’s done baking?
Use three tests: (1) Insert a toothpick in the center—it should come out with just a few moist crumbs, not wet batter; (2) Gently press the top—it should spring back; (3) Use an instant-read thermometer—internal temperature should read 200-205°F. The edges will pull slightly away from the pan. If the top is browning too quickly, tent with foil and continue baking until the center tests done.
Can I make this in a different pan size?
Yes! For an 8×4-inch pan, reduce baking time by 5-10 minutes (check at 45 minutes). For three 6×3-inch mini loaf pans, bake for 30-35 minutes. For a 9×13-inch pan (yields bars/slices), bake for 25-30 minutes. For a Bundt pan, bake for 45-50 minutes. For muffins (12-14 standard), bake for 18-22 minutes. Always use the doneness tests rather than relying solely on time.
Why does my loaf have a large crack on top?
This is actually a sign of a properly baked quick bread! The crack forms because the exterior sets before the interior, and as the batter continues rising, it splits the top. This is desirable—it’s how you know you didn’t overmix (overmixed batter creates tunnels instead). To minimize the crack for aesthetic reasons, create a shallow lengthwise depression in the batter before baking.
Can I make this dairy-free?
Absolutely! Use ½ cup canned coconut milk (shake before measuring) with 1½ teaspoons apple cider vinegar in place of buttermilk. Replace butter with melted coconut oil (refined for neutral flavor, unrefined for coconut notes). For the coating, use more coconut oil or vegan butter. The flavor and texture remain excellent with these swaps.
How should I store leftovers?
Room temperature storage is best for maintaining texture. Wrap tightly in plastic wrap or store in an airtight container for 5-6 days. Don’t refrigerate unless you must (for longer storage)—refrigeration dries out quick breads. If you do refrigerate, let slices come to room temperature or warm briefly before serving. The cinnamon sugar coating may become slightly less crispy after day 3, but flavor improves as it melds.
Can I add mix-ins like nuts or chocolate chips?
Yes! Fold in ½-¾ cup of chopped pecans, walnuts, or chocolate chips after mixing the batter. Toss them with 1 tablespoon flour first to prevent sinking. Keep in mind that additions will alter the classic cider donut flavor profile. For a more authentic experience, keep it simple and enjoy the pure apple cider taste.
What’s the best apple cider brand to use?
Look for fresh, unfiltered apple cider from local orchards or farmers markets for the most intense flavor. Commercial brands that work well include Martinelli’s (widely available), Trader Joe’s Honeycrisp Apple Cider (seasonal), and Whole Foods 365 Organic Apple Cider. Avoid “cider” that’s actually apple juice with cinnamon added—check the ingredients list. Real cider has only one ingredient: apples.
Can I make the batter ahead of time?
While you can mix dry and wet ingredients separately up to 24 hours ahead (store separately, covered), once combined, the batter should be baked within 30 minutes. The leavening agents activate immediately upon contact with liquid. For make-ahead convenience, reduce the cider and prep your pan the day before, then mix and bake when ready.
Nutritional Information & Health Benefits
Per Slice (1/12 of loaf):
- Calories: 285
- Total Fat: 11g (17% DV)
- Saturated Fat: 7g
- Cholesterol: 55mg
- Sodium: 180mg (8% DV)
- Total Carbohydrates: 43g (16% DV)
- Dietary Fiber: 1g
- Sugars: 26g
- Added Sugars: 22g
- Protein: 4g
- Vitamin A: 8% DV
- Calcium: 6% DV
- Iron: 8% DV
Nutritional values are estimates based on standard ingredients and may vary.
Health Benefits of Key Ingredients:
Apple Cider: Rich in polyphenols and antioxidants that support heart health. Contains trace minerals like potassium. According to the USDA FoodData Central, unfiltered cider retains more beneficial compounds than clear apple juice.
Cinnamon: Contains powerful anti-inflammatory properties and may help regulate blood sugar levels. Just 1 teaspoon provides significant manganese (68% DV).
Buttermilk: Lower in fat than regular milk while providing protein, calcium, and probiotics (if cultured). The lactic acid aids digestion.
Eggs: Excellent source of high-quality protein and choline for brain health. Contain all 9 essential amino acids.
Making It Healthier:
- Reduce calories by 50 per slice: Use ¼ cup butter + ¼ cup applesauce instead of ½ cup butter
- Increase fiber: Replace ½ cup all-purpose flour with whole wheat flour (adds 2g fiber per slice)
- Cut added sugar: Use ½ cup sugar in batter, skip coating (saves 90 calories, 13g sugar per slice)
- Boost protein: Add 2 tablespoons ground flaxseed to dry ingredients (adds 1g protein, 2g fiber)
- Lower sodium: Reduce salt to ¼ teaspoon (cuts sodium by 90mg per slice)
Storage, Meal Prep & Serving Suggestion
Proper Storage Techniques:
Room Temperature (5-6 days):
Wrap the completely cooled loaf tightly in plastic wrap, pressing out air pockets. Store in a cool, dry place away from direct sunlight. The cinnamon sugar coating helps seal moisture in.
Refrigeration (up to 10 days):
Wrap in plastic, then place in an airtight container or zip-top bag. Let slices come to room temperature before serving, or warm in microwave for 10-15 seconds wrapped in a damp paper towel.
Freezing (up to 3 months):
For whole loaf: Wrap in plastic, then heavy-duty aluminum foil. Label with date.
For slices: Separate with parchment paper, wrap stack in plastic, then foil.
Thaw overnight in fridge or 3-4 hours at room temperature.
Meal Prep Tips:
- Double-batch the reduced cider: Reduce 4 cups to 1 cup. Use half immediately, refrigerate or freeze the other half for your next batch.
- Slice before freezing: Pre-slice and freeze individual portions for easy grab-and-go breakfasts. Pop frozen slices in the toaster for quick reheating.
- Make mini loaves: Bake in mini loaf pans for perfect portion control and gifting.
- Prep dry mix: Combine all dry ingredients in a zip-top bag. Label with wet ingredients needed and baking instructions for quick weekend baking.
Reheating for Best Quality:
- Microwave: Wrap slice in damp paper towel, heat 10-15 seconds (brings back just-baked softness)
- Toaster: Toast lightly for crispy edges and warm center
- Oven: Wrap loaf in foil, warm at 300°F for 10-15 minutes
- Air fryer: 300°F for 3-4 minutes (creates slightly crispy exterior)
Serving Suggestions:
Breakfast/Brunch:
- Serve warm with salted butter and hot coffee
- Top with cream cheese frosting for a decadent treat
- Pair with scrambled eggs and bacon for complete breakfast
- Spread with apple butter or pumpkin butter for double fall flavor
Afternoon Snack:
- Serve with hot apple cider or chai tea latte
- Pair with sharp cheddar cheese for sweet-savory contrast
- Spread with almond butter for added protein
Dessert:
- Warm and top with vanilla ice cream and caramel sauce
- Serve with warm maple syrup for dipping
- Make French toast: Dip slices in egg mixture, cook until golden
- Create bread pudding with day-old slices
Gift Presentation: Wrap cooled loaf in cellophane, tie with raffia, attach a tag with storage instructions. Mini loaves make perfect hostess gifts or holiday presents.
Related Recipes You’ll Love
Looking for more delicious fall baking? Try these complementary recipes from our collection:
🍎 Apple Butter Recipe – Homemade spread perfect for this bread
🎃 Pumpkin Bread Recipe – Another autumn quick bread favorite
🍂 Cinnamon Roll Recipe – For cinnamon sugar lovers
🥧 Apple Pie Recipe – Classic fall dessert using fresh apples
🧁 Apple Cider Muffins – Portable version of this flavor profile
For more seasonal baking inspiration, explore our Fall Baking Collection featuring cozy recipes perfect for autumn.
Recipe Card: Apple Cider Donut Bread
Ingredients
For the Bread:
- 2 cups apple cider
- 2 cups (250g) all-purpose flour
- ¾ cup (150g) granulated sugar
- ½ cup (120ml) buttermilk
- ½ cup (115g) unsalted butter, melted
- 2 large eggs, room temperature
- 2 teaspoons vanilla extract
- 1½ teaspoons baking powder
- ½ teaspoon baking soda
- ½ teaspoon salt
- 1½ teaspoons ground cinnamon
- ¼ teaspoon ground nutmeg
- ¼ teaspoon ground allspice
For the Coating:
- 3 tablespoons unsalted butter, melted
- ⅓ cup (65g) granulated sugar
- 1½ tablespoons ground cinnamon
Instructions
- Reduce the cider: In a medium saucepan over medium-high heat, bring 2 cups apple cider to a boil. Reduce heat to medium and simmer 10-15 minutes until reduced to ½ cup. Let cool 10 minutes.
- Prep: Preheat oven to 350°F (175°C). Grease a 9×5-inch loaf pan and line with parchment paper.
- Mix dry ingredients: In a large bowl, whisk together flour, baking powder, baking soda, salt, cinnamon, nutmeg, and allspice.
- Mix wet ingredients: In a separate bowl, whisk together sugar, melted butter, eggs, buttermilk, reduced cider, and vanilla until smooth.
- Combine: Pour wet ingredients into dry ingredients. Fold gently with a spatula until just combined (don’t overmix—some lumps are fine).
- Bake: Pour batter into prepared pan. Bake 55-60 minutes until a toothpick inserted in center comes out with just a few moist crumbs and internal temperature reaches 200-205°F.
- Cool: Let cool in pan 10 minutes, then remove to a wire rack.
- Coat: While still warm, brush entire loaf with 3 tablespoons melted butter. Mix ⅓ cup sugar with 1½ tablespoons cinnamon and sprinkle liberally over all surfaces.
- Serve: Cool 30 minutes before slicing. Store wrapped tightly at room temperature up to 6 days.
Notes
- Don’t skip reducing the cider—this creates the signature flavor
- Avoid overmixing for tender texture
- Bread is best after 12-24 hours as flavors meld
- Freezes beautifully for up to 3 months
Prep: 15 min | Cook: 60 min | Total: 1 hr 15 min | Servings: 12 slices
Expert Resources & Further Reading
For more information on quick bread techniques and apple cider selection, check out these authoritative resources:
- King Arthur Baking: Quick Bread Guide – Comprehensive techniques from professional bakers
- Serious Eats: The Science of Quick Breads – Understanding the chemistry behind perfect texture
- USDA Apple Cider Safety – Safe cider selection and storage
Did you make this recipe? Rate it below and let us know how it turned out! Share your photos on social media and tag us—we love seeing your creations. Subscribe to our newsletter for weekly recipe inspiration delivered straight to your inbox.
👉 Subscribe Now for exclusive recipes and baking tips!
Apple Cider Donut Bread
 1")
A moist, tender loaf infused with concentrated apple cider flavor and wrapped in a buttery cinnamon-sugar coating, perfect for breakfast or as a fall treat.
For the Bread
- 2 cups apple cider (Fresh apple cider, not apple juice.)
- 2 cups all-purpose flour (Can substitute with whole wheat flour or gluten-free blend.)
- ¾ cup granulated sugar (Can substitute half with light brown sugar.)
- ½ cup buttermilk (Can substitute with milk mixed with vinegar or yogurt.)
- ½ cup unsalted butter, melted (Can substitute with melted coconut oil.)
- 2 large eggs (Room temperature eggs.)
- 2 teaspoons vanilla extract (Can use vanilla bean paste for visual appeal.)
- 1½ teaspoons baking powder (Ensure it’s fresh.)
- ½ teaspoon baking soda (Works with buttermilk’s acidity.)
- ½ teaspoon salt (Enhances flavor.)
- 1½ teaspoons ground cinnamon (Signature spice.)
- ¼ teaspoon ground nutmeg (Adds warmth.)
- ¼ teaspoon ground allspice (For depth.)
For the Coating
- 3 tablespoons unsalted butter, melted (For coating the bread.)
- ⅓ cup granulated sugar (For coating.)
- 1½ tablespoons ground cinnamon (For coating.)
Preparation
- Reduce the cider: In a medium saucepan over medium-high heat, bring 2 cups apple cider to a boil. Reduce heat to medium and simmer 10-15 minutes until reduced to ½ cup. Let cool 10 minutes.
- Preheat oven to 350°F (175°C). Grease a 9×5-inch loaf pan and line with parchment paper.
- In a large bowl, whisk together flour, baking powder, baking soda, salt, cinnamon, nutmeg, and allspice.
- In a separate bowl, whisk together sugar, melted butter, eggs, buttermilk, reduced cider, and vanilla until smooth.
- Pour wet ingredients into dry ingredients. Fold gently with a spatula until just combined (don’t overmix—some lumps are fine).
Baking
- Pour batter into prepared pan. Bake for 55-60 minutes until a toothpick inserted in center comes out with just a few moist crumbs and internal temperature reaches 200-205°F.
Finishing Touch
- Let cool in pan for 10 minutes, then remove to a wire rack.
- While still warm, brush entire loaf with 3 tablespoons melted butter. Mix ⅓ cup sugar with 1½ tablespoons cinnamon and sprinkle liberally over all surfaces.
- Cool for 30 minutes before slicing.
Don’t skip reducing the cider—this creates the signature flavor. Avoid overmixing for tender texture. Bread is best after 12-24 hours as flavors meld. Freezes beautifully for up to 3 months.


15 thoughts on “Ultimate Apple Cider Donut Bread Recipe (Bakery-Style at Home!)”