cauliflower pizza crust is my go to move when I want pizza vibes but my fridge is basically just vegetables, eggs, and a dream. If you have ever pulled a sad, soggy cauliflower crust out of the oven and thought, why did I do this to myself, you are not alone. I have been there, staring at a floppy circle that could never hold toppings with confidence. The good news is that it is actually easy once you know the few little steps that make all the difference. I make this on busy weeknights, and it still feels like a treat. Let me walk you through my favorite way to get it crisp, sturdy, and genuinely delicious.

How to Make Cauliflower Pizza Crust
Think of this as a simple formula: cook the cauliflower, squeeze out the water, mix with binders, bake it twice. That is basically the whole secret. The reason most attempts fail is moisture. Cauliflower holds a lot of water, and if you do not remove it, you end up steaming your crust instead of baking it.
I like using a box grater or food processor to turn cauliflower into tiny rice bits. Then I microwave it or steam it until tender. After it cools a bit, I wrap it in a clean kitchen towel and squeeze like I mean it. When you think you are done squeezing, squeeze again. You want it as dry as you can get it.
Once it is dry, you mix it with egg and cheese to hold everything together. Press it into a thin round on parchment paper. Bake until it looks dry and golden at the edges, flip it, then bake again. That second bake is what turns it from “kind of works” into “wow, this actually holds a slice.”
Also, this crust is a great base for a chicken topped pizza night. If you need a protein idea, I have made pizza with leftovers from this Longhorn Steakhouse parmesan crusted chicken and it was unreal with a little marinara and extra mozzarella.

Ingredients for Cauliflower Pizza
Here is what I use for a reliable cauliflower pizza crust. Nothing fancy, and you can adjust seasoning based on your mood.
- Cauliflower: 1 large head or about 4 to 5 cups riced cauliflower
- Egg: 1 large egg
- Cheese: 1 cup shredded mozzarella, plus 2 to 3 tablespoons grated parmesan if you like extra flavor
- Seasoning: 1 teaspoon Italian seasoning, 1 to 2 pinches salt, black pepper
- Optional: garlic powder, onion powder, red pepper flakes
A quick note on cheese: low moisture mozzarella works best. Fresh mozzarella has more water, and we are trying to avoid the water situation here. If you only have fresh, you can still use it, just expect a softer result.
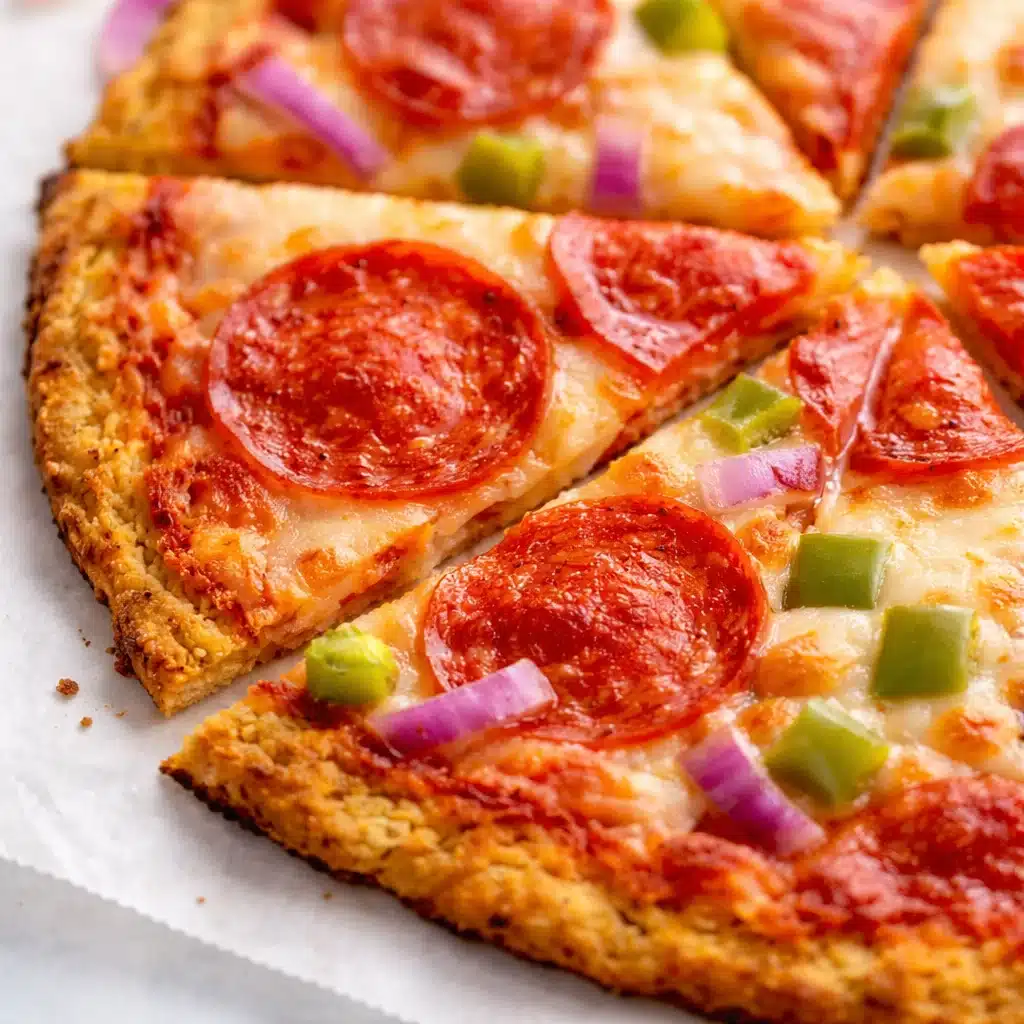
For toppings, keep it simple the first time so you can learn how your crust behaves. Light sauce, moderate cheese, and not too many watery veggies. Once you get the hang of it, you can go wild.

Step-by-Step Instructions
This is my “no drama” method. Read it once, then you will see it is basically just five simple steps.
Step 1: Rice and cook the cauliflower
Rice your cauliflower into small bits. Microwave in a covered bowl for about 4 to 5 minutes, or steam until tender. Let it cool until you can handle it without burning your hands.
Step 2: Squeeze out the moisture like it owes you money
Put the cooked cauliflower in a clean towel or cheesecloth and twist and squeeze over the sink. You should be able to get a surprising amount of liquid out. This is the make or break moment for cauliflower pizza crust.
Step 3: Mix the crust base
In a bowl, combine the dried cauliflower, egg, mozzarella, parmesan, and seasonings. It should feel like a slightly sticky dough. If it feels wet, you probably need to squeeze more moisture out.
Step 4: Shape and bake
Line a baking sheet with parchment paper. Press the mixture into a thin circle, about 10 to 12 inches wide. Make the edges slightly thicker, kind of like a rim. Bake at 450°F (232°C) for 18 to 22 minutes, until golden and set.
Step 5: Flip, bake again, then top
Carefully flip the crust (use another piece of parchment if you need help). Bake for another 8 to 12 minutes. Now add your sauce and toppings and bake again just until everything is melty and hot.
One more real life tip: if you are topping with something hearty like crispy chicken, go a bit lighter on sauce so the crust stays sturdy. I have used chopped leftovers from these paprika herb crusted crispy chicken thighs and it makes the whole pizza feel like dinner dinner, not just a snack.
Recipe Tips
If you want your cauliflower pizza crust to come out crisp and sliceable, these little habits help a lot. They are small, but together they change everything.
Go thin. A thick crust looks nice going into the oven, but it traps steam and stays soft. Thin is your friend.
Use parchment paper. Do not skip it. It prevents sticking and makes flipping way easier.
Do not overload toppings. Too much sauce or watery toppings like fresh tomatoes can make the center soft fast. If you love mushrooms or zucchini, cook them first to drive off moisture.
Let it cool for a couple minutes before slicing. It firms up as it sits. I know it smells amazing, but give it a minute.
“I tried this exact method and it finally worked. I could pick up a slice without it folding, and my kids did not even complain it was cauliflower.”
Storage and Reheating Tips
If you are anything like me, you will want to make this once and then plan a second pizza night with the leftovers. This crust stores better than you would expect, as long as you keep it dry.
To store the baked crust: Let it cool completely, then wrap it and refrigerate for up to 3 days. You can also freeze it for about 1 month. I like freezing it on a flat sheet first, then wrapping it, so it does not get weird and bent.
To reheat: Skip the microwave if you want crisp. Reheat in the oven at 425°F (218°C) for 6 to 10 minutes, or in a skillet over medium heat to crisp the bottom. If it is frozen, bake it a bit longer until it feels dry and firm again, then add toppings.
Meal prep idea: Bake two crusts, freeze one, and you have an emergency pizza option that feels way better than ordering takeout.

Common Questions
Can I use frozen riced cauliflower?
Yes, totally. Just cook it and then squeeze it really well. Frozen tends to hold even more water, so take your time with the towel step.
Why is my crust soggy in the middle?
Usually it is either not enough squeezing, the crust is too thick, or the toppings are too wet. Bake it a little longer before adding toppings and keep sauce light.
Do I have to flip the crust?
You do not have to, but it helps a lot. Flipping dries out the bottom so it is more pizza like and less casserole like.
Can I make it dairy free?
It is harder because the cheese helps bind and crisp. Some people use dairy free shreds, but results vary. If you try it, focus extra hard on squeezing moisture out and baking longer.
How do I keep it from sticking?
Use parchment paper, not foil. And let it bake until it is truly set before attempting to flip.
A Pizza Night You Will Actually Want to Repeat
Once you nail the moisture part, cauliflower pizza crust becomes one of those recipes you can rely on when you want comfort food without feeling heavy. Keep it thin, bake it twice, and do not drown it in toppings, and you will get that crispy bite you are hoping for. If you want to compare methods, I have bookmarked a few great guides like How to Make Cauliflower Pizza Crust – Detoxinista and Best Cauliflower Pizza Crust Recipe – Delish.
And if you just want a shortcut for a busy night, it is handy to know options like Cauliflower Pizza Crusts | Trader Joe’s exist. For more troubleshooting tips, I also like Foolproof Cauliflower Pizza Crust – iFoodReal.com and the classic Cauliflower Pizza Crust Recipe – Allrecipes. Now go plan a pizza night and have fun with it, because you are absolutely capable of making a cauliflower pizza crust that does not flop.