The scent of orange and warm chocolate always pulls me back to a small kitchen table where my children pressed warm palms to cooling tins and asked if they could have just one more. That deep orange perfume, bright and a little tart, rises the moment I zest the fruit, and it mixes with the rich, almost smoky whisper of dark chocolate melting on the stove. If you have a favorite candy or a method for dipping sweets, you know how a single treat can hold a whole afternoon. When I pull these Chocolate Covered Orange Creams from their tray, I remember a week of slow afternoons, a neighbor dropping by with a story, and the hush when everyone pops one into their mouth and smiles, eyes closed. You might also like the simple pleasure in my my simple chocolate candy method that taught me how to temper patience into every bite.
Why Chocolate Covered Orange Creams Still Feels Like Home
There are recipes that feed the body and there are recipes that feed memory. This is both. I first made Chocolate Covered Orange Creams on a rainy Saturday when the kids were small and the house smelled like citrus and laundry. I wanted something that felt special but that did not take over the day. It became a ritual: zesting slowly while the radio hums, tasting the cream for balance, and letting the chocolate set while we shared stories from the week.
This treat sits at the meeting point of two simple loves: bright citrus and quiet chocolate. The orange gives a sunny note that hums at the back of your throat, and the dark chocolate wraps it up like a warm sweater. Over the years I have watched cousins choose flavors, friends ask for the recipe, and my husband steal the last one late one evening when he thought I was not looking. The memory of that first pan becomes sweeter each winter. If you enjoy pairing chocolate with other flavors, try the fresh twist found in my recipe for chocolate mint cream cheese treats, which taught me how to balance bold notes with gentle cream.
What Makes This Chocolate Covered Orange Creams Special
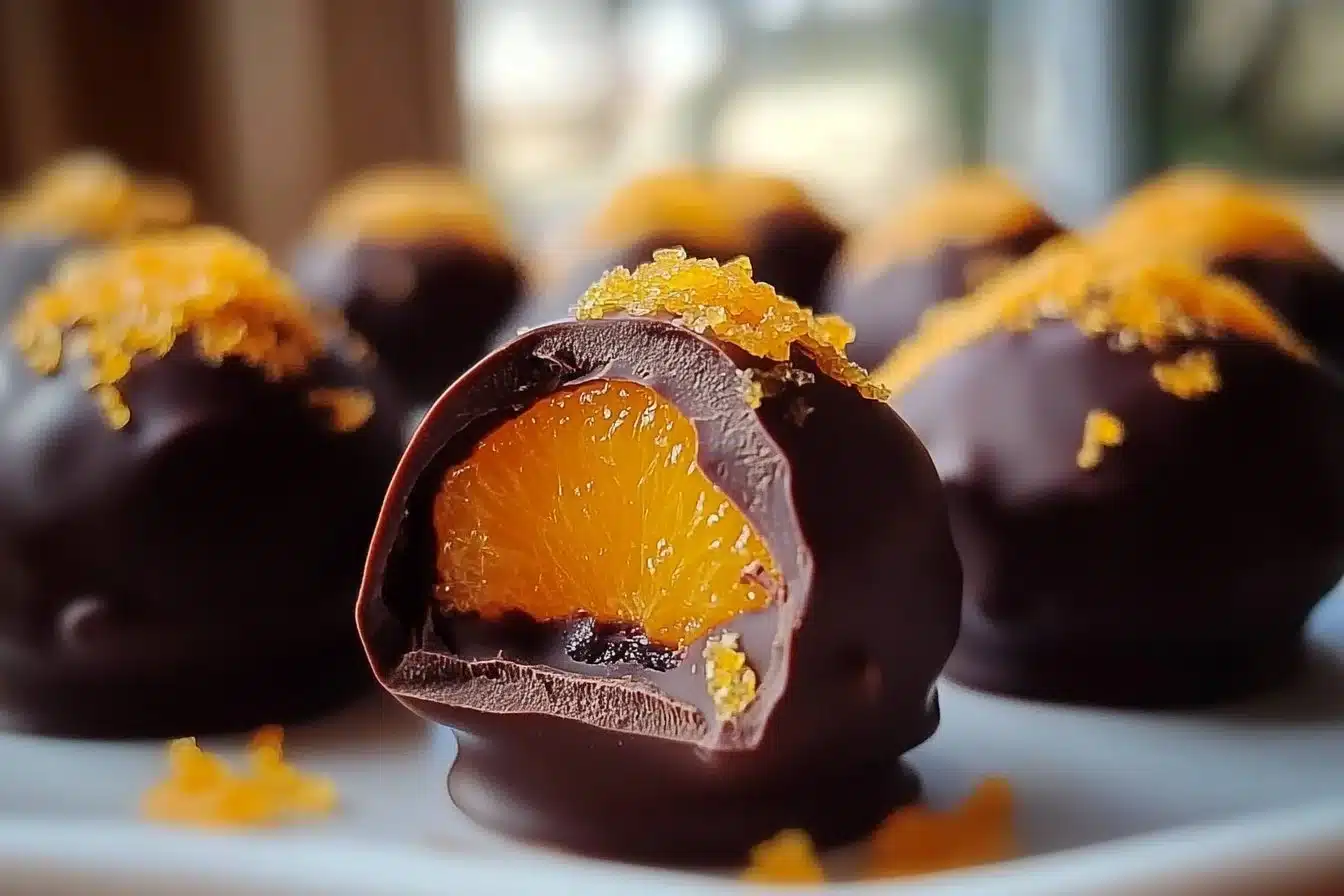
This recipe is simple but not small. It uses a few honest things and turns them into a candy that tastes like a moment gifted back to you. Heavy cream gives a soft, melt-in-your-mouth base. Orange zest lifts the whole thing like a bell. Powdered sugar sweetens without grit, and the dark chocolate seals the center with a thin, crackly shell that snaps when you bite into it.
I like that it asks for no fancy tools. You can beat the cream in a bowl with a hand mixer or by hand if you have time and patience. You can work the chocolate in a double boiler on the stove or carefully in the microwave. The process itself is part of the pleasure. It gives room to hum a tune while you stir, to teach a child how to roll a ball, and to taste and adjust until the flavor is exactly what your family remembers. Holiday tables love a plate of these, and I often set them near a warm mug of something spiced and tell stories while everyone reaches for one. If you pair orange and savory at a holiday meal, the balance echoes the bright notes I love in the cranberry orange glazed turkey breast that always points to celebration.
How to Make Chocolate Covered Orange Creams
“Every time I stir this pot, it smells just like Sunday at home.”
The rhythm of making these is gentle and steady. You start with a bowl of cream turning soft, white peaks that look like clouds, then fold in orange and sugar until the mixture smells bright and clean. A short chill gives the centers their shape, and rolling them with chilled hands is one of my favorite little chores. The balls go cold so the chocolate snaps on contact and forms a neat shell.
When the chocolate melts, stir until it is glossy and warm enough to coat without making the centers sweat. Dip each frozen ball and watch the chocolate cling, forming a sheen that catches the light. Return them to a chilled tray and wait, which is the hardest and most honest part. When the shells set, you will hear that lovely quiet snap. If you want a festive touch, sprinkle a little orange zest on top before the chocolate hardens, or dust with a pinch of sea salt for a grown-up twist. These small choices change how the candy feels on the tongue and in the moment.
Ingredients You’ll Need
1 cup heavy cream (a little extra for silkier texture if your cream is light)
1 cup powdered sugar (sift if your sugar has lumps to keep the texture velvet-smooth)
1 tablespoon orange zest (zest only the bright part for the best perfume)
1/4 cup orange juice (fresh squeezed brings the liveliest flavor)
1 teaspoon vanilla extract (a little extra vanilla if you love a cozy aroma)
8 ounces dark chocolate, chopped (pick a bar you enjoy eating; it matters)
1 tablespoon coconut oil (optional) (this makes the chocolate shinier and easier to dip)
Gather these honest things and they will turn into something that feels like a hand on your shoulder. I keep a small jar of zest in the freezer for days when I want instant orange, but fresh is always best. If you prefer a sweeter shell, choose a semisweet chocolate. If you love a deeper bite, go for a darker bar. The ingredient list is short on purpose; it lets each flavor speak.
Step-by-Step Directions
In a medium bowl, beat the heavy cream until soft peaks form.
Take your time and watch the cream thicken. When it holds a little curl on the whisk, you know it is ready. The air you fold in here gives the creams their silk and lift.Gradually add powdered sugar, orange zest, orange juice, and vanilla extract, mixing until smooth.
Add the sugar gently so the mixture stays airy and not heavy. Stir until the orange scent perfumes the whole bowl and the texture looks glossy and even. Taste a tiny bit to check for balance.Refrigerate the orange mixture for about 30 minutes to firm up.
Chill gives the centers shape and makes them easier to roll. The fridge also lets the flavors settle, so the orange sings without being sharp. Wait patiently so your hands do not heat the mix.Once firm, use a spoon to scoop out small portions and roll into balls.
Use lightly floured or chilled hands to keep the balls neat. Roll with a steady, gentle motion until each is round and smooth. Breathe in the little burst of citrus that rises as you shape them.Place the balls on a baking sheet lined with parchment paper and freeze for 1 hour.
Freezing keeps them steady so the chocolate sets cleanly around each one. Lay them apart so they do not stick together and the cold air can reach every side. This hour is when the centers become pleasantly firm.Melt the dark chocolate and coconut oil together in a microwave or double boiler.
Warm the chocolate slowly, stirring until it is glossy and smooth. If you use a microwave, heat in short bursts and stir between each one to prevent burning. A smooth sheen means it will coat beautifully.Dip each frozen orange ball into the chocolate, allowing excess to drip off, and return to the parchment-lined sheet.
Hold each ball on a fork or dipping tool and let the chocolate fall back into the bowl, creating a neat coat. Place it gently on the paper and listen for the tiny soft click as it sets a little. You can add a sprinkle of zest or a dusting before the shell hardens.Chill in the fridge until the chocolate hardens.
Put the tray into the refrigerator and wait until the shells are firm. This will only take a little while because the centers started frozen. When the chocolate is set, the candies will have a fine, even snap.Serve chilled and enjoy!
Arrange them on a small plate or a pretty dish and bring them to the table cool. Watch faces light up as people take that first bite and savor the contrast of bright orange and dark chocolate.

Bringing Chocolate Covered Orange Creams Together
I love how this recipe gathers people without making a fuss. You can prepare the creams in the afternoon and serve them after a simple dinner, or make them in the morning for a sweet that stays cool and tender through the day. For a small gathering, I place them on a low dish at the center of the table so everyone can reach and pass. If children help, they can scoop and roll; if older friends come, they will likely stand at the counter and tell stories while dipping.
Presentation can be simple and warm. A shallow bowl lined with a clean napkin gives a homemade feeling. If I am serving these at a small party, I sometimes arrange them on a platter with a few orange slices and a sprig of fresh mint for color. For a quiet evening, I place three on a tiny plate beside a cup of tea or a small glass of milk. Small traditions grow around small foods. Sometimes we count how many different reactions we get when someone tastes one for the first time. That quiet game gets more laughs than you might think.
A Few Tips for Smooth Chocolate and Bright Orange
Work with chocolate you enjoy. If the bar has a flavor you like on its own, it will shine here. If the chocolate thickens too fast, warm it a bit and add a tiny splash of coconut oil or a little vegetable oil to loosen it. If the centers feel too soft after chilling, freeze them a bit longer; a firmer center makes the dipping easier.
Keep tools and trays cool. Warm sheets can make the chocolate sink or bloom. Line a flat tray with parchment so the candies lift easily. If your kitchen is very warm, set the tray in a cooler spot or chill the tray briefly before dipping. Small changes in temperature change how the shell forms and the amount of shine you get.
Serving Chocolate Covered Orange Creams With Family Warmth
We eat these in the simplest ways and those feel the most special. Sometimes I tuck one onto the corner of a plate with fruit and cheese for a late-night nibble. Other times I serve them with strong coffee after a Sunday lunch. The pairing matters less than the moment. When my mother visits, she chooses the softest corner of the couch and eats them slowly, savoring each bite. My children once stacked three and pretended they were little towers, which lasted until they each popped one into their mouths.
If you want to make the moment extra cozy, serve the creams with a pot of warm tea or a small cup of dark coffee. The bitter and bright notes play well together and make the chocolate feel richer. For a festive table, tuck a few on a plate beside simple cookies and a bowl of nuts. This way they become part of a spread that invites people to linger. Once, during a chilly evening, we sat with blankets over our knees and a box of these chocolates on our laps. The hush lasted until the last sweet was gone.
Pairings and Small Traditions at My Table
One small tradition is to leave a tiny card beside the plate that says who made them. When children help, they get to sign the card. Another is to save one in the refrigerator for a quiet moment to myself later that evening. The flavors change slightly in the cold; the orange becomes gentler and the chocolate feels firmer on the tongue.
If you like to pair flavors, try setting out small bowls of roasted almonds, thin slices of pear, or a spoonful of fig jam. These small sides make each bite a little different and give guests a chance to mix their own pairings. For celebrations, I sometimes dust the plate with a fine bit of orange zest to echo the center and tie everything together visually.
Variations That Keep the Heart of the Recipe
If you want a lighter center, you can fold in a tablespoon of mascarpone for extra creaminess. For a dairy-free version, try a coconut cream base and use a dairy-free dark chocolate. If you love spice, add a pinch of ground cinnamon or a tiny bit of chili to the chocolate for warmth that surprises.
You can also shape the centers differently. Press them into small molds before freezing for neat shapes, or press them flat and sandwich two together with a thin layer of melted chocolate. Each change keeps the orange and chocolate harmony but gives you new textures and moments to savor. These gentle tweaks are how family recipes grow.
A Little About Technique That Makes a Big Difference
The simple things you do while making candy matter. Take care to zest only the orange skin, not the white part, which can be bitter. Chill the centers thoroughly so they do not melt when dipped. Keep the chocolate warm but not hot; it should be fluid and glossy.
If bubbles appear in your chocolate, tap the bowl gently before dipping. If the chocolate thickens too much, warm it for a few seconds and stir. Practice makes these steps comfortable. After a few batches you will know the sound of the chocolate when it is ready and the look of the cream when it is balanced.
The Simple Process Behind It
“When the chocolate glides and the orange scent rises, I know the kitchen is ready for company.”
The process moves in a circle that feels satisfying: cream, chill, freeze, dip, chill again. Each stage has a pause that lets you breathe and taste. This makes the finished candy feel like something made with time rather than rush. When friends ask me for a candy recipe that they can make with kids or on a quiet afternoon, I give them these steps because they create good work and good memories. If you like holiday baking that brings families together, you might find ideas in my chocolate yule log cake recipe, a project that taught me how to share big sweets across a long evening.
Serving Ideas That Keep People Close
Place a small pile of Chocolate Covered Orange Creams on a low platter and set it in the middle of a board of cheeses and fruits. Let people choose their own pairing. For an intimate dessert, place three on a simple dessert plate and add a few candied orange slices. At holiday parties, I tuck them into small paper cups so guests can take one or two without worry.
If you make them with children, give them small tasks. One child can press parchment onto the sheet while another names the flavors. This helps them feel part of the moment and keeps hands busy in a good way. I have watched shy kids open up and talk when they help shape sweets. These small tasks build confidence and make the treat taste like something they made together.
Keeping Chocolate Covered Orange Creams Fresh and Comforting
Store the candies in an airtight container in the refrigerator if you plan to eat them within a week. Layer them between sheets of parchment to keep the shells from sticking and to protect their neat shine. Bring them to room temperature for ten minutes before serving if you want the centers to soften a little.
If you need to keep them longer, freeze the tray in a single layer and transfer to a sealed container or heavy freezer bag. They will keep for a month that way and remain pleasant. Thaw them in the refrigerator overnight before serving so the texture comes back slowly. Over time the orange flavor will deepen and the chocolate will soften slightly. If you are saving some for later, label the container with the date and the name so you remember the comfort waiting inside.
How to Save the Leftovers
If you have leftovers after a family visit, pack a few in small paper bags and tuck them into lunch boxes for a special surprise. They travel well and give a small bright pause in the day. For a longer trip, keep them chilled in an insulated bag.
Leftovers also make thoughtful little gifts. A small box with six of these and a handwritten note makes a neighbor feel remembered. I have left them on doorsteps wrapped with a ribbon, and it has a way of starting a conversation. One winter night, a neighbor returned the favor with a jar of homemade jam. Little trades like that build the kind of closeness that keeps communities warm.
Troubleshooting Common Questions with Gentle Encouragement
If the centers seem too soft after chilling, return them to the freezer for a little longer. If the chocolate looks streaky, it may have cooled unevenly; warm it slightly and stir until it shines again. If the orange flavor feels flat, a sprinkle of zest on top before the chocolate sets will lift it.
If you worry about melting on a warm day, keep the tray chilled until the last moment. Serve from the fridge on hot afternoons and remind guests to enjoy them before the sun beats down. Little planning keeps these treats looking as lovely as they taste.
A Small Note on Tools and Leftover Ingredients
You do not need specialized tools for this recipe. A medium bowl, a mixer or whisk, a tray, and a bowl for chocolate are enough. Parchment paper is the small trinity that makes cleanup kinder. If you have leftover cream or orange, use them in a salad dressing, a quick cake, or a morning coffee. Nothing is wasted when you keep a mind for small uses.
One day I used leftover zest in a sugar jar and watched my children dip in to sweeten yogurt, which felt like a small victory. Keeping a little list of ways to use leftovers turns a single batch into many small joys.
How We Enjoy Chocolate Covered Orange Creams at Home
We do not save these for only big days. They show up after a long day of work, as a weekend treat, and on quiet school mornings when a child needs a little bright thing in their lunchbox. My husband likes them with a small cup of black coffee. My daughter likes one with a slice of apple. My son once dipped a bite into peanut butter and declared it a life-changing moment.
These small scenes make the recipe more than a set of steps. It becomes a way we mark time. I write recipes so families have chances to make these soft moments themselves. Little actions, like stirring slowly and cleaning up together, teach care and patience in simple ways. Homemade food has that quiet power.
For those who love a spicy note, try pairing a small piece with the warm bite of a chili chocolate. The contrast gives a lively finish. You might enjoy exploring that same balance in other dishes such as my dark chocolate chili, which plays with heat and cocoa in a very different but fun way.
Storing Chocolate Covered Orange Creams for Tomorrow
Store finished creams in the refrigerator in a shallow, airtight container. Layer them between parchment to protect the shells. They will keep nicely for up to a week, and the orange flavor will mellow in a comforting way. If you plan to freeze some for later, do so in a single layer first, then transfer to a sealed freezer container. Thaw slowly in the refrigerator the day before you plan to serve.
When you reopen the container, breathe in that familiar smell as you lift the lid. Often the flavors will feel rounder the next day. These little candies reward patience and come back tasting like a quiet, steady afternoon spent making something with care.
Print
Chocolate Covered Orange Creams
- Total Time: 45 minutes
- Yield: 24 candies 1x
- Diet: Vegetarian
Description
Delightful candies that blend bright orange flavors with rich dark chocolate, evoking nostalgia and warmth.
Ingredients
- 1 cup heavy cream
- 1 cup powdered sugar
- 1 tablespoon orange zest
- 1/4 cup orange juice
- 1 teaspoon vanilla extract
- 8 ounces dark chocolate, chopped
- 1 tablespoon coconut oil (optional)
Instructions
- Beat the heavy cream until soft peaks form.
- Gradually add powdered sugar, orange zest, orange juice, and vanilla extract, mixing until smooth.
- Refrigerate the orange mixture for about 30 minutes to firm up.
- Once firm, scoop out small portions and roll into balls.
- Place the balls on a baking sheet lined with parchment paper and freeze for 1 hour.
- Melt the dark chocolate and coconut oil together in a microwave or double boiler.
- Dip each frozen orange ball into the chocolate, allowing excess to drip off, and return to the parchment-lined sheet.
- Chill in the fridge until the chocolate hardens.
- Serve chilled and enjoy!
Notes
For added flavor, sprinkle some orange zest or a pinch of sea salt on top before the chocolate hardens.
- Prep Time: 15 minutes
- Cook Time: 30 minutes
- Category: Dessert
- Method: Chilling, Dipping
- Cuisine: American
Nutrition
- Serving Size: 2 candies
- Calories: 150
- Sugar: 12g
- Sodium: 30mg
- Fat: 9g
- Saturated Fat: 5g
- Unsaturated Fat: 3g
- Trans Fat: 0g
- Carbohydrates: 18g
- Fiber: 1g
- Protein: 1g
- Cholesterol: 10mg
Keywords: candy, chocolate, orange, dessert, sweets


