The first time I made Chocolate Mint Cream Cheese Buttons my kitchen smelled like a candy shop on a quiet Sunday, and my little ones came running not for a toy but because they could not resist that cool mint and warm chocolate call. I remember rolling the soft cream cheese into tiny rounds while my daughter hummed her favorite song and my husband poured the heavy cream, and in those small, messy moments the recipe became ours. If you enjoy simple, comforting desserts that carry a family memory in every bite, you might like how this one fits right alongside other easy treats like 2-Ingredient Cottage Cheese Ice Cream in our weeknight rotation.
The Story Behind Our Favorite Chocolate Mint Cream Cheese Buttons
This recipe came from a patchwork of kitchen memories rather than a single flash. I first mixed mint into cream cheese for a holiday platter years ago and later thought, why not dress them in chocolate and make a treat that feels both small and special. It started as a way to use leftover cream cheese after a party and ended up as a recipe my kids request for birthdays and rainy afternoons.
When I make these, I always remember my grandmother’s habit of turning tiny efforts into something festive. She would take whatever was on hand and make it shine with a little extra attention. From there my version grew, adding the chocolate dip and an optional crunchy coating so each bite is cool, creamy, and a little crisp. The memories these buttons bring back are simple: warm hands, a cluttered counter, and the slow, easy pleasure of dessert handed around the table.
I like to think of Chocolate Mint Cream Cheese Buttons as a recipe that welcomes all cooks. A beginner can follow the steps and find comfort in the rhythm of mixing and dipping. A home cook with more experience will find space to play — more mint, different chocolates, or a sprinkle of toasted nuts for crunch. That openness is why this recipe still feels like a small celebration every time I make it.
Bringing Chocolate Mint Cream Cheese Buttons Together
“Every time I stir this pot, it smells just like Sunday at home.”
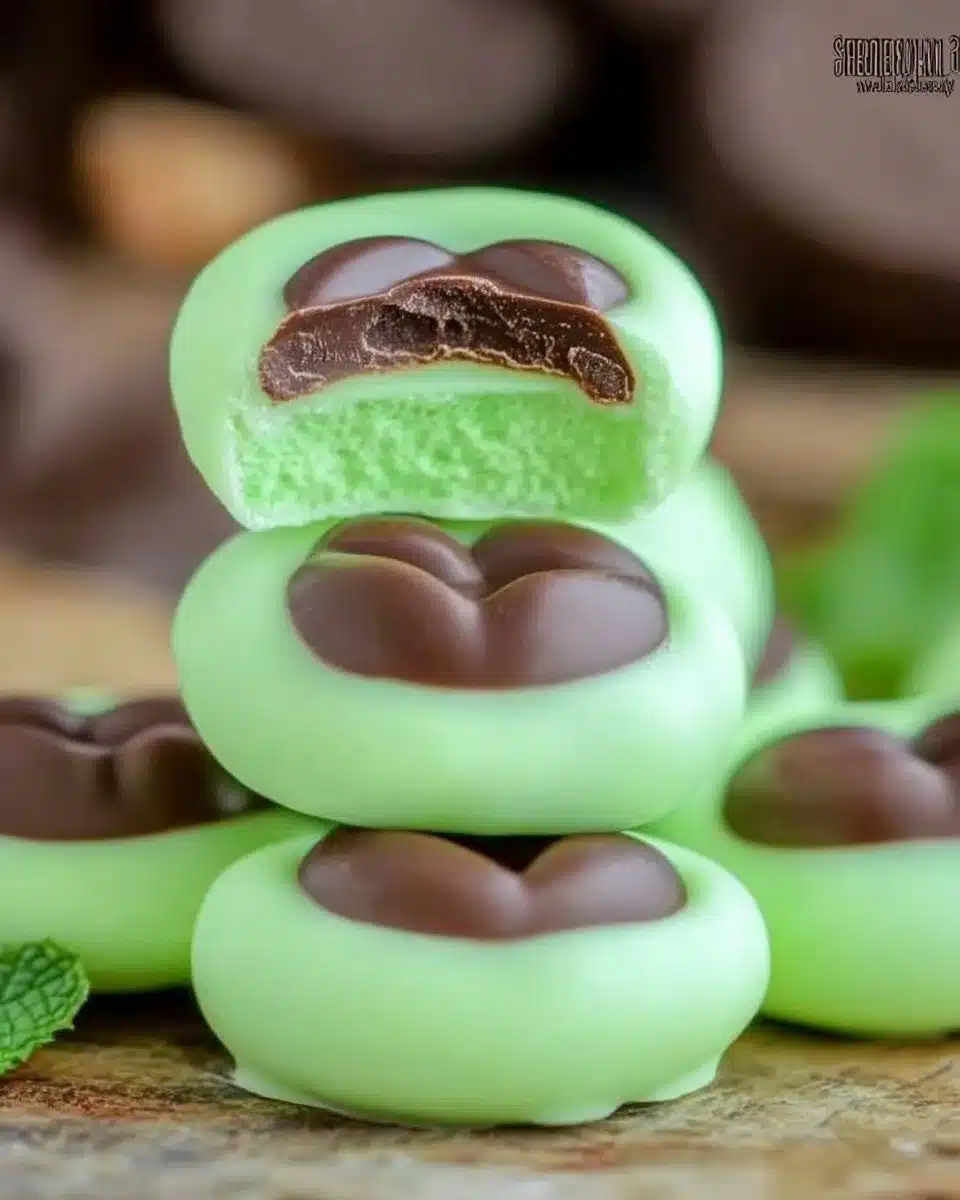
The making of these buttons moves in easy beats. You beat the cream cheese until it becomes soft and cloud-like, then fold in powdered sugar and mint until the mix smells bright and clean. While the balls chill, you warm the cream until it just kisses a simmer. Stirring chocolate into the hot cream turns it glossy and thick, and that first dip of a chilled button into the ganache is always a tiny thrill. The sound of chocolate settling and the cool snap when you bite in will tell you you’ve done it right.
The kitchen will change as you work. The air gets cooler between the bowl and the fridge, and the chocolate gives off a deep, heady sweetness. Meanwhile, the mint keeps the whole thing lively. Once the surfaces are set, you’ll notice a proud little line of shiny buttons on the parchment paper, each one a neat jewel that belongs on any weekend snack plate.
Print
Chocolate Mint Cream Cheese Buttons
- Total Time: 45 minutes
- Yield: 4 servings 1x
- Diet: Vegetarian
Description
Delicious mint-infused cream cheese balls coated in rich chocolate, perfect for sharing and celebrating small moments.
Ingredients
- 8 oz cream cheese, softened
- 2 cups powdered sugar
- 1 tsp mint extract
- 1 cup semisweet chocolate chips
- 1/2 cup heavy cream
- 1 cup crushed oreos or graham crackers (optional for coating)
- Pinch of salt
Instructions
- In a mixing bowl, beat the softened cream cheese until smooth.
- Gradually add the powdered sugar and mint extract, mixing until well combined.
- Roll the cream cheese mixture into small balls, about 1 inch in diameter, and place them on a baking sheet lined with parchment paper.
- In a saucepan, heat the heavy cream until just simmering, then remove from heat and add the chocolate chips. Stir until smooth and glossy.
- Dip each cream cheese ball into the chocolate ganache, allowing the excess chocolate to drip off. Place on parchment paper.
- If desired, roll dipped balls in crushed oreos or graham crackers while the chocolate is still soft.
- Refrigerate until the chocolate is set, about 30 minutes.
- Serve chilled and enjoy!
Notes
Try adding a splash of vanilla to the cream cheese for extra flavor. These buttons can also be frozen for longer storage.
- Prep Time: 15 minutes
- Cook Time: 30 minutes
- Category: Dessert
- Method: Chilling
- Cuisine: American
Nutrition
- Serving Size: 1 button
- Calories: 250
- Sugar: 24g
- Sodium: 90mg
- Fat: 14g
- Saturated Fat: 8g
- Unsaturated Fat: 4g
- Trans Fat: 0g
- Carbohydrates: 30g
- Fiber: 1g
- Protein: 4g
- Cholesterol: 30mg
Keywords: chocolate, mint, dessert, cream cheese
Ingredients You’ll Need
8 oz cream cheese, softened
2 cups powdered sugar
1 tsp mint extract (a little goes a long way; add more if you like a bolder mint)
1 cup semisweet chocolate chips (or your preferred baking chocolate)
1/2 cup heavy cream (fresh heavy cream gives this its richness)
1 cup crushed oreos or graham crackers (optional for coating)
Pinch of salt
(If you love a cozy aroma, add a little extra vanilla to the cream cheese.)
I keep these items simple on purpose. The cream cheese gives the filling its silky texture, the powdered sugar brings sweetness and structure, and the mint is the bright note that lifts the chocolate. The heavy cream turns chocolate into a silky ganache that coats without becoming too thick. For the optional coating, crushed cookies add a welcome crunch and a second flavor layer. If you ever want to play with the idea of peppermint and chocolate in other forms, try the fun little twist of Chocolate Peppermint Cookie Cups for another snack that smells like the holidays.
Step-by-Step Directions
- In a mixing bowl, beat the softened cream cheese until smooth.
Work at medium speed or by hand until the texture is creamy and there are no lumps left. Taste it for cool tang and imagine the sweetness to come. - Gradually add the powdered sugar and mint extract, mixing until well combined.
Add the sugar in batches so the filling stays silky, then stir in the mint and a pinch of salt. Mix until the mixture feels thick enough to hold shape. - Roll the cream cheese mixture into small balls, about 1 inch in diameter, and place them on a baking sheet lined with parchment paper.
Use a small cookie scoop for even sizes and keep your hands cool to prevent sticking. Once shaped, press each ball gently so they calm into a tidy button. - In a saucepan, heat the heavy cream until just simmering. Remove from heat and add the chocolate chips. Stir until smooth and glossy.
Watch for tiny bubbles at the edge of the cream; that is the right moment to pour in the chocolate. Stir slowly until the ganache is shiny and thick but still pourable. Breathe in that warm chocolate aroma. - Dip each cream cheese ball into the chocolate ganache, allowing the excess chocolate to drip off.
Use a fork or dipping tool and turn each button so it gets a smooth coat. Tap the fork gently on the bowl to let the extra drip back in, then set the button on parchment. The contrast between cool filling and warm chocolate is a small joy. - If desired, roll the dipped balls in crushed oreos or graham crackers for added texture.
Do this while the chocolate is still soft so the crumbs stick easily. You can press a few extra crumbs on top for a rustic look and a satisfying crunch. - Place the chocolate-coated buttons back onto the parchment paper and refrigerate until the chocolate is set.
This usually takes at least 30 minutes, and I like to leave them a little longer so the centers are perfectly chilled. They feel best when they are cool but not frozen. - Serve chilled and enjoy!
Arrange the buttons on a small plate or tray, and let your family help themselves. Notice the shine, hear the quiet snap, and savor the cool mint against the deep chocolate.

Serving Chocolate Mint Cream Cheese Buttons With Family Warmth
These buttons love to be shared. I place them in a small dish on the coffee table during a slow afternoon and watch conversations soften as people reach for one. They are perfect for a holiday platter, a simple dessert after a weeknight meal, or tucked into a lunchbox as a small surprise. For a festive spread, arrange them with fresh berries, a bowl of toasted nuts, and a few sprigs of mint for color.
Presentation is gentle but thoughtful. Use a small doily or a square of parchment on a plate, and stack two or three buttons so each guest can take a couple at once. If you plan to serve them at a party, place them in paper candy cups to keep the chocolate from sticking and to make passing the tray easier. For an afternoon with kids, let them choose the coating and help with the dipping; those hands-on moments are part of what makes these treats feel like home.
Pairings matter in a sweet but friendly way. A cup of rich coffee balances the mint and the chocolate. For a lighter touch, try a glass of cold milk or a warm cup of tea. In winter, a peppermint tea echoes the mint without being too sweet. If you’re planning a dessert board, include other holiday-style bites like Chocolate Peppermint Cookies to keep the flavors connected across the table.
Storing Chocolate Mint Cream Cheese Buttons for Tomorrow
To keep these buttons fresh, store them in an airtight container in the refrigerator. Lay parchment between layers so they do not stick together and maintain their shiny finish. They will stay at their best for up to five days, though in our house they rarely last that long.
You can also freeze them for longer keeping. Place the buttons on a tray in a single layer and freeze until firm. Once frozen, transfer them to a freezer-safe container with parchment between layers. Thaw in the refrigerator for a couple of hours before serving so the centers return to that cool, creamy texture. Expect a slight softening of the chocolate sheen after freezing, but the flavor will remain bright.
If you find the chocolate has lost some of its shine after storing, a quick pop into the fridge will help it set back into place. For travel, keep them on a small plate in a cooler bag with an ice pack. That little care keeps the texture intact and the presentation tidy, especially when you are bringing them to a potluck or family gathering.
Small Tricks, Variations, and Friendly Advice
H3: Gauge Your Mint
Mint extract can be strong. Start with the teaspoon called for and add a little more only if you want it brighter. If you prefer a natural herb note, finely chop a small sprig of fresh mint and fold it in for a milder, garden-like flavor. Taste as you go.
H3: Chocolate Choices
Semisweet chocolate chips are a reliable choice, but feel free to use dark chocolate if you like a richer, less sweet finish. Milk chocolate will make the coating sweeter and softer. If you have high-quality chocolate, chop it and use that for a silkier ganache.
H3: Coating Ideas
Try crushed peppermint candies for a holiday crunch, toasted coconut for a tropical twist, or finely chopped toasted almonds for a nutty contrast. For a classic look, a dusting of cocoa powder is pretty and simple.
H3: Texture Tweaks
If your cream cheese mixture seems too soft to roll, chill it for 10 to 20 minutes until it firms. If it is too stiff, add a tiny splash of cream and beat until smooth. Hands small or warm can be helped with a quick rinse under cold water before rolling to keep the mixture from sticking.
H3: Kid-Friendly Steps
Let kids measure the powdered sugar and help roll the balls. They like dipping into the ganache and rolling in crumbs. Keep a wet cloth nearby to clean sticky fingers and encourage the little helpers to decorate a few buttons with sprinkles for their own plates.
H3: Scaling the Recipe
This recipe scales easily. For a crowd, double to triple the ingredients and use a small scoop to maintain even sizes. Plan extra chilling time when you increase the batch so everything firms correctly.
H3: A Note on Tools
A small cookie scoop, a mixing bowl, a saucepan, a spatula, and parchment paper are all you need. A candy thermometer is not necessary for this recipe; watch for the cream to reach a gentle simmer and trust your senses. Good tools make the work easier, but you do not need fancy equipment to get a lovely result.
Troubleshooting Common Hiccups
If the ganache becomes grainy, it may have been overheated or the chocolate may have been stirred too roughly. Remove from heat and stir gently until smooth, or add a touch more warm cream to bring it back together. If the coating is too thin, let it cool slightly and dip again for a thicker layer.
If the cream cheese mixture is too sweet for your taste, reduce the powdered sugar by a quarter cup next time and adjust. If the mint tastes chemical, you might be using too much extract; reduce it and consider using fresh mint for a milder note. For a softer center, allow the buttons to rest at refrigerator temperature for a bit longer instead of freezing.
When the chocolate does not stick to the buttons, ensure the filling is well chilled. Warm or room temperature centers can soften the chocolate. Chill the rolled balls for at least 15 to 30 minutes before dipping so they hold their shape and get a smooth coat.
Making This Recipe Your Own
There is room in this recipe to be playful. Add a smear of jam in the center before you chill for a surprise fruit note. Press a small mint leaf on top of each dipped button for a pretty finish. For a boozy adult version, add a teaspoon of liqueur to the ganache or a splash into the cream cheese mixture. Keep notes in a little recipe journal about adjustments you make, because those small changes become the signature of your kitchen.
I often make a batch with half rolled in crumbs and half plain so guests can choose their texture. On quiet evenings I keep a small box in the fridge just for those moments when I want something that is both indulgent and small. It is a recipe that asks for a little attention and returns the favor with comfort.
A Few Ways to Gift These Buttons
Wrapped in a small tin or a glass jar, these buttons make a thoughtful gift. Layer parchment between rows, tie a ribbon, and tuck in a handwritten note. If you are delivering them to a neighbor, include a small stack of paper cups so they can serve without fuss. They travel well with a cooling pack and a sturdy container, and the homemade look says more than a store-bought box ever could.
When I hand out a tin of these, people often ask for the recipe. Sharing it has become another way to connect with friends, and I love swapping tips about coatings and pairings. Baking for others feels like sharing a piece of a quiet afternoon, and that is almost as sweet as the buttons themselves.
Conclusion
If you want to compare versions or see a visual guide while you make them, this lovely take on the idea inspired how I first thought about chocolate and mint together: Chocolate Mint Cream Cheese Buttons – Mom On Timeout.


1 thought on “Chocolate Mint Cream Cheese Buttons”