I can still smell the first batch as if it were baking right now. The warm chocolate scent rolled through the house the way a favorite song rolls through an old radio, and the bright peppermint cut through it like winter sunshine. I can see my children pressing their small palms on the counter while I used a jar to press the cookie centers, all of us laughing when one cookie cup toppled and we ate it warm. If you want the full story and the recipe that lives in my kitchen year after year, you will find the heart of it on this Chocolate Peppermint Cookie Cups Recipe page where I first wrote down how to make them with love.
Why This Chocolate Peppermint Cookie Cups Recipe Means So Much
The first time I made these cookie cups I was making treats for a small school holiday sale. I had a tired oven and two sleepy kids who wanted to help, and I remember how a little peppermint extract removed the ordinary from a simple cookie. The smell turned the kitchen into a place of tiny miracles and family folklore. From that moment on, peppermint and chocolate became our house scent for a month every year.
I have made these for birthdays, potlucks, and quiet evenings when we needed a sweet word between us. They are the kind of cookie that carries a note of celebration, but also a comfort that says you are safe at home. That mix of fun and warmth is exactly what I hope for when I share a recipe.
My friends and neighbors ask for this recipe and then tell me their own stories after they make it. One neighbor swapped candy canes for peppermint pieces and wrote me a note about how the cookies reminded her of the tree-lighting in her small town. These small stories make this recipe more than a list of steps. They make it family.
If you have ever loved a simple cookie with a surprising twist, you might also like my other take on peppermint treats, and I find myself returning to the way small changes make big memories in our kitchen. For more ideas that use the same bright flavor pairings, I sometimes point readers to a sibling recipe like our Chocolate Peppermint Cookies which keeps the same spirit but in a different shape.
Ingredients You’ll Need
2 cups all-purpose flour
1/4 cup Dutch-processed cocoa powder (sifted)
1/4 cup black cocoa powder
1 tsp baking soda
1/2 tsp salt
1 cup unsalted butter (room temperature)
1/2 cup granulated sugar
1 cup light brown sugar (packed)
2 large eggs (room temperature)
1 tsp vanilla extract
1 cup heavy whipping cream (chilled)
8 oz cream cheese (full fat)
1/2 cup granulated sugar
1 tsp peppermint extract
red color gel (for piping bag decoration)
candy canes (chopped, for garnish)
A little note on the ingredients to keep you company while you shop. A little extra vanilla if you love a cozy aroma will never hurt. Fresh butter gives this its richness and makes the cookie edges sing. Chilled cream is easier to whip into strong, billowing peaks, so pop that bowl into the fridge while you mix the dough.
If you keep a jar of crushed candy canes on hand around the holidays, this recipe will feel effortless. I like full fat cream cheese because it gives the filling a soft, tangy backbone that the peppermint and whipped cream can lean on. Use room temperature eggs so they mix more easily and your dough stays tender.
Bringing Chocolate Peppermint Cookie Cups Together
“Every time I stir this pot, it smells just like Sunday at home.”
The kitchen fills up with small signals that tell you the dessert is coming along. The dry mix looks deep and dusty with cocoa when you whisk it. The butter and sugar cream into a pale, airy fluff that reminds you of clouds. When the cookie dough hits the oven, the scent of chocolate rises and the edges pull away, glossy and soft in the middle.
I work at a steady pace when I make these. I let the mixer sing while I tidy the counter. Meanwhile I line up the muffin tins and reach for a jar to press the centers as soon as the cookies come out. The rhythm helps the kids feel included and helps me keep calm. It is a small ceremony that turns baking into memory.
You will notice small changes as you go. When the cookie dough looks tacky but not wet, you know it has the right balance. When the cookies come out, wait for the edges to set and the centers to still feel soft. That is the exact moment to press in a jar and make a tender well for the filling. These parts feel small, but they make the texture perfect.
Step-by-Step Directions
Preheat your oven to 350°F (175°C). Spray two regular-sized cupcake tins thoroughly with cooking spray to prevent sticking. Line up a small jar on the counter to press wells when the cookie cups come out of the oven. Move a wire rack close so you can transfer the cups quickly.
In a medium bowl, whisk together the all-purpose flour, Dutch-processed cocoa powder, black cocoa powder, baking soda, and salt. Set this mixture aside for later use. Sift or whisk until the powders look smooth and even in color.
In a large mixing bowl, beat the unsalted butter, granulated sugar, and light brown sugar on medium-high speed until the mixture is light, fluffy, and well combined, about 2 to 3 minutes. You will see the color lighten and the texture become airy. Stop and scrape the bowl so nothing clings to the sides.
Reduce the mixer speed to low and add the eggs one at a time, followed by the vanilla extract. Beat until fully incorporated. Each egg should blend in smoothly and the batter will look glossy. Breathe in the warm vanilla and chocolate notes as you mix.
Gradually add the flour mixture to the butter mixture and mix only until just combined, making sure not to overmix. Stop when you still see a few streaks of flour. The dough should look soft and slightly sticky, not dry or crumbly.
Using a large cookie scoop or approximately 3 tablespoons, portion the cookie dough evenly into the prepared muffin tins. Press the dough slightly so it flattens into rounds. Leave room in the centers so you can create a cup after baking.
Bake the cookie cups for about 10 to 13 minutes or until they are mostly set but still soft in the centers. Watch for the edges to turn slightly firm and the tops to lose their raw sheen. The aroma should be rich and warm.
Immediately after removing from the oven, press down firmly into the center of each cookie cup using a small jar or container to create a well for the filling. Do this while the cookies are hot so they hold the shape. You will form a neat little bowl for the cream.
Allow the cookie cups to cool in the pans for 10 minutes. Then gently twist each cup slightly to loosen them, continue cooling for an additional 5 minutes, and transfer them to a wire rack to cool completely. The slow cool keeps the edges from cracking and the bottoms from sweating.
Using a cold bowl and whisk, whip the chilled heavy cream until stiff peaks form. The cream should hold its shape and look glossy. Keep a close watch so it does not overwhip into grainy butter.
In a separate mixing bowl, beat the full-fat cream cheese, granulated sugar, and peppermint extract together until the mixture is smooth and creamy. Scrape the bowl so no lumps remain. Taste for peppermint and add a little more if you like a brighter mint note.
Gently fold the whipped cream into the cream cheese mixture until fully combined and smooth. Use gentle strokes so the mixture stays light and airy. The filling should be thick enough to pipe but soft enough to puff.
Using a small food-safe paintbrush, paint two decorative red stripes on the inside of a piping bag fitted with a large round tip. Fill the piping bag carefully with the peppermint cheesecake filling. The stripes make each swirl look festive and handmade.
Pipe a generous swirl of the cheesecake filling into each cooled cookie cup. Start in the center and work outward until the cup looks full and pretty. The filling will soften the cookie a touch and add a creamy contrast.
Refrigerate the filled cookie cups for about 1 to 2 hours or until the filling is set. The chill helps the flavors knit together and keeps the filling firm when you serve. While they chill, the peppermint scent will rise gently.
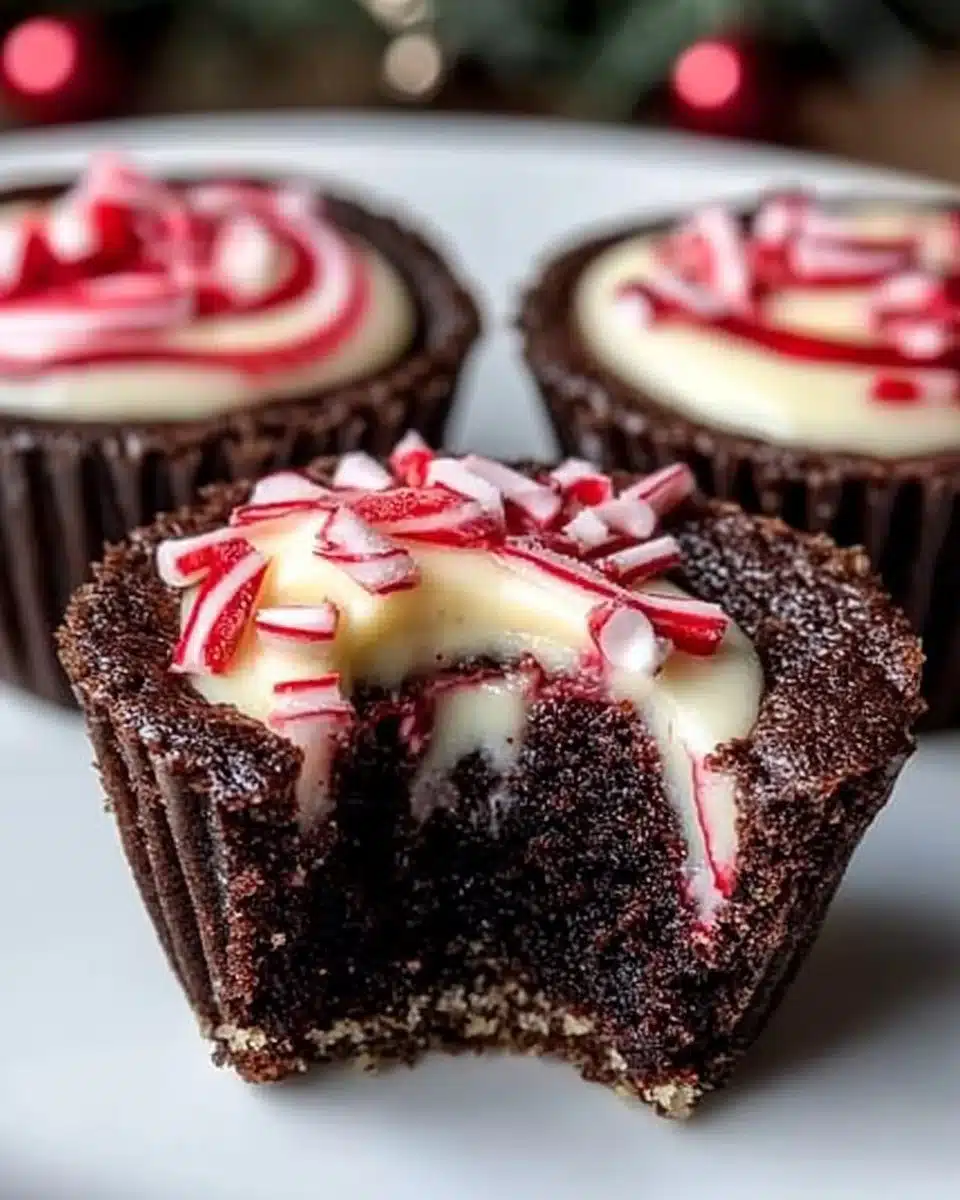
Sprinkle chopped candy canes on top of the chilled cookie cups. Serve immediately or keep refrigerated and consume within 2 to 3 days. The candy cane adds a sharp crunch and a festive color.
For longer storage, freeze without candy cane topping for up to 4 weeks. Thaw in the refrigerator before serving and add fresh candy cane just before you serve. This trick keeps the texture of the candy bright.

Serving Chocolate Peppermint Cookie Cups Recipe With Family Warmth
I like to bring these cookie cups to the table on a simple platter, with a few small napkins folded nearby and a pot of hot cocoa or coffee. The contrast between the warm drink and the cool, creamy filling is a small joy. Place a few whole candy canes on the platter to make it feel like a little holiday vignette.
My children have a habit of choosing the one with the most filling. We make a tiny rule that whoever does the dishes after dessert gets first pick. It is a silly family ritual, but it turns an ordinary dessert into something we all lean toward together. The cookie cups invite that kind of playful giving.
For a party, I tuck them into paper liners and arrange them on tiered trays. A sprinkle of crushed candy cane around the base of each cup looks like a snowy rim. If I have guests who prefer milder mint, I set out a bowl of chopped fresh mint or a small dish of cocoa powder for a light dusting. Little choices like that help everyone feel at home.
When I bring them to a neighbor or a friend, I stack them gently in a box with parchment paper between layers. A short note tucked on top makes the gift feel personal. I write something simple like, enjoy this little bit of our kitchen light. These small gifts have mended bad days and celebrated small wins.
I sometimes pair a batch with a simple cheese board and fruit for a casual brunch. The cookie cups become the sweet anchor next to warm scones and a jug of steaming tea. The pairing is not fancy, but it feels complete. People often tell me the cookie cups were the first thing they reached for.
If you like to lean into other peppermint chocolate ideas, you might enjoy trying a different texture or shape in the same flavor family. For inspiration on how the same flavors shine in a chewier cookie style, check this take on Peppermint Chocolate Chip Cookies which is a nice sibling option when you want a plain tray of cookies instead of filled cups.
Small Tips and Tricks I Learned in My Kitchen
Always let the cookie cups cool enough before you pipe the filling. Warm crumbs will make the filling slide. When you wait, the filling sits and looks neat. Patience makes the difference between a tidy plate and a messy one.
If your cream cheese has lumps, press it through a sieve or beat longer on low speed. A smooth filling feels like silk and tastes fresher. When you fold in the whipped cream, use a spatula and move slowly. Quick mixing will flatten the cream and make the filling dense.
A jar to press the wells can be a plain jam jar or a small glass bottle. I keep a few on the shelf just for this purpose. The straight sides make a clean cup and you get a uniform shape across the batch. My children once used a small wooden spoon by mistake and we loved the irregular look of the cups.
If you need to travel with the cookie cups, freeze them on a tray until firm and then move them to a sturdy box with parchment layers. Thaw them in the fridge at your destination and add candy cane just before serving. This keeps travel from turning them into a gooey mess.
If the peppermint is too strong for someone in your house, reduce the extract to 1/2 teaspoon and add a little vanilla. That softens the mint without losing the idea of the flavor. If you love mint, add an extra drop or two of peppermint after you beat the cream cheese for a brighter lift.
Storing Chocolate Peppermint Cookie Cups Recipe for Tomorrow
Store these cookie cups in a shallow airtight container in the refrigerator for up to 2 to 3 days. The filling keeps its texture best when chilled. If you need to keep them longer, freeze without the candy cane topping and thaw in the fridge when you are ready to eat.
Flavors shift in the fridge in a kind way. The peppermint calms a touch and the chocolate deepens into a quieter, richer note. The cream filling tightens and tastes cleaner after a few hours. I often make them the day before a gathering because the flavor feels more settled and more ready.
When you rewrap them for the fridge, place a sheet of parchment between layers so the filling does not catch on the lid. If you have any leftovers, warm one gently in the microwave for 10 to 12 seconds to soften the cookie a little and make the filling extra dreamy. Do not overheat or the filling will melt.
If you plan to freeze, flash-freeze them on a tray until the filling is firm. Then move them to a freezer box and wrap the box in foil for extra protection. Add fresh candy cane just before serving after thawing in the fridge. This method keeps the texture of the candy crisp.
If you ever find the cookie edge has softened too much in storage, a quick five-minute pop in a 300°F oven will revive the snap. Let them cool fully before adding any topping. This small rescue trick is one I use when I expect guests and want every plate to feel fresh.
Final Notes from My Kitchen
Baking these cookie cups has taught me to trust small routines and to share them with patience. The simple act of stirring, of pressing a well with a jar, of piping a fat swirl, stitches together a small moment of joy. I hope this recipe brings you the same quiet happiness it brings our family.
If you try this recipe, please keep a note of any small change you make. A pinch more salt, a touch less peppermint, a different chocolate will make the recipe yours. That is the real beauty of cooking with people you love.
Print
Chocolate Peppermint Cookie Cups
- Total Time: 45 minutes
- Yield: 24 servings 1x
- Diet: Vegetarian
Description
Delightful chocolate cookie cups filled with a creamy peppermint cheesecake topping, perfect for holiday gatherings.
Ingredients
- 2 cups all-purpose flour
- 1/4 cup Dutch-processed cocoa powder (sifted)
- 1/4 cup black cocoa powder
- 1 tsp baking soda
- 1/2 tsp salt
- 1 cup unsalted butter (room temperature)
- 1/2 cup granulated sugar
- 1 cup light brown sugar (packed)
- 2 large eggs (room temperature)
- 1 tsp vanilla extract
- 1 cup heavy whipping cream (chilled)
- 8 oz cream cheese (full fat)
- 1/2 cup granulated sugar
- 1 tsp peppermint extract
- red color gel (for piping bag decoration)
- candy canes (chopped, for garnish)
Instructions
- Preheat your oven to 350°F (175°C). Spray two regular-sized cupcake tins with cooking spray.
- In a medium bowl, whisk together flour, Dutch-processed cocoa powder, black cocoa powder, baking soda, and salt. Set aside.
- In a large mixing bowl, beat butter, granulated sugar, and light brown sugar until light and fluffy, about 2-3 minutes.
- Add eggs one at a time and the vanilla extract, mixing until incorporated.
- Gradually add the flour mixture, mixing until just combined.
- Portion the dough into prepared muffin tins, pressing slightly to flatten.
- Bake for about 10-13 minutes until edges are set but centers are soft.
- Immediately press down in the center of each cookie cup to create a well for filling.
- Cool in pans for 10 minutes, then transfer to wire racks to cool completely.
- Whip the chilled heavy cream until stiff peaks form.
- In a separate bowl, beat cream cheese, sugar, and peppermint extract until smooth.
- Fold whipped cream into the cream cheese mixture until combined.
- Pipe the cream cheese filling into each cooled cookie cup.
- Refrigerate for 1-2 hours until filling is set.
- Sprinkle chopped candy canes on top before serving.
Notes
For the best flavor, chill the heavy cream before whipping and use room temperature eggs for a more tender dough. Adjust the peppermint extract to taste if desired.
- Prep Time: 30 minutes
- Cook Time: 15 minutes
- Category: Dessert
- Method: Baking
- Cuisine: American
Nutrition
- Serving Size: 1 cookie cup
- Calories: 250
- Sugar: 15g
- Sodium: 150mg
- Fat: 10g
- Saturated Fat: 6g
- Unsaturated Fat: 4g
- Trans Fat: 0g
- Carbohydrates: 30g
- Fiber: 1g
- Protein: 3g
- Cholesterol: 40mg
Keywords: chocolate, peppermint, cookies, holiday desserts, baking


