Perfect party food is portable, beautiful, and reliably delicious — that’s why Mini Christmas Cheesecakes are a holiday must. These bite-sized cheesecakes give you the creamy, tangy satisfaction of a classic cheesecake without the stress of a full-size springform or the awkwardness of slicing. Whether you’re feeding a crowd, prepping ahead for a cookie exchange, or building a dessert platter, mini cheesecakes deliver maximum cheer for minimum fuss.
If you’re already planning sweets for the season, pair these with easy classics like Christmas cookies for a balanced dessert table — soft cookies and creamy cheesecake make a crowd-pleasing combo.
This guide covers everything: why the mini format works, ingredient science, step-by-step baking logic, common mistakes and fixes, creative variations, storage and reheating, nutrition notes, and FAQs. Read through once, then start baking — you’ll be glad you did.
Why Mini Cheesecakes Are the Best Holiday Dessert
Mini cheesecakes solve common holiday pain points:
- Portability: no slicing or plates required.
- Portion control: guests can sample several desserts.
- Make-ahead friendly: they hold up well refrigerated or frozen.
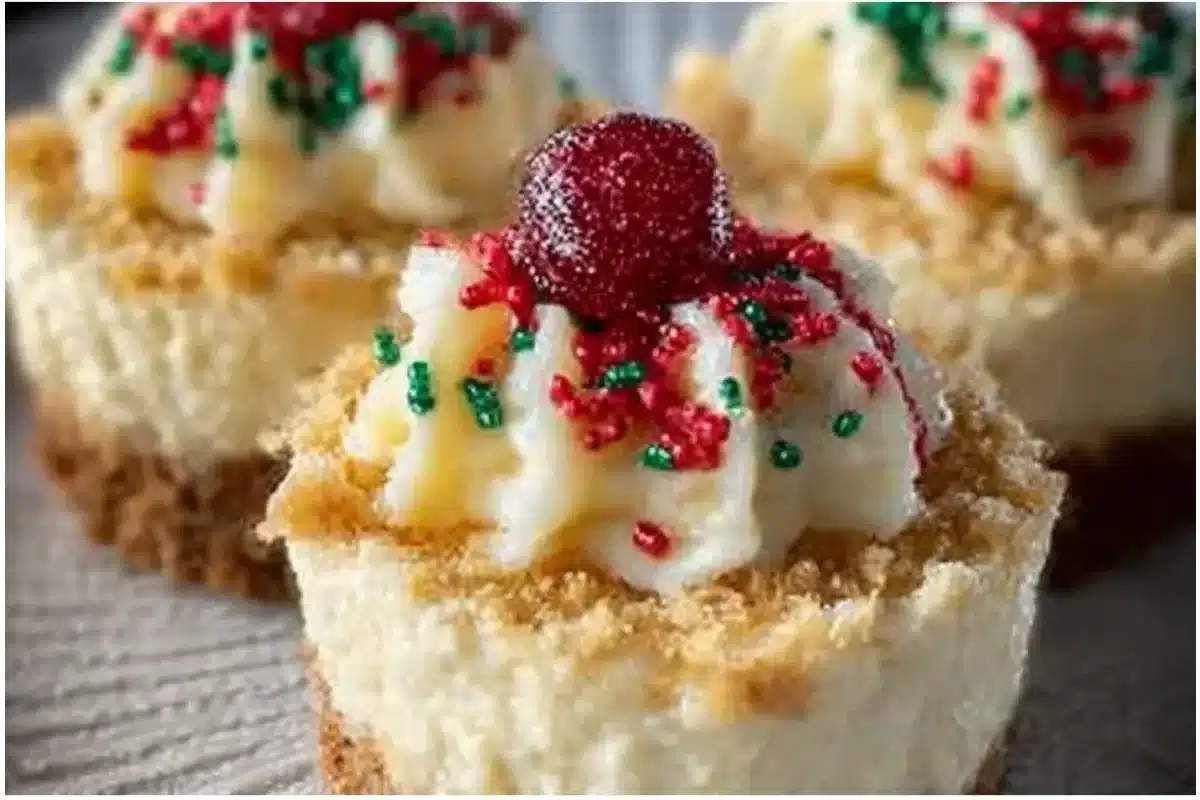
- Visual impact: easily dressed for a Christmas theme using red berries, green pistachios, or white chocolate.
They also increase the odds of consistent results. Full-size cheesecakes can crack, sink, or remain underbaked in the center; the shallow, small format of minis bakes more evenly and finishes faster. The science is simple: smaller mass = shorter bake time = less time for temperature gradients to create cracks.
Print
Mini Christmas Cheesecakes
- Total Time: 85 minutes
- Yield: 24 mini cheesecakes 1x
- Diet: Vegetarian
Description
Delicious bite-sized Mini Christmas Cheesecakes that are perfect for holiday gatherings, combining a creamy filling with a festive crust.
Ingredients
- 2 cups graham cracker crumbs (about 12–14 full crackers)
- 6 tbsp (85g) unsalted butter, melted
- 2 tbsp granulated sugar (optional)
- 24 oz (680g) full-fat cream cheese, room temperature
- 3/4 cup (150g) granulated sugar
- 2 large eggs, room temperature
- 1/4 cup (60g) sour cream or heavy cream
- 1 1/2 tsp vanilla extract
- 1 tsp lemon zest (optional)
- 1 cup fresh cranberries or jam
- 3 tbsp chopped pistachios
- 2 tbsp melted white chocolate for drizzling (optional)
- Mini peppermint pieces or edible gold dust (optional)
Instructions
- Preheat oven to 325°F (160°C). Line two 12-cup muffin tins with paper liners or silicone cups.
- Make the crust: combine graham crumbs, melted butter, and sugar in a bowl. Divide about 1–1 1/2 tbsp of crumbs into each liner and press firmly to form an even base.
- Chill the crusts in the fridge for 10 minutes while you make the filling.
- Make the filling: beat cream cheese on medium speed until smooth (about 2 minutes). Scrape the bowl well.
- Add sugar and mix until combined on low speed. Avoid overbeating.
- Add eggs one at a time, mixing just until incorporated. Finish with sour cream/heavy cream, vanilla, and lemon zest, mixing until smooth.
- Fill crusts: divide filling evenly among liners (about 2–3 tbsp each).
- Bake for 16–20 minutes for standard minis. Centers should be slightly jiggly but not liquid.
- Cool gradually: turn off oven, crack the oven door, and let cheesecakes sit for 20–30 minutes. Then cool completely on a rack.
- Chill: refrigerate for at least 2–4 hours (preferably overnight) to fully set.
- Decorate: add jam or compote, fresh cranberries, pistachios, and drizzle with white chocolate.
Notes
For best results, use room-temperature ingredients and avoid overbeating to prevent cracks.
- Prep Time: 25 minutes
- Cook Time: 20 minutes
- Category: Dessert
- Method: Baking
- Cuisine: American
Nutrition
- Serving Size: 1 mini cheesecake
- Calories: 150
- Sugar: 10g
- Sodium: 200mg
- Fat: 10g
- Saturated Fat: 5g
- Unsaturated Fat: 4g
- Trans Fat: 0g
- Carbohydrates: 14g
- Fiber: 1g
- Protein: 3g
- Cholesterol: 40mg
Keywords: Christmas cheesecake, mini desserts, holiday recipes, bite-sized treats, festive sweets
Ingredient breakdown — what to buy and why it matters
Good desserts start with thoughtful ingredients. Below is a concise breakdown of the components and the role each plays.
Crust
- Graham crackers or digestive biscuits (120–150g): provide structure, toasty flavor, and a contrast to the rich filling. For a nuttier crust use crushed pecans or pistachios.
- Unsalted butter (5–6 tbsp / 70–85g), melted: binds crumbs and adds richness. Salted butter is okay; reduce added salt if used.
- Sugar (1–2 tbsp): optional, brightens the crust flavor.
Baking logic: the crust should be compacted to a uniform thickness — the tighter the packing, the better the bite. Overly loose crumbs lead to crumbly bottoms.
Filling
- Cream cheese (8 oz / 225g per 6–8 mini cheesecakes, use a total of 16–24 oz depending on yield): full-fat cream cheese provides the classic creamy mouthfeel and structure. Low-fat variants can curdle and produce a softer set.
- Granulated sugar (2/3–3/4 cup per 16 oz cream cheese): sweetens and thins the mixture slightly for smoother baking.
- Eggs (1 per 8 oz cream cheese): eggs provide structure and help the filling set. Room temperature eggs mix more evenly.
- Sour cream or heavy cream (2–4 tbsp): adds silkiness and helps prevent cracks. Sour cream gives a slight tang; heavy cream gives richness without extra tang.
- Vanilla extract (1–2 tsp): flavor anchor. Consider using vanilla paste for speckled appearance.
- Lemon zest (optional): brightens and cuts through richness.
Ingredient science: cream cheese contains proteins and fat that coagulate on heating. Overbeating incorporates air, which expands and collapses in the oven causing cracks. Gentle mixing and room-temperature ingredients reduce this risk.
Toppings (choose one or combine)
- Fresh cranberries or pomegranate arils: color and tartness.
- Raspberry or strawberry compote: classic pairing.
- Melted white or dark chocolate: festive drizzle.
- Crushed candy cane or peppermint bark: seasonal crunch.
- Chopped pistachios: green accent and nutty flavor.
Toppings add texture and visual cues. If you use high-moisture sauces (fruit compote), store separately until serving to avoid soggy crusts.
Tip: If you love bar-style baked treats, a sturdy shortbread or dense graham crust reminiscent of Christmas bars translates well to minis when you want a richer base.
Equipment and essential technique
You don’t need a specialized pan, but these items make the job easier:
- Standard 12-cup muffin tin or a mini cheesecake pan (24–36 cavity).
- Paper liners or silicone cups (liners make cleanup easier; silicone avoids condensation).
- Electric mixer (stand or hand) — a whisk attachment or paddle is preferred. A little elbow grease works, but you’ll spend longer for a perfectly smooth filling.
- Measuring tools and a rubber spatula.
- A shallow pan for a water bath (optional).
- Cooling rack.
Baking logic: a water bath (bain-marie) reduces temperature swings and prevents cracking by creating moist, gentle heat. The minis’ small size often bakes smoothly without a water bath, but for silky top texture and to minimize browning, wrap the muffin tin in foil and place it inside a larger pan with hot water halfway up the tin.
Step-by-step method — foolproof mini cheesecake recipe
This recipe yields about 24 small cheesecakes (using a standard 12-cup muffin tin × 2 batches — adjust quantities if using a 24-cavity pan).
Recipe Card:
- Yield: ~24 mini cheesecakes
- Prep time: 25 minutes (plus 30 minutes chilling)
- Cook time: 16–20 minutes per batch
- Total time: 1 hour (active) + chilling
Ingredients
- For the crust:
- 2 cups graham cracker crumbs (about 12–14 full crackers)
- 6 tbsp (85g) unsalted butter, melted
- 2 tbsp granulated sugar (optional)
- For the filling:
- 24 oz (680g) full-fat cream cheese, room temperature
- 3/4 cup (150g) granulated sugar
- 2 large eggs, room temperature
- 1/4 cup (60g) sour cream or heavy cream
- 1 1/2 tsp vanilla extract
- 1 tsp lemon zest (optional)
- For topping:
- 1 cup fresh cranberries or jam
- 3 tbsp chopped pistachios
- 2 tbsp melted white chocolate for drizzling (optional)
- Mini peppermint pieces or edible gold dust (optional)
Instructions
- Preheat oven to 325°F (160°C). Line two 12-cup muffin tins with paper liners or silicone cups.
- Make the crust: combine graham crumbs, melted butter, and sugar in a bowl. Divide about 1–1 1/2 tbsp of crumbs into each liner and press firmly to form an even base (use the bottom of a shot glass to compact).
- Chill the crusts in the fridge for 10 minutes while you make filling — this helps them hold together.
- Make the filling: beat room-temperature cream cheese on medium speed until smooth and no lumps remain (about 2 minutes). Scrape the bowl well.
- With the mixer on low, add sugar and mix until combined. Do not overbeat.
- Add eggs one at a time, mixing just until incorporated. Finish with sour cream/heavy cream, vanilla, and lemon zest; mix until smooth and glossy. Stop as soon as mixture is homogenous.
- Fill crusts: divide filling evenly among liners (about 2–3 tbsp each) — filling should come nearly to the top but not overflow.
- Bake: place muffin tin(s) on the middle rack. Optionally create a water bath by placing tins in a larger pan and pouring boiled water until it reaches halfway up the outside of the muffin tin. Bake for 16–20 minutes for standard minis, or 10–14 minutes for very small (1-inch) cavities. Centers should be slightly jiggly but not liquid.
- Cool gradually: turn off oven, crack the oven door, and let cheesecakes sit for 20–30 minutes to reduce shock. Then remove from oven and cool completely on a rack.
- Chill: refrigerate at least 2–4 hours (overnight preferred) to fully set.
- Decorate: spoon a teaspoon of jam or compote onto each cheesecake, gently press a few fresh cranberries, sprinkle pistachios, and drizzle white chocolate. Add finishing touches like mini candy canes for extra festivity.
Real cooking insight: The telltale sign of doneness is the “mooneness” of the center — it should wobble slightly while the outer 1/4–1/3 is set. If you fully set the center, you’ll end up with a dry, dense texture.
Tips, pro advice, and mistakes to avoid
- Room temperature ingredients: Let cream cheese and eggs sit on the counter for 30–60 minutes. Cold cream cheese requires much more beating, which introduces air.
- Avoid overbeating: Once the cream cheese is smooth, add other ingredients on low speed and finish by hand-folding if necessary. Overbeating pulls in air bubbles that expand and pop during baking, causing cracks.
- Don’t bake at too high a temperature: High heat causes doming and cracking. Stick to 325°F (160°C) for minis.
- Use a water bath for perfectionists: Even for minis, a shallow water bath improves texture.
- Protect liners from condensation: If using paper liners and you plan to freeze, wrap each cake in plastic wrap to prevent soggy liners.
- Test a single mini if using a new tin: Oven temperatures vary and pan materials differ. Bake a single test cupcake to determine optimal time before baking the whole batch.
- Remove cheesecakes gently: Allow complete chilling before removing liners; they’ll pop out cleanly if properly set.
Common mistakes:
- Using low-fat cream cheese: yields watery filling that doesn’t set well.
- Filling too high: overflow during baking creates a mess and uneven tops.
- Skipping the chill: cutting into warm cheesecake ruins the shape and texture.
Variations and swaps — make them your own
Mini cheesecakes are an adaptable canvas. Here are festive variations and practical swaps.
- Peppermint swirl: fold 2–3 tbsp crushed candy cane into the filling or swirl peppermint-flavored ganache on top after baking.
- Pistachio cranberry: replace 1/3 of crust crumbs with finely chopped pistachios and top with chopped toasted pistachios for crunch.
- Chocolate peppermint: use chocolate cookie crumbs (Oreos or chocolate wafers) for the crust and swirl white chocolate on top.
- Eggnog cheesecake: replace 2 tbsp of sour cream with 2 tbsp of eggnog and sprinkle nutmeg on top.
- No-bake version: use gelatin (per package instructions) and chill until set — great for when oven space is limited.
- Topping inspiration: crushed brittle, toasted coconut, or a quick nut praline add interesting textures. For a salty-sweet kick, sprinkle a few flakes of sea salt on chocolate-topped minis.
If you love crunchy, candy-like toppings, try a peppermint “brittle” inspired approach from Christmas Crack to create shards that crown your minis for eye-catching contrast.
Make-ahead, storage, and freezing
Mini cheesecakes are one of the most forgiving make-ahead desserts.
Short-term storage:
- Refrigerate in an airtight container for up to 5 days. Place a layer of parchment between tiers if stacking.
- For the freshest texture, store plain (no high-moisture toppings) and add fruit or sauces just before serving.
Freezing:
- Fully set cheesecakes freeze exceptionally well. Flash-freeze on a tray until firm (1–2 hours), then transfer to a sealed freezer bag or container. Properly wrapped, they keep for up to 3 months.
- Thaw overnight in the refrigerator. Add delicate toppings like whipped cream, fresh berries, or candied nuts after thawing.
Reheating:
- Cheesecakes are best served cold or at cool room temperature. If you prefer slightly warmer filling, bring to room temperature for 20–30 minutes. Avoid microwaving — it will change texture. For a warm topping, gently warm compote separately and spoon onto the chilled mini prior to serving.
Pro tip: Freeze extras individually between parchment layers for grab-and-go portions for holiday guests or as host gifts.
Nutrition insights and portion considerations
Mini cheesecakes are rich — that’s intentional. If you’re watching portions or calories, the mini format helps control intake. Approximate nutrition per mini (assuming 24 yield, plain with graham crust):
- Calories: 120–170 kcal
- Fat: 8–12 g
- Carbohydrates: 10–15 g
- Protein: 2–4 g
Nutrition variables:
- Using low-fat cream cheese lowers calories but affects texture.
- Switching to a nut crust increases healthy fats and may lower carbohydrate count.
- Choosing sugar substitutes or lower-sugar fruit toppings can reduce carbs, but be mindful of aftertastes and baking behavior — some sugar alternatives can alter the set of the filling.
For a lighter option, try topping with Greek yogurt sweetened with a touch of honey and lemon instead of heavy compote — it brightens flavor and boosts protein (see our notes on Greek yogurt nutrition for comparisons).
Presentation and serving ideas
- Dessert board: arrange minis with cookies, nuts, and fruit for a festive grazing board.
- Single-serve gifts: place two or three minis in a small clear box and tie with ribbon.
- Layered trifle: crumble a few minis and layer with whipped cream and berry compote for a quick trifle variation.
- Coffee pairing: pairing with coffee is classic — try flavored lattes or a citrusy black tea to cut richness.
If you’re building a dessert spread, balance flavors and textures. Combine these minis with chewy items (cookies) and crunchy candies for contrast.
Frequently Asked Questions (FAQ) — schema-ready
Q: How long do mini cheesecakes need to chill before serving?
A: Chill at least 2–4 hours, but overnight is best. Cooling fully ensures the filling firms and flavors meld.
Q: Can I use reduced-fat cream cheese?
A: You can, but expect a softer texture and less rich mouthfeel. Low-fat versions sometimes weep; increase chilling time and consider adding 1 tbsp of gelatin dissolved in warm water if you need a firmer set.
Q: Do I need a water bath for mini cheesecakes?
A: Not strictly necessary, but a shallow water bath improves texture and reduces browning. For reliable results, wrap the tin in foil and place it in a larger pan with hot water to create a gentler baking environment.
Q: Why did my mini cheesecakes crack?
A: Cracks are usually the result of overbeating (too much air), too-high oven temperature, or sudden cooling. Mix gently, bake at lower heat, and allow gradual cooling in the turned-off oven with the door ajar.
Q: Can I make these gluten-free?
A: Yes — use gluten-free graham crackers or substitute almond flour mixed with melted butter for the crust. Adjust pressing and bake time slightly.
Q: Are mini cheesecakes freezer friendly?
A: Yes. Flash-freeze and store in airtight bags for up to 3 months. Thaw in the refrigerator overnight.
Q: What’s the best way to remove mini cheesecakes from liners?
A: Refrigerate until firm. Then carefully peel the paper liner away. Silicone cups may release easier but can trap condensation — handle gently.
Q: How can I make egg-free or vegan mini cheesecakes?
A: Make a no-bake vegan cheesecake using blended silken tofu or cashew cream with agar-agar as a setting agent, or use commercial vegan cream cheeses and a stabilizer. These will be denser and may require chilling longer.
Serving sizes, scaling, and timing for parties
Plan for 1–2 minis per guest as part of a larger dessert selection; 3–4 per guest if minis are the only dessert. They’re ideal for buffets because guests can mix and match.
To scale:
- Double the recipe for larger batches, but bake in separate pans to maintain consistent baking times.
- If using a 24-cavity pan, halve or double mixing times based on your chosen yield.
Make-ahead schedule:
- Bake 2 days ahead and refrigerate.
- Freeze extras 3 weeks ahead and thaw the night before.
- Prepare toppings the day of to keep fruit fresh and prevent soggy crusts.
Frequently overlooked finishing touches that elevate minis
- Edible glitter or gold dust on white chocolate drizzle for holiday sparkle.
- Toasted citrus zest to cut richness.
- A tiny sprig of rosemary or microgreens for a pine-like accent — be cautious, as rosemary can be overpowering.
- Light sprinkle of flaky sea salt on chocolate-topped minis to enhance chocolate flavor.
Additional recipes and inspiration
If you’re assembling a holiday dessert table, consider balancing mini cheesecakes with other textures and flavors. Shortbread and butter cookies work well alongside these minis. For crunchy, salty complements and more seasonal ideas, explore our take on quick, salty-sweet snacks and other festive desserts.
For a cookie-and-cheesecake pairing that’s crowd-pleasing, our Christmas cookies collection offers many shapes and flavors that complement these cheesecakes.
Final thoughts
Mini Christmas Cheesecakes are an approachable, elegant, and make-ahead-friendly addition to your holiday repertoire. With straightforward ingredients, simple technique adjustments, and festive finishes, they deliver consistent results and wow visually. The mini format reduces stress and increases variety — everyone gets a perfect bite every time.
Conclusion
If you want to add a whimsical twist to your holiday baking, try decorating with tiny Santa hats — this idea is beautifully captured in the Mini Santa Hat Cheesecakes tutorial. For further inspiration on festive mini cheesecakes and decorating techniques, see this Mini Christmas Cheesecake (Perfect Festive Treats) guide.
Mini Santa Hat Cheesecakes: https://www.bakedbyrachel.com/mini-santa-hat-cheesecakes-mini-cheesecake-pan-giveaway/
Mini Christmas Cheesecake (Perfect Festive Treats): https://decoratedtreats.com/mini-christmas-cheesecakes.html
Enjoy baking, sharing, and making memories — and don’t forget to save this recipe for next year or share it with a friend who needs a reliable holiday dessert.
If you’d like, I can format this recipe as a printable card, convert quantities for different pan sizes, or create a gluten-free or vegan version with exact ingredient swaps. Which would you prefer?


