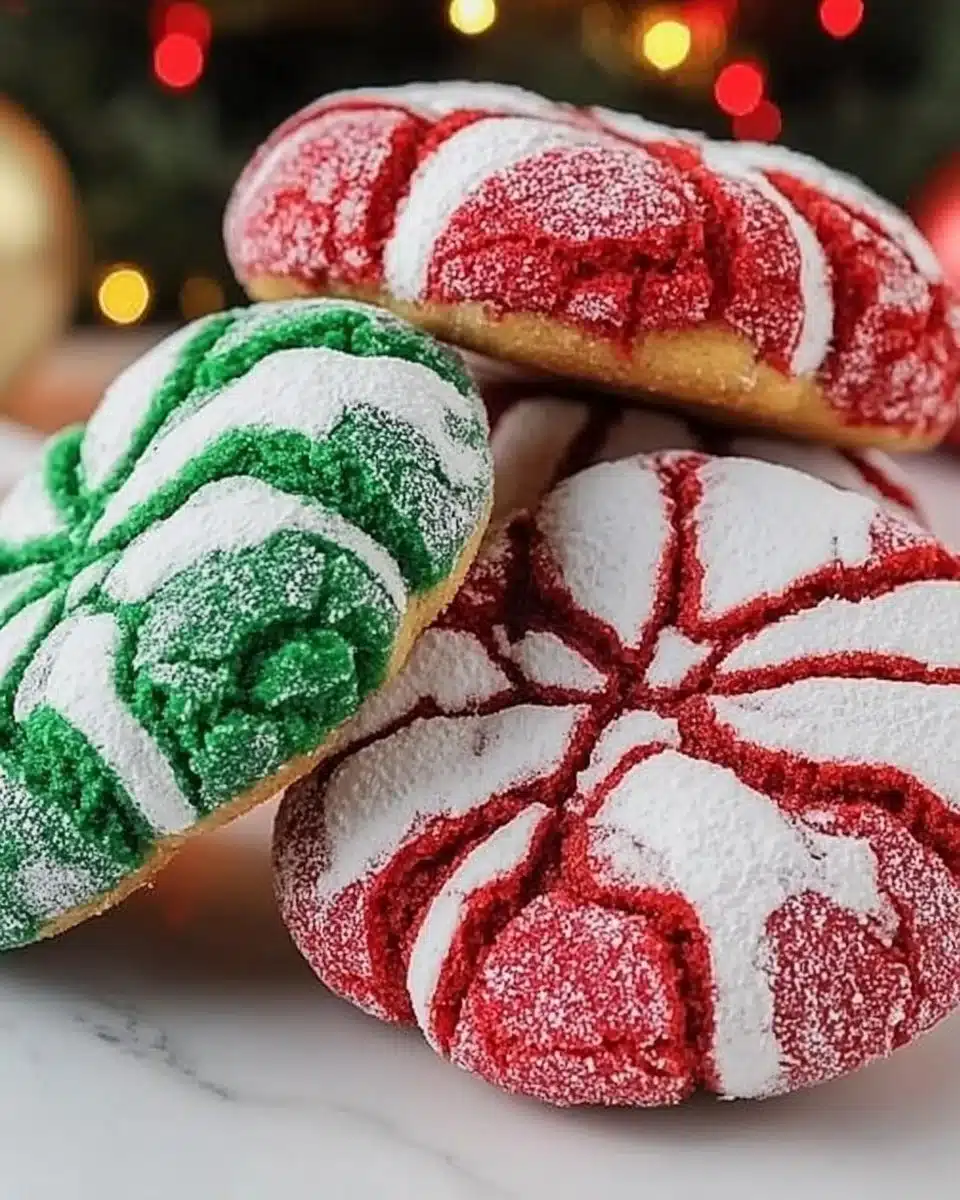
The smell of sugar and butter curling through the house, the soft crackle of powdered sugar under my fingertips, and the sight of tiny red and green domes lined up like little holiday lanterns on the baking sheet—this is the moment I think of when I make Christmas Crinkle Cookies (Red & Green). I remember my kids pressing their noses to the oven window, breath fogging the glass, while I hummed an old carol and rolled dough into perfect, imperfect balls. Those small, warm moments are what I want you to feel in your kitchen when you bake these cookies.
Why This Christmas Crinkle Cookies (Red & Green) Means So Much
These cookies came to our house the way most traditions do—slowly, lovingly, and with a little help from a well-loved box. I first made this version on a rainy December afternoon when time was short and the kids needed something to unwrap joy from. The simple white cake mix base makes them forgiving, and the red and green colors make every batch smile like holiday lights.
They are the kind of cookie you can make with a sleepy morning and a cup of tea, or with a loud living room full of cousins and a game on the table. Every batch carries the memory of small hands dusting sugar and a grandmother telling a quiet story between stirs. If you like trying new cookie ideas around the holidays, you might enjoy my festive cookie collection which has a handful of family favorites we rotate through.
What matters to me is the way food holds memory. These cookies are both practical and tender. They are fast enough for last-minute trays, but pretty enough to share with neighbors. The colorful crinkle top feels like a holiday wink, and when someone takes the first bite, their face softens. That little moment—the soft center, the powdered sugar on the lip—becomes a story we tell again.
The Story Behind Our Favorite Christmas Crinkle Cookies (Red & Green)
A few years back I made a batch for a school party. I colored half the dough red and half green, and the kids insisted I make stripes by arranging balls of both colors together. It was messy and giggly, and the cookies came out just a bit swirled. Those cookies disappeared first and the teacher wrote a note asking for the recipe. That’s when I realized how little effort it takes to make something that makes other people feel cared for.
I love how approachable these cookies are. You do not need to be an expert to make them look and taste wonderful. They are forgiving—if your oven runs hot or your timing slips a little, they still come out soft and festive. If you love playful holiday baking, you might also enjoy the bright twist of pinwheel cookies for another cheerful option.
Making them has become a small family ritual: mixing, dividing, coloring, and sealing the bowls with plastic wrap. It is the rhythm of the kitchen—measuring, scraping, whispering little jokes about how the dough never stays in one bowl—that makes the cookies part of our life, not just a recipe.
Bringing Christmas Crinkle Cookies (Red & Green) Together
“Every time I stir this pot, it smells just like Sunday at home.”
The process is simple and steady, like an easy song. You begin with a pale, grainy mound of cake mix and add eggs and oil until it becomes a thick, slightly glossy dough. When you split it into two bowls and drop a dab of gel coloring into each, the dough takes on those red and green notes like ornaments settling into a tree.
As you roll the balls, you will feel the dough warm a bit from your hands. When you dip them into powdered sugar, watch how the sugar clings in a soft cloak. The oven brings everything together; you will know they are ready when the tops crack and the edges set, while the centers keep a tender, almost pillowy feel. If you love a different spiced note, try a ginger-scented batch next time—my take on gingerbread crinkle cookies uses the same friendly approach but with warm spices.
These cookies are about texture as much as color. The contrast between the powdered sugar crust and the soft interior makes every bite worth it. You will feel proud pinching that first cookie apart and watching the soft center give way.
Ingredients You’ll Need
1 box white cake mix (13.25 oz)
2 large eggs
1/3 cup vegetable oil
1/3 cup powdered sugar (for coating)
Red gel food coloring
Green gel food coloring
A few warm side notes while you gather things: a little extra vanilla if you love a cozy aroma, a splash of almond extract when you want a softer nutty note, and fresh butter for contrast if you swap part of the oil for butter in future tries. Keep everything at hand before you start; when the kitchen fills with the smell of baking, you will want to move without stopping.
Step-by-Step Directions
In a large mixing bowl, combine the white cake mix, eggs, and vegetable oil. Stir until the dough comes together, glossy and thick, and the cake mix is fully moistened.
Mix until a smooth, thick dough forms. Use a wooden spoon or a sturdy spatula and scrape the edges of the bowl so nothing is left behind, and breathe in the warm, sweet scent.
Split the dough into two equal portions. I use a bench scraper and an eye for evenness; this is where the red and green take their separate stages.
In separate bowls, color one batch red and the other green with gel food coloring. Add a little at a time until the color sings, and fold until the hue is even.
Mix well until colors are vibrant and even. The dough should be smooth and fully colored, with no streaks left, and it will look like little ornaments in their bowls.
Cover bowls with plastic wrap. Tuck them into the fridge so the dough firms up and is easier to roll, and the colors will set while you tidy the counters.
Refrigerate for 30 minutes to firm the dough. This short rest makes a big difference when you roll the balls; cooler dough handles beautifully and makes neater cookies.
Preheat oven to 375°F (190°C). Give the oven enough time to reach temperature so the cookies bake evenly from the moment they meet the heat.
Line baking sheet with parchment paper or a silicone mat. I like silicone for easy release and even browning; parchment works perfectly too.
Scoop 1 tbsp portions and roll into balls. Use a small scoop for consistent sizing, and roll between your palms until they are smooth and round.
Roll each ball generously in powdered sugar until fully coated. The sugar gives that lovely snowy look and creates the crinkle effect as the dough expands.
Arrange dough balls 2 inches apart on baking sheet. Give them room to breathe so they can spread without touching and form those beautiful cracks.
Bake for 9-11 minutes until cookies are crinkled and set around the edges. Keep an eye on them; you will see the tops crack and the edges firm up while the centers stay soft.
Do not overbake – centers should remain soft. Remove them as soon as the edges are set and the tops have that signature crinkle.
Let cookies rest for 2-3 minutes on the baking sheet. This short pause lets them finish gently and keeps the bottoms from getting too crisp.
Transfer to wire rack to cool completely before serving or storing. Cooling on a rack prevents steam from making the bottoms soggy and keeps the texture just right.
Optional Add-ins:
- Add 1/2 cup mini chocolate chips to the dough for a little chocolate surprise in every bite. Fold them in gently so the colors stay bright.
- Stir in 1/4 teaspoon almond extract for a soft, nutty lift to the plain cake flavor. A little goes a long way.
- Mix 1/2 cup chopped pistachios into the green dough for a nutty crunch and a deeper green tone. The nuts add texture and a lovely contrast.
 18")
Serving Christmas Crinkle Cookies (Red & Green) With Family Warmth
We set these out on a simple plate, sometimes layered with a doily when guests are coming, and sometimes straight from the rack when the kids are home from school. They fit into any holiday table: with hot cocoa, on a cookie platter, or tucked into a lunchbox for a sweet surprise.
For a small tradition, I place a few on each plate at family brunch and let everyone guess which color tastes sweeter. It is a gentle game that always brings laughter. If you want a festive pairing, serve them with warm milk or a strong black coffee; the sugar and softness play nicely against a more bitter drink.
If you are making a gift box for neighbors, wrap stacks of three in parchment and tie with twine. I add a sprig of rosemary or a cinnamon stick for a fragrant, homey touch. For another seasonal spin, line a tin with tissue and add a batch of candy cane cookies to make a mixed holiday tin that everyone will cheer for.
Storing Christmas Crinkle Cookies (Red & Green) for Tomorrow
Store cooled cookies in an airtight container at room temperature. They will stay soft and lovely for 3 to 4 days if kept away from heat and humidity.
If you need them to last longer, freeze the cooled cookies in a single layer on a tray until firm, then transfer to a freezer-safe bag. They will keep well for up to 3 months, and thaw gently on the counter when you are ready.
To refresh slightly stale cookies, warm them in a 300°F oven for 5 minutes and let them cool for a minute before serving. The warmth brings back the tender center and brightens the powdered sugar crust.
If you are stacking them in a container, place a sheet of parchment between layers to keep them neat. A note for hosts: labels that name the cookies and the date help avoid mystery treats in the pantry later on.
Tips, Troubleshooting, and Little Tricks
If your dough feels tacky and too soft to roll, chill it a bit longer. Cold dough rolls more cleanly and makes rounder cookies.
If the color is not vibrant enough, use gel food coloring rather than liquid. Gel gives deeper color without changing dough texture.
If cookie edges brown too fast, your oven might run hot or the rack may be too high. Rotate the pan and lower the rack for a more even bake.
For uniform cookies, use a small scoop. Consistent size means even baking and a neat tray of matching cookies.
If your powdered sugar melts into the tops during baking, make sure the dough is not overly oily. A quick chill helps the sugar cling without dissolving.
For a crispier edge, bake 1 to 2 minutes longer; for a softer cookie, keep the shorter bake time and let them set on the pan.
Ways to Make This Recipe Your Own
Add a hint of orange zest to the red dough for a citrus-twisted bite. The bright flavor cuts through the sweetness and feels festive.
Fold in finely chopped nuts to the green dough for crunch. Pistachios or walnuts both bring warmth.
Make a marbled version by gently pressing a small piece of red and green dough together and rolling into balls. The swirl looks joyful and rustic.
Try a little colored sugar on top instead of powdered sugar for a sparkly finish. It gives a different texture and a fun sheen.
If you prefer a slightly richer cookie, swap 1/4 cup of the oil for melted butter and chill until firm. Butter deepens the flavor and gives a whisper of caramel as the edges brown.
Baking with Kids and Small Helpers
I invite my children to help with the fun parts: coloring, rolling, and the powdered sugar bath. Younger kids love shaking their hands instead of rolling to make flour-dusted palms and giggly crumbs.
Use smaller cookie scoops for little hands to practice measuring. If you have very young helpers, put extra cookie sheets on hand for the inevitable playful squishes.
Turn the afternoon into a lesson in patience and rhythm. Let a child time the fridge rest and count aloud, and celebrate the quiet victory when the first tray goes into the oven.
Teach a simple kitchen safety rule: hot pans need adult hands. Hold their attention with a little story about why cookies need space to grow. They will remember the tale and the sugar on their fingers.
Gift Ideas and Party Presentation
Wrap a stack of cookies in a clear box with a ribbon and a handwritten note. It feels like a small ceremony of kindness.
Make a cookie plate with mixed colors, green and red alternating. It looks like a string of edible lights and invites people to take one.
For a party, place cookies on tiered stands with small labels. Add sprigs of rosemary as garnish; it looks festive and gives a clean scent to the table.
If you bring them to a potluck, pack cookies flat in a tin lined with parchment. Add a sheet on top so they stay dust-free and ready for passing around.
FAQ: Common Questions Answered
Q: Can I use a different cake mix?
A: Yes. A yellow or vanilla cake mix works fine, though white cake mix keeps the colors true and bright.
Q: Can I make them without powdered sugar?
A: You can roll them in granulated sugar, but powdered sugar gives the classic crinkle look and a soft exterior.
Q: Is there a gluten-free option?
A: There are gluten-free cake mixes that will work similarly. Follow the package directions and keep an eye on texture.
Q: Why do my cookies spread too much?
A: Check the dough temperature and oven heat. Chilling the dough and making sure the oven is not too hot helps control spread.
Q: How do I prevent cracking too much?
A: Cracks are part of the charm. If you want fewer cracks, press the tops slightly before baking. Still, a soft crackle is what gives crinkle cookies their character.
Small Celebrations and Big Gatherings
For small family evenings, plate a few cookies with a mug of warm milk and a folded storybook. The simplicity of that tray becomes a new small ritual.
For larger gatherings, make multiple batches and set up a cookie station where guests can choose red, green, or mixed. Add a little note with ingredients for those with allergies and a cheerful sign that says something like, “Take one for the road.”
When I host, I tuck a couple of cookies into each guest’s napkin. It is a quiet, personal touch that makes people laugh and feel noticed.
A Final Note from My Kitchen to Yours
Baking these Christmas Crinkle Cookies (Red & Green) is about more than the cookie. It is about the soft, shared moments that become the backbone of family life. Whether you make them for a neighbor, a school party, or a slow winter morning, I hope they bring that small warmth into your day.
Conclusion
If you want a classic reference or another take on this festive treat, you can compare notes with this lovely recipe for Christmas Crinkle Cookies which inspired many home bakers and helped shape how I think about color and texture in holiday baking.
Print 19")
Christmas Crinkle Cookies (Red & Green)
- Total Time: 41 minutes
- Yield: 24 cookies 1x
- Diet: Vegetarian
Description
Festive red and green cookies that bring warmth and joy to holiday gatherings. Easy to make and visually delightful.
Ingredients
- 1 box white cake mix (13.25 oz)
- 2 large eggs
- 1/3 cup vegetable oil
- 1/3 cup powdered sugar (for coating)
- Red gel food coloring
- Green gel food coloring
Instructions
- In a large mixing bowl, combine the white cake mix, eggs, and vegetable oil. Stir until the dough is glossy and thick.
- Split the dough into two equal portions.
- Color one batch red and the other green with gel food coloring.
- Cover bowls with plastic wrap and refrigerate for 30 minutes to firm the dough.
- Preheat oven to 375°F (190°C) and line a baking sheet with parchment paper.
- Scoop 1 tablespoon portions and roll into balls, then coat in powdered sugar.
- Arrange dough balls 2 inches apart on the baking sheet.
- Bake for 9-11 minutes until cookies are crinkled and set around the edges. Let cookies rest for 2-3 minutes before transferring to a wire rack to cool.
Notes
Add chocolate chips or nuts for extra flavor. Store in an airtight container for up to 4 days.
- Prep Time: 30 minutes
- Cook Time: 11 minutes
- Category: Dessert
- Method: Baking
- Cuisine: American
Nutrition
- Serving Size: 1 cookie
- Calories: 150
- Sugar: 12g
- Sodium: 150mg
- Fat: 6g
- Saturated Fat: 1g
- Unsaturated Fat: 5g
- Trans Fat: 0g
- Carbohydrates: 22g
- Fiber: 0g
- Protein: 2g
- Cholesterol: 20mg
Keywords: Christmas cookies, holiday baking, festive treats


