Holiday baking should be joyous, not stressful. If you’ve ever tried to make meringues and ended up with weepy blobs, sticky middles, or cracked disasters, this Christmas Tree Meringues Recipe is written to fix that. I’ll walk you through the simple ingredients, the science that makes meringues work, pro piping and assembly techniques, and reliable ways to make beautiful, crunchy meringue trees every time.
This recipe is designed for home bakers who want a festive dessert that’s elegant, gluten-free, transportable, and great for gift tins. It’s approachable for beginners but includes chef-level tips so even experienced cooks can upgrade presentation and shelf life.
Quick pairing idea: press a few of these into your holiday cookie box next to something salty-sweet like Christmas Crack for contrast.
What you’ll learn in this guide
- What meringue is and why technique matters
- Ingredient breakdown and substitutions with their effects
- Exact, step-by-step method for piped tree meringues and assembly
- Pro tips, troubleshooting, and humidity fixes
- Variations (chocolate, matcha, Italian meringue) and serving ideas
- Storage, shelf life, nutrition, and FAQs
What Are Christmas Tree Meringues — and why this recipe works
Meringue is whipped egg whites and sugar. The air you trap in egg whites is stabilized by proteins (mainly ovalbumin) that form a flexible network when you beat them. Sugar dissolves into the matrix, adds sweetness, and—critically—helps the structure hold during baking. Low, slow baking removes moisture and dries the meringues into crisp shells.
This Christmas Tree Meringues Recipe uses classic French meringue (whipped egg whites with granulated or caster sugar) piped into triangular “tree” layers and dried slowly. The method balances easy technique with reliable results. If you live in humid climates or need ultra-stable meringues for decorations, read the Italian meringue variation below.
Chef note: For piping tall, layered tree shapes, you want sturdy, glossy stiff peaks—not overbeaten, dry-crumbly whites. This guide explains how to hit that sweet spot.
Ingredient breakdown — what each item does (and smart swaps)
Egg whites (room temperature, fresh or slightly aged): The core structure. Room-temperature whites whip faster and to a higher volume. Slightly older eggs (a few days) are easier to whip because the albumen becomes less viscous. Use large eggs for predictable results.
Granulated sugar or caster (superfine) sugar: Stabilizes and sweetens. Superfine sugar dissolves faster and gives a silkier meringue; granulated works if you beat longer or pulse in a food processor to make it finer. For the highest gloss and stability, use caster or superfine sugar.
Acid (cream of tartar or white vinegar or lemon juice): Lowers the pH to help proteins unfold and stabilize the foam. Use 1/8 to 1/4 teaspoon per 2–3 egg whites. Cream of tartar is the traditional choice; vinegar works in a pinch.
Vanilla extract or other extracts (almond, peppermint): Flavoring. Add a small amount so it doesn’t affect the foam stability.
Cornstarch (optional, for stability): A pinch (1/8 tsp) helps absorb any residual moisture for a drier crumb—useful if you plan to sandwich meringue halves or store in less-than-perfect conditions.
Food coloring and powdered colors: Gel or powdered coloring is best because liquid coloring can deflate whites. If using color, add a drop into the whipped meringue and fold quickly but carefully.
Decorations (chocolate, sprinkles, edible gold dust, sugar pearls): Add after the meringues are piped or immediately after baking while slightly warm depending on the decoration.
Why not yolks? Fat from egg yolks prevents whipping. Even a trace of yolk or oil on your bowl/whisk will stop whites from reaching stiff peaks—cleanliness matters.
Smart swaps and dietary notes
- Sugar alternatives: Erythritol and other sugar alcohols don’t always dissolve or caramelize like sucrose; results vary. For classic crisp meringue, stick with sugar.
- Stabilizers: If you want to make a marshmallow-like interior or frostable product, use an Italian meringue (cooked syrup) — more on that below.
- Vegan option: Aquafaba (chickpea brine) can be whipped to mimic meringue, but ratios and drying behavior differ. Not covered in depth here.
Related inspiration: if you’re building a holiday dessert spread, add international flair by pairing small meringues with light treats — check out 30 Easy Japanese Recipes for delicate palate-pleasing sweets to serve alongside.
Recipe card — Christmas Tree Meringues Recipe
Yield: about 24 small tree meringues (6 trees made of 4 stacked layers)
Prep time: 25 minutes (active) + 1 hour drying time (oven)
Cook/dry time: 1 hour 15 minutes to 2 hours (depending on size and oven)
Total time: approximately 2–3 hours (including cooling/drying)
Ingredients
- 4 large egg whites (room temperature)
- 1 cup (200 g) superfine (caster) sugar
- 1/4 tsp cream of tartar (or 1/2 tsp white vinegar)
- 1 tsp pure vanilla extract
- Pinch of fine salt
- Green gel food coloring (optional)
- Melted dark or white chocolate for assembly (optional)
- Small decorations: sugar pearls, edible glitter, sprinkles (optional)
Equipment
- Stand mixer with whisk or large electric hand mixer
- Large stainless steel or glass mixing bowl (no plastic)
- Piping bag with star tip (Wilton 1M or closed star) and round tip for trunk, optional
- Baking sheets and parchment paper or silicone mats
- Cooling rack
Method (brief; full step-by-step follows)
- Preheat oven to 200°F (95°C) or lowest setting. Line trays.
- Whip room-temperature whites with cream of tartar to soft peaks. Add sugar slowly until glossy stiff peaks. Add vanilla and color.
- Pipe concentric triangle layers for each tree (or pipe discs to stack). Bake on low to dry for 60–120 minutes. Turn oven off and cool in oven.
- Assemble trees using melted chocolate as “glue”, decorate.
Nutrition estimate per small tree (one assembled tree made of 4 layers): ~150–200 kcal — mostly from sugar; low fat; no gluten.
Step-by-step method — the chef’s workflow
- Prep and mise en place
- Separate eggs cold for easier separation, then bring whites to room temperature for 20–30 minutes. Keep yolks for custards or mayonnaise.
- Clean and dry your mixing bowl and whisk—wipe with a paper towel dampened with white vinegar if you suspect oil. Do not use plastic bowls if possible—they retain grease.
- Preheat and position
- Preheat oven to 200°F (95°C) or your oven’s lowest setting; if you have a convection option, you can use it to help dry more evenly. Line baking sheets with parchment or silicone mats. If you like perfectly crisp bases, weigh down the trays a little so they sit flat.
- Whip whites to soft peaks
- In the mixing bowl, add whites, pinch of salt, and cream of tartar. Start whisking at medium speed until frothy, then increase to medium-high until soft peaks form. Soft peaks: when you lift the whisk, peaks form but the tips curl over.
- Gradual sugar addition
- This is the single most crucial part. With the mixer running on medium-high, add superfine sugar a tablespoon at a time, waiting a few seconds between additions so it dissolves. Rushing this step can create grainy, unstable meringue. After all sugar is added, continue whisking until the whites are glossy and hold stiff peaks—when you lift the whisk, peaks stand straight and the meringue looks satiny. Rub a little meringue between your fingers—if it’s smooth (no sugar grit) it’s ready.
- Flavor and color
- Gently fold in vanilla. If you want green trees, add a tiny dot of gel color and fold quickly but gently to avoid deflating. For marbling, drop color and barely swirl.
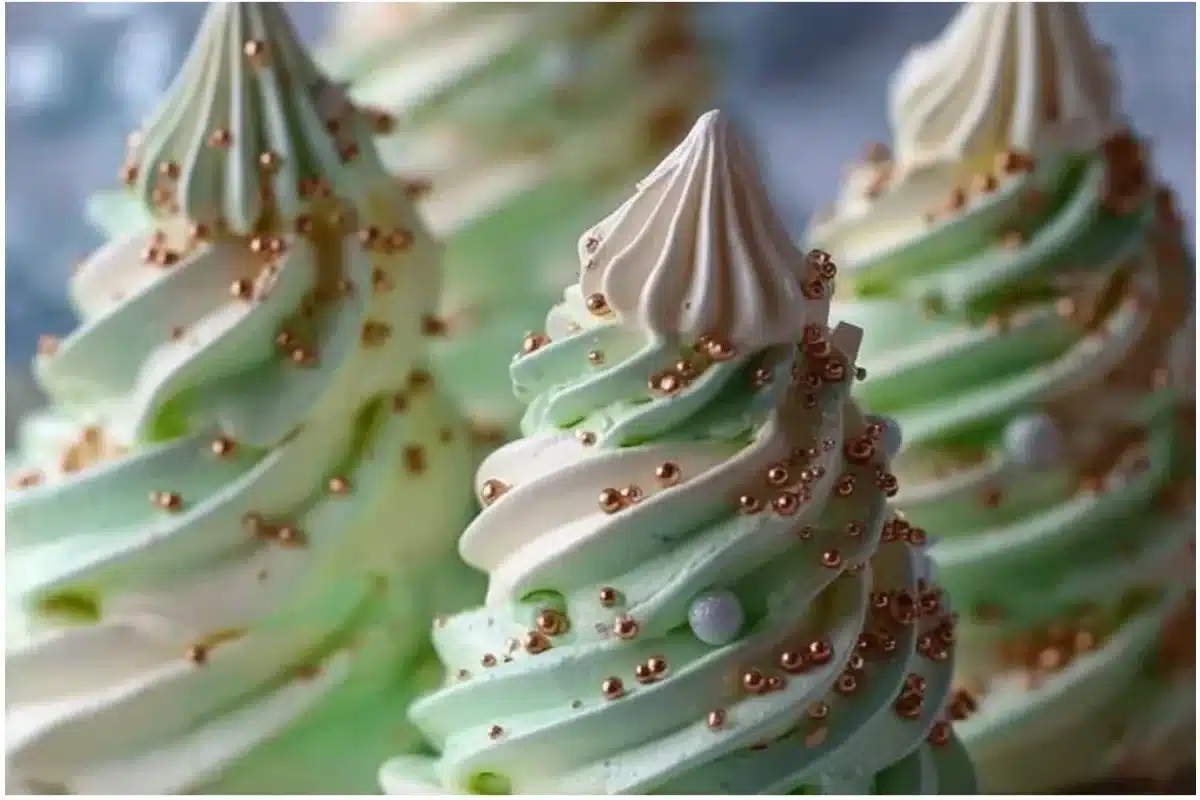
- Piping technique for trees
- Fit a pastry bag with a large star tip. Practice: pipe a small triangle on scrap parchment. For stacked trees, pipe round discs in graduated sizes (largest at base, smaller on top), or pipe concentric ridged triangles. The aim is to create pieces that stack without toppling. If you plan to pipe a trunk, use a small round tip and pipe a short cylinder.
- Decorating before/after bake
- You can add sprinkles just after piping (before baking) so they stick, or decorate with chocolate after baking. If using delicate metallic dust, brush on after cooling.
- Drying in the oven
- Bake/dry at 200°F (95°C) for 60–120 minutes depending on size. Small pieces (1–2 inches) dry in 60–75 minutes; larger pieces need longer. The meringue should lift off easily and sound hollow when tapped. Avoid browning; increase time at low heat rather than higher temp.
- Cooling
- Turn oven off and leave meringues inside with the door closed for 30–60 minutes or until completely cool. Slow cooling prevents cracking due to rapid temperature change.
- Assembly
- Use a dab of melted chocolate or thicker frosting as glue to stack layers into a tree. Pipe a small chocolate trunk. Chill briefly to set chocolate.
Real-time tips:
- If your oven has hot spots, rotate trays halfway through drying.
- If humidity is high, extend drying time or use a dehumidifier. Alternatively, briefly place meringues in a low oven for a few extra minutes.
Common mistakes and how to avoid them
Problem: Egg whites won’t whip. Causes: bowl or tools greasy; yolk contamination; whites too cold or extremely fresh but viscous. Fix: Use clean stainless bowl; ensure no yolk; bring whites to room temperature; try using cream of tartar.
Problem: Weepy meringues (weeping or sweating after baking). Causes: Undissolved sugar, under-dried, too much humidity, or residual moisture. Fix: Add sugar more slowly, test for smoothness between fingers, extend drying time, cool slowly inside oven.
Problem: Meringues crack. Causes: Oven too hot; rapid temp change; humidity shifts. Fix: Lower oven temp; cool slowly in oven.
Problem: Browning or caramelized tops. Causes: Temp too high. Fix: Lower the oven; dry longer at a lower temperature.
Problem: Grainy texture. Cause: Sugar not dissolved. Fix: Use superfine sugar; add gradually; rub a small amount between fingers to test.
Pro chef hack: Add 1/2 tsp of cornstarch and 1 tsp vinegar to the sugar—this combination is used in some pavlova recipes to create a marshmallow-like interior while keeping a crisp shell. Use sparingly for meringues intended to be crunchy.
Variations and swaps — seasonal and creative takes
Matcha Christmas Trees
Swap 1–2 tsp matcha powder for part of the sugar (or sift matcha into the whipped meringue). Use a light green tint and matcha adds subtle bitter notes that pair well with white chocolate accents.Chocolate Meringues
Fold 1–2 tbsp cocoa powder into the sugar before adding (sift). Use dark chocolate drizzle for assembly. Cocoa makes the meringue slightly denser but intensely flavorful.Peppermint Meringues
Add 1/4–1/2 tsp peppermint extract (reduce vanilla) and sprinkle crushed candy cane bits on top immediately after piping.Italian meringue trees (for humid climates or for frosting)
Italian meringue is made by whipping egg whites to soft peaks and then slowly adding a hot sugar syrup (118–121°C / 245–250°F) while beating to create a stable, glossy meringue that doesn’t need baking. Pipe and chill—these will be soft and marshmallow-like, and are excellent if you need meringues that won’t weep in humid conditions. Note: they’re not traditionally dried in the oven; they’re used as frosting or chilled decorations.Pavlova-style bases
Instead of piping many small trees, bake one large meringue disk and decorate like a Christmas wreath with whipped cream, berries, and pistachios.
Pairing ideas
- Pair delicate meringue trees with something richer to balance sweetness—cheesecake bites, dark chocolate truffles, or small spiced cookies. For lighter palate options after holiday richness, consider a cleansing smoothie plan; try a reset after indulgence with 21-Day Smoothie Diet Recipes if you want healthier beverage ideas post-holiday.
Assembly and presentation — making the trees sturdy and beautiful
Scale and balance: Make base layers slightly larger in diameter than the layers above. Pipe discs or triangles and test stack balance before baking a full batch.
Use edible “glue”: Melted chocolate (dark or white) is ideal because it sets firm and looks clean. For gluten-free and dairy-free variations, use tempered vegan chocolate or a thick royal icing (powdered sugar + lemon juice + meringue powder).
Make a star topper: Pipe a small star or press a small edible sugar star onto the top layer with a dab of chocolate.
Dusting and finish: A light spray of edible luster powder or brushing a diluted simple syrup (rare) can add shine. But be sparing—liquid can ruin crispness.
Transportation: Pack in a rigid box with layers separated by parchment. Avoid airtight containers in humid weather; store in a dry, cool place.
Storage and reheating
How long do meringues last?
- Properly dried and stored in an airtight container in a cool, dry location, meringues keep 1–2 weeks and sometimes up to 3 weeks. Humidity is the enemy. If you live in a humid climate, add a packet of silica gel (food-safe) to the container (not touching the meringues) or store them in the refrigerator for short periods, but refrigeration can cause condensation when removed.
Freezing
- Meringues freeze well. Freeze the baked and cooled shells in a single layer on a tray for 1 hour, then transfer into an airtight container with parchment layers. Thaw at room temperature in the container before opening to prevent moisture contact.
Re-crisping
- If meringues become slightly chewy due to humidity, re-crisp them by placing them in a 250°F/120°C oven for 10–15 minutes, then turn the oven off and let them cool inside. Watch carefully to avoid browning.
Nutrition insights
Meringues are mostly sugar and egg whites, so they’re:
- Low fat (virtually none)
- Low in protein (egg whites contribute protein but meringues are not a high-protein food)
- High in simple carbohydrates (sucrose)—quick energy but not filling
- Gluten-free by default (great for guests with gluten intolerance)
Approximate nutrition per small assembled tree (4-layer tree, ~25 g sugar total):
- Calories: 150–200 kcal
- Fat: 0–1 g
- Protein: 3–4 g
- Carbohydrates: 35–45 g (mostly sugar)
All values approximate; adjust for added chocolate or decorations.
If you need a lower-sugar treat, consider smaller meringues or pairing one with a high-protein nibble to reduce glycemic impact.
Troubleshooting quick checklist
- Whites not foaming: Check for grease; use a clean steel bowl; ensure no yolk.
- Meringue flat or collapses: Sugar added too early or too late; overbeaten; under-whipped before sugar.
- Sticky surface after baking: Under-dried; increase bake/dry time and cool in oven.
- Meringue browned: Oven too hot—reduce temp and extend time.
Frequently Asked Questions (FAQ) — Schema-ready
Q: Can I use powdered sugar instead of caster sugar for meringues?
A: Powdered sugar contains cornstarch which can change drying and texture. It’s not ideal for meringues you intend to dry crispy. Use caster/superfine sugar for best results.
Q: How do I know when the sugar is fully dissolved?
A: Rub a small amount of meringue between your fingertips. If it’s smooth and not gritty, the sugar is dissolved.
Q: Why did my meringue weep after baking?
A: Weeping can result from under-drying, undissolved sugar, or humidity. Ensure low, long drying and test for hollowness; cool slowly inside the oven.
Q: Can I make meringues ahead?
A: Yes — bake, cool completely, then store in an airtight container in a cool, dry place up to 2 weeks. Freeze for longer storage.
Q: Are there eggless meringues?
A: Yes — aquafaba (chickpea liquid) can be whipped into meringue-like foam, but handling and drying differ. This recipe focuses on classic egg-white meringue.
Q: Is Italian meringue better for humid climates?
A: Italian meringue (made with hot sugar syrup) is more stable and less prone to weeping in humid conditions but is not typically dried to a crisp shell. Use Italian meringue when you need stability for frosting or piping that stays soft.
Make ahead schedule for holiday hosting
- 3–5 days before: Bake meringue layers and store in an airtight container in a cool, dry cupboard.
- 1–2 days before: Decorate with drizzled chocolate or assemble trees if you prefer fully set decorations.
- Day of: Final touch-ups, dusting edible glitter, and packing into presentation boxes.
Conclusion
These Christmas Tree Meringues are an elegant, light, and crowd-pleasing addition to seasonal baking. Follow the method for glossy, stable stiff peaks, dry gently at low heat, and assemble with a small dab of chocolate for a holiday-ready centerpiece or gift. For more ideas on shapes and a different five-ingredient approach, check out this helpful visual tutorial on Meringue Trees: Easy, 5-Ingredient Recipe. If you want another easy how-to to compare piping styles and decoration ideas, see this simple guide to Christmas Meringues {easy recipe!}.
External resources:
- Chelsweets’ detailed tutorial on Meringue Trees: Meringue Trees: Easy, 5-Ingredient Recipe
- Inquiring Chef’s variation and decoration ideas: Christmas Meringues {easy recipe!}
If you try this Christmas Tree Meringues Recipe, save it, share a photo, and tell me how they turned out—was your oven cooperative? Need help troubleshooting a specific step? I’ll give tailored fixes and ideas for flavor variations or packaging for gifts.


