I still remember the first time the oven filled the house with a warm, sweet breath that made everyone wander into the kitchen barefoot and sleepy. The sticky scent of brown sugar and butter wrapped around our small table, and the kids argued softly over who would get the biggest square while my husband poured coffee. Those little squares of Cinnamon Roll Bliss Bars tasted like a soft promise that the day would unfold gently, and they have since become my quiet way to say welcome home.
Why This Cinnamon Roll Bliss Bars Means So Much
This recipe came together one rainy morning when I wanted the comfort of a cinnamon roll but needed something I could cut and share easily. I wanted to make something that felt like a hug from the inside, something you can pass around at brunch or tuck into a lunchbox. The bars keep the gooey center the classic roll gives you and add a simple crust that holds everything in tidy squares.
Family life shaped how I make these bars. With two kids and late afternoons of homework, I wanted a treat that was fast enough for weeknights and special enough for slow weekends. Over time, these bars learned to travel well to soccer meets, neighborhood gatherings, and the small celebrations we make up. They are the kind of recipe that shows you can make a small moment feel memorable.
Cooking in my home has always been about bringing people close, not about perfect technique. I keep these bars humble and real. The recipe uses pantry staples and a little ready-made help, and that balance makes it kind and doable. If you have ever made something that made your house smell like a holiday for a moment, you will know exactly why these bars matter.
I like how the recipe bridges time. It borrows the warm swirl of a classic cinnamon roll and makes it into an easy tray bake that tastes like both a childhood memory and a fresh discovery. When I bring these to a table, people lean in; they remember their own kitchen moments. It is a small way we stitch our lives together, one warm square at a time.
How to Make Cinnamon Roll Bliss Bars
“Every time I stir this pot, it smells just like Sunday at home.”
The process is gentle and rhythmic. You unroll dough, press it to form a crust, add a sweet layer, and top it with more rolls that bake into soft, golden mounds. While the oven does its quiet magic, your kitchen fills with cinnamon and butter, and you can feel the house relax.
In my kitchen I move in small loops: I melt the butter, stir the sugar until it glints, and set the icing packets where the kids cannot find them. The rhythm is calm and simple, and it keeps the focus on the warm smells and the soft touch of dough under my fingers. This is cooking that asks for presence more than perfection.
From there, the oven joins the work. You watch for the edges to turn golden and for the center to look set but still soft. That moment right out of the oven, when you taste a small piece to check the balance of sweet and spice, is one of my favorites. It is brief, honest, and enough to know you did well.
Ingredients You’ll Need
Two (2) cans (8 counts each) refrigerated cinnamon rolls (with icing packets reserved)
1/2 cup (1 stick) unsalted butter, melted (fresh butter gives this its richness)
1/2 cup packed light brown sugar (adds a deep, molasses note)
1 teaspoon vanilla extract (a little extra vanilla if you love a cozy aroma)
2 ounces cream cheese, softened (room temperature makes whisking easier)
1/2 cup powdered sugar (sifted if it clumps)
These items are simple and familiar, and that is part of the joy. You do not need anything fussy to make a treat that feels special. I like to keep a pair of cinnamon roll cans in the fridge for moments when I want a quick, warm dessert.
If you prefer, you can swap in a higher butterfat cinnamon roll or choose a brand with a richer filling. Each small choice will nudge the end flavor in a comforting way. For the cream cheese, use full fat if you want a lush finish that feels indulgent and smooth.
Sometimes I fold in a pinch of ground nutmeg to the brown sugar mixture or scatter a few chopped pecans over the top before baking. These are gentle changes that do not change the heart of the recipe. If you want to explore those ideas, think of them as friendly extras that deepen the texture and aroma.
I often link this kind of tray bake to other warm recipes I love to make around the holidays. You might find a similar cozy note in other quick bars and breads. For a holiday spin, try pairing these bars with a citrusy salad to cut through the sweetness, like some versions of festive fruit and spice combinations I keep in my own notes. For a related idea, check this cinnamon crunch peach muffin bread when you want to play with fruit and spice.
Step-by-Step Directions
Step 1: Preheat the oven to 350°F (175°C). Line a 9×13 inch baking pan with parchment paper, allowing the paper to overhang on the sides for easy removal later. Separate the cinnamon rolls from the enclosed icing packets and set the icing aside.
Breathe in the buttery, sweet aroma as the oven warms, and take a moment to smooth the parchment so it sits flat.
Step 2: In a medium bowl, combine the melted butter, brown sugar, and vanilla extract; stir until well blended. Unroll and slightly flatten half (8 rolls) of the cinnamon rolls and press them evenly onto the bottom of the prepared pan to form a cohesive crust layer.
Stir until glossy and the sugar looks moist, and press the dough gently so the seams meet and form a soft base.
Step 3: Pour the butter and brown sugar mixture evenly over the cinnamon roll base. Gently arrange the remaining 8 cinnamon rolls on top of the filling, placing them side-by-side across the pan. Bake for 25 to 30 minutes, or until the edges are golden brown and the center is set.
Wait for the edges to turn golden and listen for the quiet crackle at the rim of the pan; that soft sound means the sugars have caramelized.
Step 4: While the bars are cooling slightly, prepare the "bliss" glaze. In a small bowl, combine the reserved icing packets, the softened cream cheese, and the powdered sugar. Whisk vigorously until the glaze is smooth, thick, and lump-free.
Whisk until the glaze is airy and glossy, and taste a small dab to make sure the tang of the cream cheese balances the sweetness.
Step 5: Drizzle the prepared cream cheese glaze liberally over the warm bars, ensuring even coverage. Allow the Cinnamon Roll Bliss Bars to cool completely before removing them from the pan using the parchment paper edges and cutting into squares for serving.
Let the glaze set a little so it stays soft on the bars but does not run away, then lift the whole slab out and slice with a sharp knife for clean edges.

Bringing Cinnamon Roll Bliss Bars Together
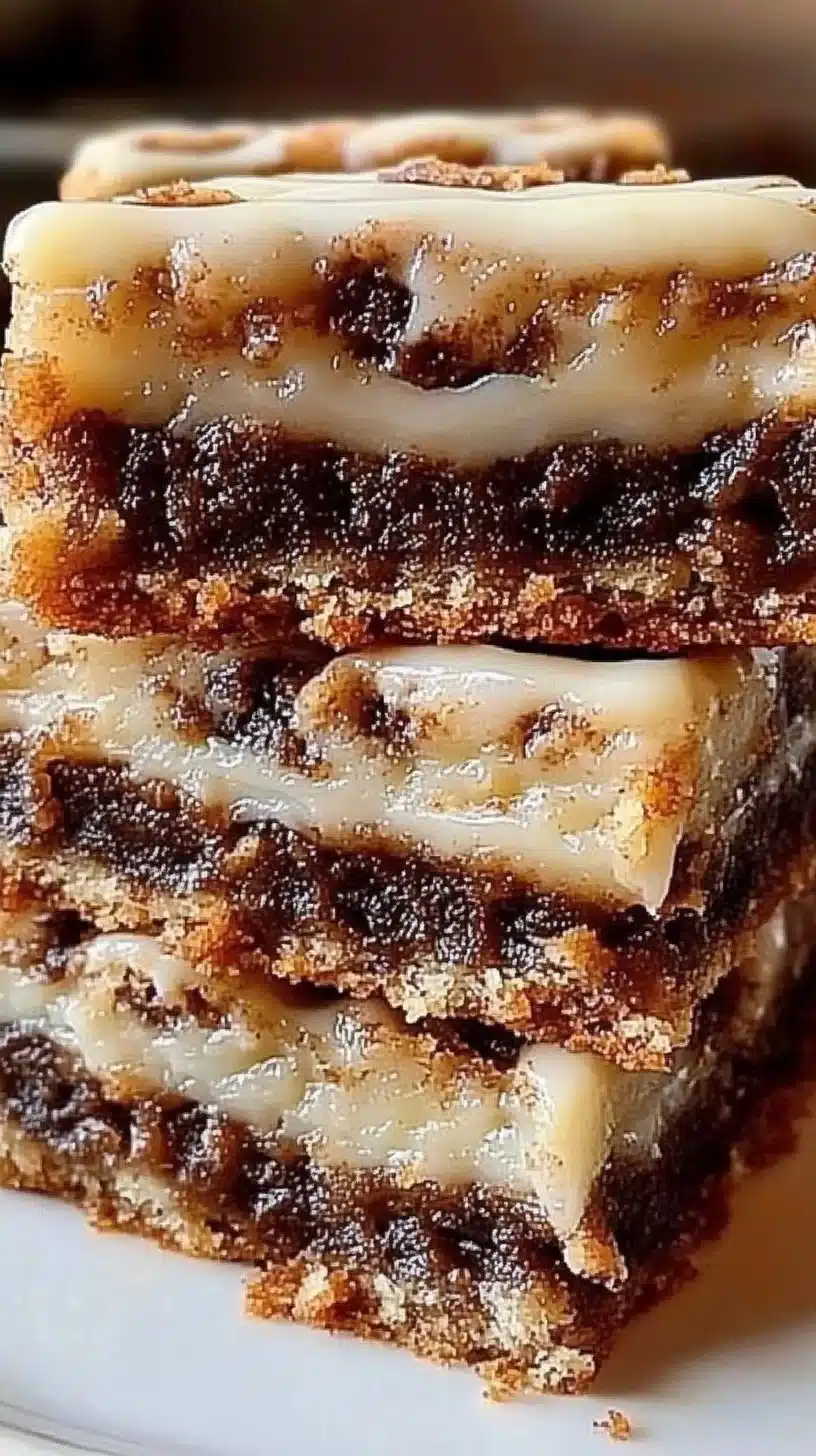
After baking, the bars settle in a way that feels tender and honest. The bottom layer becomes slightly caramelized, the middle stays soft and pull-apart, and the top rolls bloom into small domes. When you slice them, sticky strings of warm cinnamon reach between the squares and everyone smiles.
I like to cool the bars on a wire rack before glazing because the rack lets air reach the bottom and stops steam from making the crust soggy. Then I come back with a wide spoon and the glaze, and I let it fall in lazy ribbons. Watching the glaze sink into the warm swirls is one of those small pleasures that makes baking feel like a ritual.
If you are serving these for a morning crowd, pop them into a low oven for a few minutes to warm through. That refreshed warmth softens any edges the fridge may have made and brings the glaze back to its glossy state. A warm square with a steaming mug makes a quiet morning feel like an event.
When the kids were small, we made a little game of picking the corner pieces and trading for the middle ones. Now the game is who gets the square with the most ribbon of glaze. Imperfect as it is, the sharing becomes the point. Food that asks to be shared lets us slow down and notice each other a bit more.
Serving Cinnamon Roll Bliss Bars With Family Warmth
I serve these bars straight from the pan for a family-style moment. I set the pan in the middle of the table and give everyone a small plate and a napkin. The informal feel keeps the focus on the taste and the talk, not on perfect presentation. For a brighter spread, add a bowl of fruit and a pot of coffee or tea.
If you want to make them look a little more festive, dust the top with a touch of powdered sugar or scatter a few toasted almond slivers. They add a pleasant crunch and a small visual lift without stealing the show. A side of yogurt or a simple fruit compote adds balance on a brunch table.
For a picnic or potluck, wrap a stack of cooled squares in parchment and tie them with twine. They travel well and stay moist when packed snugly. If you bring them to a bake sale or a school event, cut them into smaller squares and arrange them in rows; people love easy, hand-friendly bites.
At holidays, I place a small sign next to the pan that says, "Take a warm one." It feels like an invitation and encourages people to linger. Little rituals like that make food feel like a gift. If you want to pair them with a bright salad, these bars go especially well with crisp, tart flavors, such as a citrusy apple and grape salad I turn to for contrast. Try pairing them with this cinnamon apple grape salad for a fresh counterpoint.
How to Save the Leftovers
These bars keep their comfort when you store them simply. Once they cool completely, place them in an airtight container in the fridge for up to four days. The cream cheese glaze firms a little in the cold, and the flavors settle into a deeper, more mellow form. I like them the next day with a cup of tea because the cinnamon has settled into the dough and tastes more rounded.
To reheat individual squares, microwave for about 10 to 15 seconds to bring back a soft, fresh feel. If you have a toaster oven, a quick 5-minute warm-up at low heat gives a renewed crust and soft center. Avoid long reheating, as that can dry the bars out.
For longer storage, you can freeze unglazed bars for up to two months. Wrap the cooled tray in plastic, then foil, and label the date. When you want them, thaw in the fridge overnight and warm gently before glazing. If you need to freeze already glazed bars, freeze them in a single layer first, then wrap to protect the glaze from sticking.
A gentle trick I use is to warm slightly and add a tiny pat of butter to a warmed square before serving. It melts into the creases and brings the fresh-baked feel back to life. These small gestures make leftovers feel like a second act, not a compromise.
Tips and Troubleshooting From My Kitchen
If your pan looks unusually wet after baking, make sure your brown sugar was packed and not dry. The mixture should look like a glossy syrup when you pour it over the bottom layer. If it seems too thin, a quick sprinkle of an extra tablespoon of brown sugar into the mix can help.
When unrolling the cinnamon rolls, be gentle. A light flattening gives you a cohesive base without pressing out the swirls too much. If the seams do not meet, a few gentle pinches with your fingers will help them tuck together into one soft crust.
If the top rolls brown too quickly before the center sets, tent the pan loosely with foil for the last 5 to 10 minutes of baking. That will slow browning and let the center finish cooking. Ovens vary, and this small step keeps the bars evenly done.
For a more pronounced cinnamon flavor, add a half teaspoon of ground cinnamon to the brown sugar mixture. For a subtler version, reduce the brown sugar by a tablespoon and rely on the roll filling. These small shifts change the character of the bars while keeping the recipe friendly.
If your glaze looks lumpy, make sure the cream cheese is truly softened. You can warm the bowl a little by resting it over warm water and then whisking briskly. A smooth glaze is worth the little patience it asks.
Variations That Keep the Heart of the Recipe
You can add a handful of raisins or currants to the brown sugar layer for a sweet, chewy surprise. Dried fruit pairs beautifully with cinnamon and brings an old-fashioned comfort to the bars. Just scatter them lightly so the bars still hold together.
Chopped nuts like pecans or walnuts add a welcome crunch. Toast them briefly to bring out their oils and deepen the flavor. Sprinkle them on top before baking or scatter after glazing for a fresh texture contrast.
If you want a citrus note, fold a teaspoon of orange zest into the glaze. The bright pop of citrus cuts through the richness and makes the bars feel lighter and brighter. I find the hint of orange sings beautifully with the cinnamon.
For a chocolate twist, sprinkle a few mini chocolate chips into the top layer before baking. They will melt into soft pockets of chocolate that taste like a grown-up touch on a childhood favorite. Small additions like this keep the recipe playful.
Making Ahead for a Busy Morning
Prepare the layered pan the night before and keep it covered in the fridge. In the morning, slide it into a cold oven, set the temperature, and let it bake a little longer than the recipe time until the center feels set. This gentle start-from-cold method gives a fresh-baked feel with morning ease.
If you plan to serve in the morning, glaze while the bars are still slightly warm so the glaze melts into the swirls. If you prefer a firmer top, wait until the bars cool more before glazing. Both ways are right; it depends on whether you want sticky sweetness or sliceable neatness.
I often double the batch when I know we will need snacks over several days. Extra bars mean a quick comfort for late-night homework or a neighbor drop-by. They are just as welcome hours later, and doubling saves time when life is full.
When you make them ahead, add a small note for yourself about timing and temperature so your next batch feels just as good. Homemade recipes become family staples when they adapt to your life and your schedule.
A Few Notes on Tools and Small Details
A sharp knife makes a clean cut through the glaze and keeps each square tidy. If the glaze sticks to the knife, wipe it clean and run it under warm water between cuts. This small habit keeps slices pretty and the work smooth.
Parchment paper with overhang makes lifting out the baked slab almost effortless. I cannot recommend it enough. The overhang serves as handles and saves the gentle jostle a pan can give during transfer.
If you like to present the bars on a board, place a layer of parchment between the board and the bars to catch any glaze drips. It keeps the board clean and makes serving less fuss. Little steps like these keep the focus on the food and the company.
A shallow, wide pan gives more edge pieces and a gently caramelized bottom. A deeper pan can make a thicker bar but may lengthen the bake time. Choose the pan that matches the feel you want to share.
Moments When These Bars Shine
They are perfect for slow Saturday mornings when the house is soft and everyone takes their time. They work well at brunches where you want to feed a crowd without fuss. They also come to life at small holiday gatherings when you need a tray that feels festive without much work.
I have brought them to school events, potlucks, and neighbor-hosted dinners. People appreciate a square that is warm, familiar, and easy to eat. They invite conversation and linger on the table, encouraging a slow and friendly rhythm.
When a friend stops by because a day feels heavy, I set a pan on the counter and cut a few squares to share. The offer to sit and eat something warm is often the first step toward the bigger conversations. Food does this quietly, and these bars are good at it.
For birthday mornings, I make a small twist: add a few chocolate sprinkles right after glazing. It is a small, childlike flourish that makes someone feel celebrated. Those tiny touches matter in ordinary life.
On Teaching Kids to Bake These
This recipe is a great way to teach little hands about gentle pressing and simple pouring. Kids can unroll the rolls, press the base, and stir the butter mixture. They love to drizzle the glaze and see how it changes the look of the bars.
I always set a small bowl for them to mix in and a safe spoon to stir. Teaching them to keep the workspace tidy and to taste safely makes the kitchen a place of learning and calm. They end up proud and a little braver for the next time.
Let them pick a small extra like a sprinkle or nut to add on top. Their ownership in the final choice makes them more likely to try a bite. Those small decisions build a lifetime of kitchen confidence.
If you have picky eaters, let them choose between a plain square or one with a tiny addition like a few chips. Choices make the experience more fun and less about pressure. Cooking together becomes a simple celebration.
Flavor Notes and Why They Work
The trio of butter, brown sugar, and vanilla creates a warm base that complements the cinnamon filling in the rolls. Brown sugar brings depth and a hint of caramel, while vanilla rounds the edges and makes the whole thing feel cozy. The cream cheese in the glaze adds a soft tang that balances the sweetness.
Texture comes from contrasts. The pressed base caramelizes a little, the middle stays tender, and the top rolls keep their shape. The glaze forms a soft, cool finish that makes each bite a little different. That variation is what keeps people coming back.
A little acid in the glaze, from cream cheese, is key. It keeps the bars from tasting too one-note sweet and adds a fresh balance. This is a small trick I use in many of my sweet recipes to keep them lively.
The warmth of the spices and the coolness of the glaze create a comforting kind of tension on the palate. It is a familiar balance that feels like home. Every bite reminds me why simple things can be so satisfying.
Sharing This Recipe With Friends
When someone asks for the recipe, I tell the story of the first rainy morning and how the house filled with a gentle, warm smell. I give them the list of simple ingredients and the small tips that save time and fuss. Recipes become better when we pass along the little notes we learned.
If a friend has a time crunch, I highlight the make-ahead option and the freezer trick. If they want to impress a crowd, I point them to the toasted nut idea or the citrus glaze twist. Sharing recipes is not just about steps. It is about letting others know which parts matter most.
You can write a short note on the back of a recipe card about which part to watch in the oven. Little practical tips help others make the dish their own. These small acts of sharing feel like passing on a piece of home.
I also tell them to trust their oven and their senses. Learn the look and scent of the bars as they bake. The more often you make something, the more confident you become.
A Final Thought From My Oven
The best recipes are not the most complicated ones. They are the ones that bring people together with ease and leave a warm trail in the kitchen. These Cinnamon Roll Bliss Bars do that for me. They fold comfort into a simple pan and invite quiet conversation.
I hope you make them on a day that needs a little softness or on a morning that wants to feel special. Let your kitchen breathe with that sweet, cinnamon air and watch as the people you love gather close. Small things like this remind us that joy is often baked in simple steps.
Conclusion
If you love the smell of cinnamon and the ease of a tray bake, you might enjoy comparing this tray-style idea to other cinnamon-forward cakes for inspiration. For a related take that celebrates the classic cinnamon roll flavor in cake form, try the Cinnabon Cinnamon Roll Cake Recipe for a different way to bring that same cozy aroma to your table.
Print
Cinnamon Roll Bliss Bars
- Total Time: 45 minutes
- Yield: 12 servings 1x
- Diet: Vegetarian
Description
These Cinnamon Roll Bliss Bars combine the comforting flavors of classic cinnamon rolls into a convenient tray bake, perfect for sharing at brunch or family gatherings.
Ingredients
- Two (2) cans (8 counts each) refrigerated cinnamon rolls (with icing packets reserved)
- 1/2 cup (1 stick) unsalted butter, melted
- 1/2 cup packed light brown sugar
- 1 teaspoon vanilla extract
- 2 ounces cream cheese, softened
- 1/2 cup powdered sugar
Instructions
- Preheat the oven to 350°F (175°C). Line a 9×13 inch baking pan with parchment paper, allowing the paper to overhang on the sides for easy removal later. Separate the cinnamon rolls from the enclosed icing packets and set the icing aside.
- In a medium bowl, combine the melted butter, brown sugar, and vanilla extract; stir until well blended. Unroll and slightly flatten half (8 rolls) of the cinnamon rolls and press them evenly onto the bottom of the prepared pan to form a cohesive crust layer.
- Pour the butter and brown sugar mixture evenly over the cinnamon roll base. Gently arrange the remaining 8 cinnamon rolls on top of the filling. Bake for 25 to 30 minutes, or until the edges are golden brown and the center is set.
- While the bars are cooling slightly, prepare the glaze. In a small bowl, combine the reserved icing packets, cream cheese, and powdered sugar. Whisk vigorously until the glaze is smooth.
- Drizzle the cream cheese glaze liberally over the warm bars, ensuring even coverage. Allow the bars to cool completely before cutting into squares for serving.
Notes
For a special touch, add a pinch of nutmeg to the brown sugar mixture or sprinkle chopped pecans over the top before baking. These bars can be frozen unglazed for up to two months.
- Prep Time: 15 minutes
- Cook Time: 30 minutes
- Category: Dessert
- Method: Baking
- Cuisine: American
Nutrition
- Serving Size: 1 square
- Calories: 310
- Sugar: 20g
- Sodium: 300mg
- Fat: 12g
- Saturated Fat: 7g
- Unsaturated Fat: 3g
- Trans Fat: 0g
- Carbohydrates: 45g
- Fiber: 1g
- Protein: 4g
- Cholesterol: 30mg
Keywords: cinnamon rolls, dessert bars, easy baking, family recipes