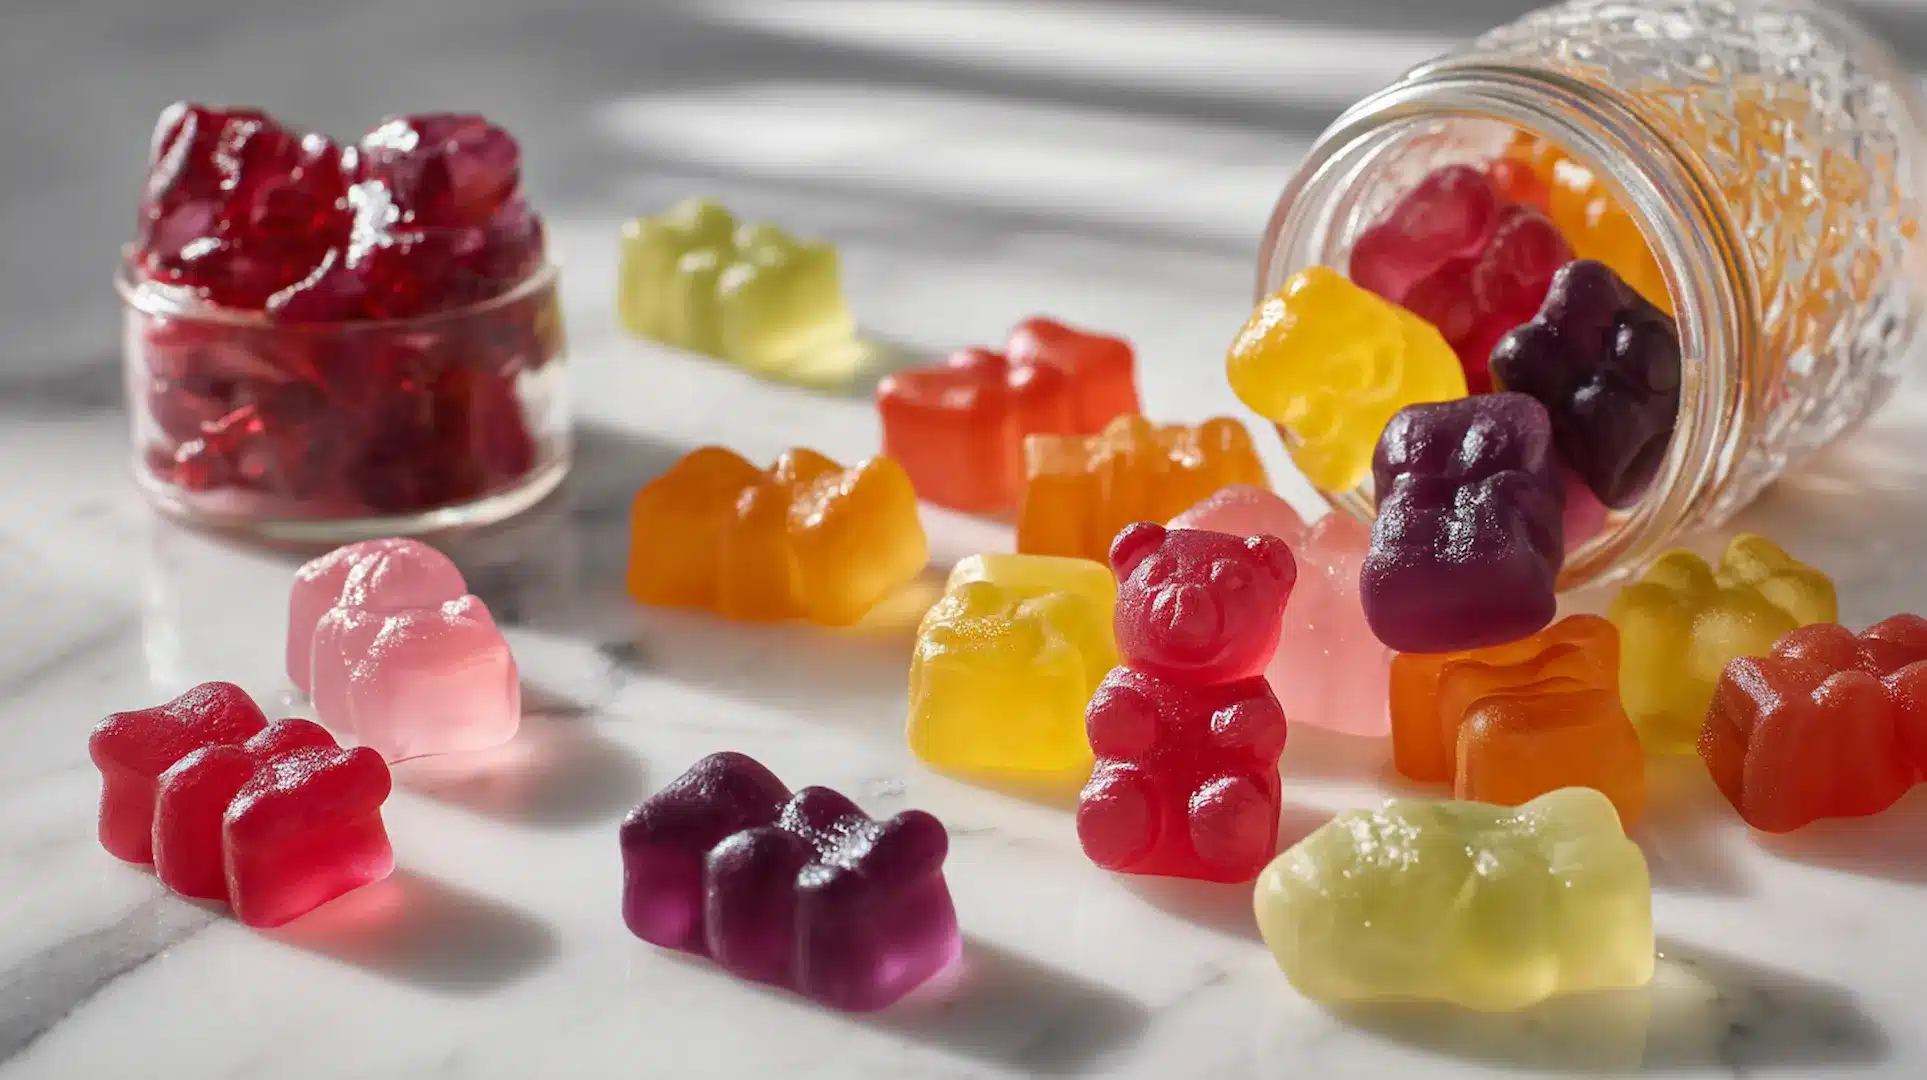
Three months ago, I found myself standing in the candy aisle, watching my daughter’s eyes light up at rows of brightly colored gummy bears. As a parent who tries to make healthier choices healthier choices, I felt that familiar internal struggle. That’s when I decided to figure out how to make homemade healthy gummies that could compete with store-bought versions, and honestly, I wish I’d discovered this recipe years ago.
What started as a weekend experiment for homemade healthy gummies turned into our family’s favorite Friday afternoon tradition. These gummies use just four natural ingredients, take less than an hour from start to finish, and create such beautiful colors from real fruit juice that my kids actually prefer them over the artificial candy aisle options.
The best part? You control every single ingredient. No artificial colors, no high fructose corn syrup, no mystery ingredients you can’t pronounce. Just pure fruit juice, natural sweetener, unflavored gelatin, and water. Simple, wholesome, and surprisingly fun to make.
What You’ll Learn in This Guide
- How to make homemade healthy gummies with just 4 natural ingredients
- The secret to achieving perfect gummy texture every time
- Creative flavor combinations using different fruit juices
- Which juices to avoid (they prevent proper setting)
- Storage tips to keep your gummies fresh for up to a week
- Vegan alternatives using agar agar powder
- Troubleshooting common issues like air bubbles and improper setting
Why I Started Making Homemade Healthy Gummies
As someone who grew up in a Mediterranean household where natural ingredients were always prioritized, the ingredient lists on most commercial gummies troubled me. When I looked at what my kids were eating, I saw artificial colors derived from petroleum, high fructose corn syrup, and preservatives I had to Google to understand.
I wanted to recreate that chewy, satisfying texture in homemade healthy gummies kids love, but using ingredients I actually felt good about serving. After testing various recipes and ratios over several weeks, I landed on this four-ingredient formula that delivers every single time.
The real validation came when my daughter’s friend came over for a playdate. She tried these gummies and asked if we could make them together. Her mom later texted me asking for the recipe because her daughter wouldn’t stop talking about them. That’s when I knew this wasn’t just a mom win—it was genuinely something kids would choose on their own.
What Makes These Healthy Gummies Different
Walk into any grocery store and you’ll find gummy candies everywhere. But these treats’ll find gummy candies everywhere. But here’s what sets these treats apart from what you’ll find in those colorful packages.
Natural Ingredients Only
Every ingredient serves a purpose, and you can pronounce every single one. The fruit juice provides natural flavor and gorgeous color. Honey adds sweetness with beneficial enzymes and antioxidants according to research from the National Institutes of Health. Gelatin creates that perfect chewy texture. That’s it. No Red 40, no Yellow 5, no artificial anything.
Customizable to Your Family’s Preferences
One of my favorite aspects of making homemade healthy gummies is how easily you can adjust them. Need less sugar? Cut back on the honey. Want more intense fruit flavor? Use 100% juice instead of juice blends. Have a child with dietary restrictions? Swap gelatin for agar agar powder.
I’ve made batches with just a touch of sweetness for myself and more generous honey portions for the kids. You have complete control, which is incredibly empowering as a parent trying to make better food choices.
Educational and Fun
Making homemade healthy gummies has become more than just a recipe in our house. It’s turned into a science lesson about how gelatin works, a color-mixing experiment when we try different juices, and a patience-building activity as we wait for them to set. My kids now understand where their food comes from and what goes into it.
Understanding Your Ingredients: What You Need and Why
Let me walk you through each ingredient so you understand exactly what role it plays in creating perfect gummies.
Fruit Juice: The Flavor and Color Foundation
This is where your creativity shines. I’ve tested this recipe with apple, orange, cranberry, pomegranate, grapefruit, black cherry, grape, lemonade, and watermelon juice. Each one creates a distinct flavor and natural color that’s absolutely stunning.
Apple juice creates pale, translucent homemade healthy gummies with mild sweetness. Pomegranate delivers deep ruby red with a slightly tart profile. Black cherry produces rich purple treats that kids find especially appealing. The combinations are endless.
However, there’s an important scientific note here. Avoid pineapple, kiwi, mango, papaya, figs, guava, and fresh ginger root juice. According to biochemistry research, these contain a protease enzyme that breaks down gelatin proteins and prevents proper setting. I learned this the hard way after a failed batch of pineapple gummies that never firmed up.
For best results, use 100% fruit juice without added sugars. The natural fruit sugars provide plenty of sweetness, especially when combined with honey.
Honey: Natural Sweetness with Benefits
I use honey as my primary sweetener for homemade healthy gummies because it brings more to the table than just sweetness. Honey contains antioxidants, has antimicrobial properties, and provides trace minerals. In Mediterranean cooking, we’ve used honey as a natural sweetener for thousands of years.
If you don’t have honey or prefer not to use it, maple syrup works beautifully as a substitute. You can also use additional granulated sugar or a sugar alternative like stevia, though you’ll lose some of those beneficial properties honey provides.
Unflavored Gelatin: The Magic Texture Creator
Gelatin is what transforms juice into those perfect chewy homemade healthy gummies. I use Knox unflavored gelatin, which comes in convenient packets. Each packet contains about 2.5 teaspoons of gelatin powder.
You can find unflavored gelatin at any major grocery store, usually in the baking aisle or near the Jell-O products. If you buy gelatin in bulk containers, you’ll just need to measure out 2.5 teaspoons per batch.
For vegetarian or vegan homemade healthy gummies, substitute with 1 teaspoon of agar agar powder. Keep in mind that agar agar sets slightly differently. The texture won’t be quite as bouncy as traditional gelatin gummies, but they still turn out delicious and firm enough to hold their shape.
Optional Sweetener: Adjusting to Taste
Beyond the honey, I add a small amount of additional sweetener to balance the tartness of certain fruit juices. This is completely optional and adjustable to your preferences.
I typically use 2 teaspoons of either granulated sugar or stevia. Some juices, like apple or grape, are naturally sweet enough that you might skip this entirely. Tarter juices like grapefruit or cranberry benefit from a bit more sweetness.
Essential Equipment for Making Gummies
You don’t need specialized equipment to make homemade healthy gummies. Here’s what I use every time, and most of these items are probably already in your kitchen.

Silicone Molds: Choose Your Shapes
This is where the fun really begins with homemade healthy gummies. I started with a classic gummy bear mold, but I’ve since collected dinosaur molds, sea shell shapes, and even gummy worm molds. My kids love choosing which mold we’ll use for each batch.
Most silicone molds come with an eye dropper, which is absolutely essential for filling those tiny cavities. If your mold doesn’t include one, order a separate eye dropper. Trust me on this one. I tried filling molds with a spoon once, and it was a disaster.
The size of your mold determines how many gummies one batch makes. My standard gummy bear mold produces about 75 homemade healthy gummies per batch. Larger dinosaur shapes might yield 40-50 gummies from the same amount of mixture.
Small Saucepan and Mixing Tools
A small saucepan works perfectly for heating the juice mixture. You want something with good heat distribution to prevent scorching.
For mixing, use a spoon or small silicone spatula. Avoid using a whisk, as it incorporates too many air bubbles into the mixture. Those bubbles will transfer to your gummies and create an odd, foamy appearance on the finished product.
Baking Sheet and Refrigerator Space
Place your silicone molds on a baking sheet before filling them with homemade healthy gummies mixture. This makes transporting them to the refrigerator much easier and prevents spills. I learned this lesson after trying to carry a full mold to the fridge and watching half the cavities slosh over the sides.
Make sure you have a flat area in your refrigerator where the molds can sit undisturbed for at least 30 minutes. Any tilting will cause uneven gummies with flat sides.
Step-by-Step Guide: Making Your First Batch
Let me walk you through the process of making homemade healthy gummies exactly as I do it in my kitchen. I’ll share the little tips and tricks I’ve discovered that make the difference between good gummies and absolutely perfect ones.

Step 1: Prepare Your Workspace
Before you start cooking, set up your silicone molds on a baking sheet. Check your refrigerator and clear a flat space for the sheet. Have your eye dropper ready and within reach.
This preparation step saves so much frustration later. The mixture sets quickly once the gelatin is added, so you want everything ready to go.
Step 2: Heat Your Fruit Juice Mixture
Pour 1/3 cup of your chosen fruit juice into a small saucepan for homemade healthy gummies. Add 2 tablespoons of honey and 2 teaspoons of your optional sweetener if using.
Place the saucepan over medium-high heat and stir occasionally as it heats. You’re looking for a gentle simmer, not a rolling boil. As soon as you see bubbles forming around the edges and breaking the surface, remove it from heat immediately.
Here’s a crucial tip I learned after several batches: don’t let it boil vigorously. Excessive heat can actually weaken gelatin’s setting power. We want it hot enough to dissolve the gelatin but not so hot that it compromises the structure.
Step 3: Cool the Mixture Slightly
Set the hot juice mixture aside for about 3 minutes. This cooling period is more important than I initially realized. If you add gelatin to liquid that’s too hot, it can break down the proteins and result in gummies that don’t set properly or have a weird texture.
The mixture should still be quite warm to the touch, just not scalding hot. Think of it as the temperature of hot tea that you could comfortably sip.
Step 4: Bloom Your Gelatin
While the juice mixture cools, prepare your gelatin for homemade healthy gummies. This process is called blooming, and it’s essential for smooth, lump-free gummies.
In a small bowl, mix 2.5 teaspoons of unflavored gelatin powder with 1 tablespoon of water. Stir vigorously until the gelatin completely absorbs the water. The mixture will become thick and gel-like within 30 seconds to a minute.
This step prevents clumps in your final homemade healthy gummies. If you skip blooming and add dry gelatin powder directly to the juice, you’ll end up with grainy texture and undissolved gelatin bits.
Step 5: Combine Gelatin and Juice
As soon as your gelatin is fully bloomed, add it to your slightly cooled juice mixture. This timing is important. If the bloomed gelatin sits too long, it will firm up and become difficult to incorporate.
Stir gently but thoroughly with your spoon or spatula. Make sure every bit of gelatin dissolves into the juice mixture. You should see no clumps or streaks of gelatin. The mixture should be smooth and uniform in color.
If you do notice small gelatin clumps, don’t panic. You can return the pan to very low heat for just 30 seconds while stirring. The gentle warmth will help dissolve any remaining bits.
Step 6: Fill Your Molds
Now comes the satisfying part of making homemade healthy gummies. Using your eye dropper, carefully fill each cavity in your silicone mold. This requires a bit of patience, but I find it oddly meditative.
Fill each cavity right to the brim when making homemade healthy gummies. Use the surface tension to your advantage. You should see the liquid slightly doming above the mold surface. This ensures your gummies have a nice rounded back when you pop them out.
If you don’t fill them to the brim, your homemade healthy gummies‘ll end up with flat-backed treats that are noticeably thinner than their store-bought counterparts. I made this mistake with my first batch and the kids immediately noticed they looked different.
Work relatively quickly but don’t rush. As the mixture continues to cool, it will start to thicken. If it thickens too much while you’re filling, you can gently warm it for just a few seconds.
Avoid creating air bubbles as you fill. Squeeze the eye dropper slowly and steadily. Air bubbles will set inside the gummies and create an unappealing appearance with little pockets of air visible through the translucent candy.
Step 7: Refrigerate Until Set
Carefully transfer your baking sheet with the filled homemade healthy gummies molds to the refrigerator. The key word here is carefully. Even though you filled to the brim, you don’t want any sloshing or spilling.
Let the homemade healthy gummies chill for at least 30 minutes. I usually give them 45 minutes to be safe. They should be completely firm and slightly cool to the touch when ready.
Step 8: Pop and Enjoy
This is the moment my kids love most when making homemade healthy gummies. The homemade healthy gummies should pop right out of the silicone molds with just a gentle push from underneath. If they’re sticking, they might need a few more minutes in the refrigerator.
Properly set homemade healthy gummies will hold their shape perfectly and have a satisfying chewiness. They should be firm but not hard, with just a bit of bounce when you bite into them.
Creative Flavor Combinations I’ve Tested and Loved
After making dozens of batches of homemade healthy gummies over the past few months, I’ve discovered some flavor combinations that work exceptionally well. Here are my family’s favorites.

Rainbow Variety Pack
This is our go-to when we want variety in homemade healthy gummies. I make separate batches with apple juice (pale yellow), orange juice (bright orange), cranberry juice (ruby red), grape juice (deep purple), and sometimes watermelon juice (pink). Arranged together, they create a stunning rainbow effect that kids absolutely love.
Making multiple flavors does take more time, but the visual impact is worth it. Each batch takes about 10-15 minutes of active work, so plan accordingly if you’re making five different flavors.
Citrus Burst
Mix equal parts orange and grapefruit juice for sophisticated homemade healthy gummies that aren’t too sweet. Adults particularly enjoy this combination. The grapefruit adds complexity and a subtle bitterness that balances the orange’s natural sweetness.
Berry Medley
Combine pomegranate and black cherry juice for deep, rich homemade healthy gummies with, rich berry flavor with beautiful dark purple color. This combination tastes almost identical to store-bought mixed berry gummies but without any artificial ingredients.
Tropical Paradise
Use a blend of orange and passion fruit juice (remember, avoid pure pineapple) for tropical flavor. This creates a vacation-inspired profile that reminds me of sunny beaches. The color is a beautiful peachy-orange.
Classic Apple
Sometimes simple is best. Pure apple juice creates mild, slightly sweet homemade healthy gummies that even picky eaters love. The pale golden color is naturally beautiful, and the familiar flavor makes these treats an easy introduction to homemade candy.
Troubleshooting Common Issues
Even with a straightforward recipe for homemade healthy gummies, sometimes things don’t go perfectly. Here’s how to solve the most common problems I’ve encountered.
Gummies Won’t Set Properly
If your homemade healthy gummies are still soft after an hour in the refrigerator, one of three things likely happened. First, you might have overheated the juice mixture, which can break down gelatin’s setting power. Second, you might have used one of those enzyme-containing fruits I mentioned earlier. Third, your gelatin might be old or expired.
The fix: If you catch it early, you can actually reheat the mixture, add a bit more bloomed gelatin, and try again. Otherwise, treat it as a learning experience and start fresh with new gelatin.
Air Bubbles Throughout
Those little air pockets trapped in your homemade healthy gummies usually come from two sources: using a whisk to mix or squeezing the eye dropper too quickly.
The fix: Use a spoon or spatula for mixing, and fill your molds slowly and deliberately. If you do see bubbles forming on top as you fill, you can gently tap the mold on the counter to encourage them to rise and pop.
Gummies Stick to the Mold
If your homemade healthy gummies aren’t releasing cleanly from the mold, they probably need more time in the refrigerator. Sometimes what feels firm to the touch isn’t quite set enough for easy removal.
The fix: Give them another 15-20 minutes of chilling time. Properly set homemade healthy gummies should pop out with minimal effort.
Uneven Texture or Grainy Gummies
This almost always indicates that the gelatin wasn’t fully dissolved. Those grainy bits are undissolved gelatin powder.
The fix: Make sure you bloom your gelatin properly and stir until completely smooth before filling your molds. Don’t rush this step.
Gummies Are Too Sweet or Not Sweet Enough
Taste is subjective, and different fruit juices have varying natural sweetness levels.
The fix: Adjust the honey and optional sweetener to your preference. Start with less and increase in future batches until you find your perfect balance. I keep notes on my phone about which combinations needed more or less sweetness.
Storage and Shelf Life
Proper storage keeps your homemade healthy gummies fresh and maintains their texture. Here’s what works best based on my experience.

Refrigerator Storage
Store your homemade healthy gummies in an airtight container in the refrigerator. They’ll stay fresh for up to one week. I use glass containers with tight-fitting lids, but any airtight container works fine.
The cool temperature prevents mold growth and helps maintain that perfect chewy texture. At room temperature, these treats can become sticky and start to lose their shape.
Freezing (Yes, It Works!)
I’ve successfully frozen these homemade healthy gummies for up to two months. Place them in a single layer on a parchment-lined baking sheet and freeze until solid. Then transfer to a freezer-safe container or bag.
Thaw in the refrigerator overnight before serving. The texture remains remarkably good, though they might be slightly softer than fresh gummies.
Room Temperature Considerations
These homemade healthy gummies can sit at room temperature for a few hours without issue, perfect for packing in lunchboxes or taking to playdates. However, don’t leave them out all day. They’ll become sticky and might start to lose their shape in warm conditions.
Making This Recipe Work for Different Dietary Needs
One of the beauties of making your own homemade healthy gummies is how adaptable the recipe becomes for various dietary requirements.
Vegan and Vegetarian Options
Replace the unflavored gelatin with 1 teaspoon of agar agar powder for vegan homemade healthy gummies. The process remains the same, though the final texture will be slightly different. Agar agar creates firmer, less bouncy gummies that some people actually prefer.
Make sure your optional sweetener is vegan-friendly if you’re making fully vegan treats. Honey isn’t vegan, so substitute with maple syrup or agave nectar.
Lower Sugar Options
If you’re watching sugar intake, use 100% fruit juice with no added sugars and reduce or eliminate the honey and optional sweetener. The gummies will be less sweet but still delicious, letting the natural fruit flavor shine through.
You can also dilute the juice slightly with water. Use 1/4 cup juice and 2 tablespoons water instead of 1/3 cup juice. This reduces sugar content while maintaining the setting properties.
Allergy-Friendly
This recipe is naturally free from most common allergens. There’s no dairy, eggs, nuts, soy, or gluten. As long as you choose allergen-free fruit juice, these treats work beautifully for children with multiple food allergies.
Frequently Asked Questions
Can I use fresh fruit instead of juice?
You can, but you’ll need to blend and strain the fruit first to create juice. Fresh fruit puree with bits and chunks doesn’t work well in this recipe because it creates an uneven texture and doesn’t fill the molds properly.
Why can’t I use pineapple or kiwi juice?
These fruits contain protease enzymes that break down gelatin’s protein structure, preventing proper setting. According to Healthline’s nutrition experts, your gummies will never firm up if you use these juices. This is a scientific fact, not just a preference.
Can kids help make these treats?
Absolutely! This is a wonderful recipe for cooking with children. They can help choose juice flavors, fill the molds with supervision, and of course, pop out the finished gummies. The hot stove portion requires adult supervision, but otherwise it’s very kid-friendly.
How do I make the gummies more sour?
After the gummies set, you can toss them in citric acid powder (found in the canning section of grocery stores). Use about 1/4 teaspoon per batch. This creates a sour coating similar to commercial sour gummies.
Can I double or triple the recipe?
Yes, but I recommend making multiple separate batches rather than one large batch. The mixture thickens as it cools, and a large batch might start setting before you finish filling all your molds.
What if I don’t have silicone molds?
You can pour the mixture into a small greased pan, let it set, and then cut it into squares. These won’t have the cute shapes, but they’ll taste just as good. Use a sharp knife coated with cooking spray to prevent sticking.
Are these gummies sticky?
Properly made treats shouldn’t be sticky when stored in the refrigerator. They might become slightly tacky at room temperature, especially in humid conditions. If stickiness is an issue, you can lightly coat them in a bit of cornstarch.
How long do these take from start to finish?
Active working time is about 10-15 minutes per batch. Including the 30-45 minute setting time in the refrigerator, you’re looking at about 55 minutes total. Most of that is hands-off waiting time.
Can I add vitamins or supplements to these gummies?
You can, though I haven’t personally tested this extensively. Liquid vitamins could potentially be incorporated into the juice. However, be aware that heat might degrade certain vitamins, and you’d need to calculate dosage carefully based on how many gummies the recipe makes.
Why do my treats taste different from store-bought ones?
Store-bought gummies typically contain citric acid for tartness, various artificial flavors for intensity, and specific ratios of sugars that create their characteristic taste. Your homemade version will taste more like pure fruit because that’s exactly what it is. Many people find this difference refreshing after getting used to it.
 3")
Homemade Healthy Gummies Recipe (4 Ingredients, Natural Colors!)
- Total Time: 55 minutes
- Yield: 7 servings (75 gummies)
Description
Learn how to make homemade healthy gummies with just 4 natural ingredients. No artificial colors, perfectly chewy texture, and bursting with real fruit flavor. Kids love these better than store-bought!
Ingredients
1/3 cup (80ml) 100% fruit juice – apple, orange, cranberry, grape, pomegranate, or black cherry
2 tablespoons (42g) honey or maple syrup
2 teaspoons (4g) stevia or granulated sugar (optional, for extra sweetness)
2 1/2 teaspoons (7g) unflavored gelatin powder (1 standard Knox packet)
1 tablespoon (15ml) water for blooming gelatin
Instructions
1. Place silicone molds on a baking sheet and clear a flat space in your refrigerator.
2. In a small saucepan, combine fruit juice, honey, and optional sweetener. Heat over medium-high heat, stirring occasionally, until mixture just begins to simmer with small bubbles. Remove from heat immediately.
3. Set hot juice mixture aside for 3 minutes to cool slightly. It should remain warm but not scalding hot.
4. In a small bowl, mix gelatin powder with 1 tablespoon water. Stir vigorously until gelatin fully absorbs water and becomes thick and gel-like (30-60 seconds).
5. Add bloomed gelatin to slightly cooled juice mixture. Stir gently with spoon or spatula (not whisk) until gelatin completely dissolves and mixture is smooth.
6. Using eye dropper, carefully fill each silicone mold cavity to the brim. Work slowly to avoid air bubbles.
7. Carefully transfer baking sheet to refrigerator. Chill for 30-45 minutes until completely firm.
8. Gently push each gummy from underneath mold to pop out. Store in airtight container in refrigerator for up to one week.
Notes
One batch makes approximately 75 small gummies using standard gummy bear molds. Different mold sizes yield different quantities.
Make multiple batches with different juice flavors to create a colorful rainbow variety pack.
AVOID these juices: pineapple, kiwi, mango, papaya, figs, guava, or ginger root – they contain enzymes that prevent gelatin from setting.
For VEGAN option: Replace gelatin with 1 teaspoon agar agar powder. Texture will be slightly firmer and less bouncy.
Adjust sweetness: Use 1-3 tablespoons honey based on juice natural sweetness and preference.
Best juice choices: Apple creates pale yellow gummies, cranberry makes ruby red, orange produces bright orange, grape yields deep purple, and pomegranate delivers rich red.
If mixture starts setting while filling molds, gently warm for a few seconds.
Fill molds to the very brim using surface tension for properly rounded gummies.
Store refrigerated to maintain perfect chewy texture and prevent melting.
- Prep Time: 5 minutes
- Cook Time: 10 minutes
- Category: Healthy Snacks, Kid-Friendly Treats
- Method: Simmer & Set
- Cuisine: American, Family-Friendly
Nutrition
- Serving Size: 10 gummies
- Calories: 31
- Sugar: 7g
- Sodium: 9mg
- Fat: 0g
- Saturated Fat: 0g
- Unsaturated Fat: 0g
- Trans Fat: 0g
- Carbohydrates: 7g
- Fiber: 0g
- Protein: 1g
- Cholesterol: 0mg
Keywords: homemade healthy gummies, natural gummy recipe, fruit juice gummies, healthy candy for kids, gelatin gummies, DIY gummy bears, no artificial colors
The Bigger Picture: Why Homemade Matters
Making homemade healthy gummies represents something larger than just a recipe. According to Mayo Clinic’s pediatric nutrition guidelines, it’s about taking control of what goes into your family’s food, understanding ingredients, and showing kids that delicious treats don’t require artificial anything.
In my Mediterranean upbringing, food was never just about eating. It was about nourishment, tradition, and care. Making these treats connects me to that philosophy. Every batch is an opportunity to show my children that we can have snacks that taste amazing without compromising our values about food quality.
The time investment is minimal, the ingredients are affordable, and the satisfaction of watching your kids enjoy something you made from scratch is priceless. Plus, knowing exactly what’s in every gummy means I don’t have to feel guilty when they ask for seconds.
Your Turn: Start Making Gummies Today
If you’ve read this far, you have everything you need to create your first batch. The recipe is forgiving, the process is straightforward, and the results are genuinely impressive.
Start with a simple flavor like apple or grape juice for your first attempt. Get comfortable with the process. Then branch out and experiment with color combinations, tartness levels, and creative mold shapes.
I’d love to hear about your experience. What flavors did you try? Did your kids get involved? What creative variations did you come up with? Share your results in the comments below, and don’t hesitate to ask questions if something isn’t clear.

Making your own treats might seem like a small thing, but it’s these small decisions about food quality that add up to create healthier habits for your entire family. You’ve got this, and your kitchen is about to become a whole lot more fun.
Looking for more healthy recipes the whole family will love? Check out our immune-boosting soup recipe that’s perfect for keeping everyone healthy during cold season!
Homemade Healthy Gummies Recipe
Prep Time: 5 minutes
Cook Time: 20 minutes
Setting Time: 30 minutes
Total Time: 55 minutes
Servings: 7 servings (10 gummies each, approximately 75 total gummies)
Calories per serving: 31 kcal
Ingredients
- 1/3 cup fruit juice (apple, orange, cranberry, grape, pomegranate, or black cherry recommended)
- 2 tablespoons honey (or maple syrup)
- 2 teaspoons stevia or granulated sugar (optional, for additional sweetness)
- 2 1/2 teaspoons unflavored gelatin powder (1 standard Knox packet)
- 1 tablespoon water (for blooming gelatin)

Equipment Needed
- Small silicone molds (gummy bear, dinosaur, or any shape you prefer)
- Eye dropper (usually included with silicone molds)
- Small saucepan
- Spoon or small silicone spatula
- Small bowl for blooming gelatin
- Baking sheet
- Refrigerator space
Instructions
- Prepare your workspace: Place silicone molds on a baking sheet. Clear a flat space in your refrigerator for the sheet to sit undisturbed.
- Heat the juice mixture: In a small saucepan, combine 1/3 cup fruit juice, 2 tablespoons honey, and 2 teaspoons optional sweetener. Heat over medium-high heat, stirring occasionally, until the mixture just begins to simmer with small bubbles forming. Remove from heat immediately. Do not let it boil vigorously.
- Cool slightly: Set the hot juice mixture aside for 3 minutes to cool slightly. It should remain warm but not scalding hot.
- Bloom the gelatin: While the juice cools, mix 2.5 teaspoons unflavored gelatin powder with 1 tablespoon water in a small bowl. Stir vigorously until the gelatin fully absorbs the water and becomes thick and gel-like (about 30-60 seconds).
- Combine gelatin and juice: Add the bloomed gelatin to your slightly cooled juice mixture. Stir gently with a spoon or spatula (not a whisk) until the gelatin is completely dissolved and the mixture is smooth and uniform. If you see any clumps, return to very low heat for 30 seconds while stirring.
- Fill the molds: Using an eye dropper, carefully fill each cavity in your silicone molds to the very brim. Work slowly to avoid air bubbles. Fill each cavity until you see the surface tension holding the liquid slightly above the mold surface.
- Refrigerate: Carefully transfer the baking sheet with filled molds to the refrigerator. Chill for 30-45 minutes until completely firm and cool to the touch.
- Remove and enjoy: Gently push each gummy from underneath the silicone mold to pop them out. Store in an airtight container in the refrigerator for up to one week.
Recipe Notes
- One batch makes approximately 75 small gummies using a standard gummy bear mold. Different mold sizes will yield different quantities.
- Make multiple batches with different juice flavors to create a colorful variety pack.
- Avoid these juices: Do not use pineapple, kiwi, mango, papaya, figs, guava, or fresh ginger root juice, as they contain enzymes that prevent gelatin from setting properly.
- Vegan option: Replace unflavored gelatin with 1 teaspoon agar agar powder. The texture will be slightly firmer and less bouncy.
- Adjusting sweetness: Reduce or increase honey based on the natural sweetness of your juice and personal preference. You can use up to 3 tablespoons honey for sweeter gummies or as little as 1 tablespoon for less sweet versions.
- Storage: Keep gummies refrigerated in an airtight container for best texture and to prevent molding.
- For more delicious recipes using natural sweeteners, try our turmeric hack recipes!
Nutrition Information (per serving of 10 gummies)
- Calories: 31 kcal
- Carbohydrates: 7g
- Protein: 1g
- Sodium: 9mg
- Sugar: 7g
Nutritional information is approximate and provided for informational purposes. For detailed nutritional guidance, consult with FDA’s nutrition resources.
More Healthy Recipes You’ll Love
Now that you know how to make homemade healthy gummies, explore more of our healthy recipes:
- Semaglutide-Friendly Recipes – Healthy meal ideas that support your wellness journey
- Cortisol Cocktail Recipe – A stress-reducing beverage made with natural ingredients
- Snowball Cookies – Another kid-friendly treat that’s perfect for special occasions
- Lamington Recipe – A delicious dessert made with natural ingredients


1 thought on “Homemade Healthy Gummies Recipe (4 Ingredients, Natural Colors!)”