Little Debbie Christmas Tree Cake Truffles are the fastest, most crowd-pleasing way to turn a nostalgic boxed snack into an elevated holiday confection. If you love the fun, minty-sprinkled flavor of the original Little Debbie treat but want something bite-sized, refined, and giftable—these truffles deliver. They’re no-bake, wallet-friendly, and fast to assemble, which makes them perfect for busy holiday schedules and last-minute party trays.
Why this recipe matters: store-bought novelty cakes can be dry or messy to serve. Making truffles solves that by combining cake crumbs with a binder (cream cheese, frosting, or ganache) and a chocolate shell for a consistent, creamy center every time. You get the recognizable flavor with a prettier presentation and fewer crumbs on your table.
Quick note: these truffles are beginner-friendly but offer room for pro-level tweaks (tempering, ganache shells, flavored coatings). Before we dive into the recipe card and method, I’ll explain the ingredients and the cooking logic behind each step so your truffles come out perfect every time. If you enjoy quick holiday treats, you’ll also appreciate simple breakfast hacks like this easy banana pancakes recipe—both save time and feel homemade.
What are Little Debbie Christmas Tree Cake Truffles?
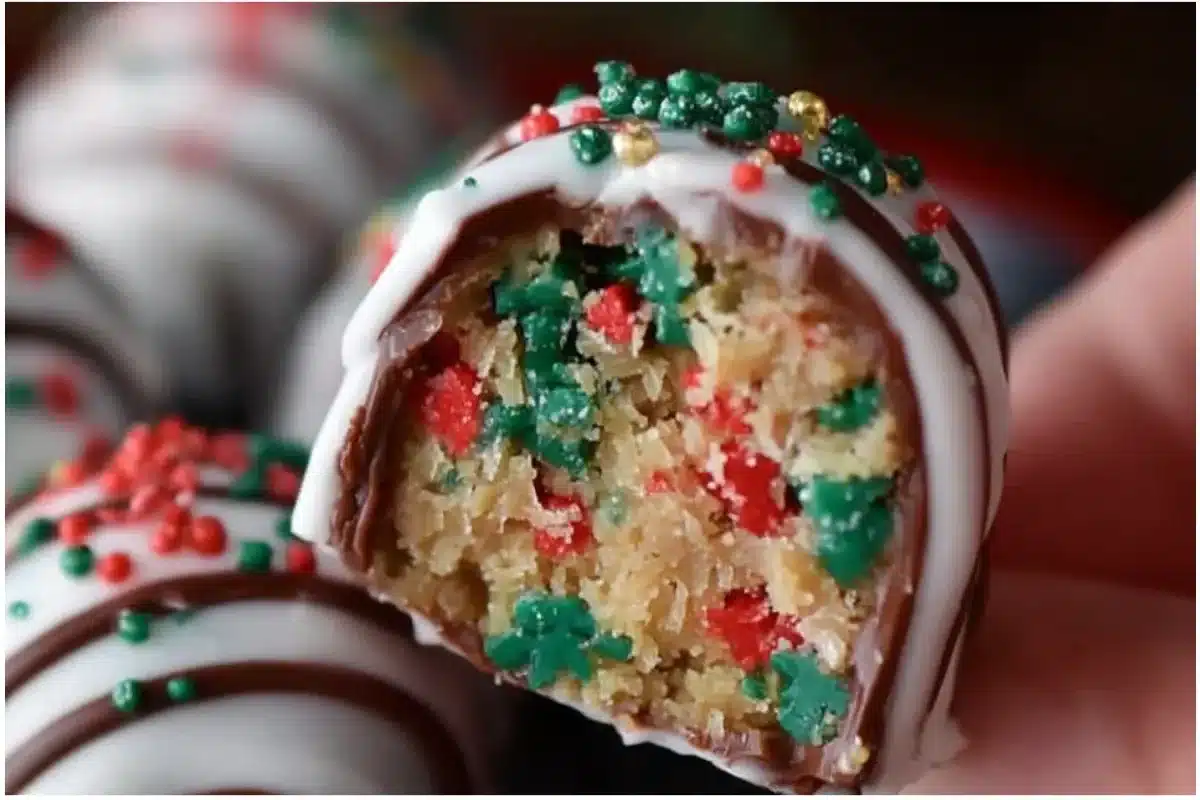
Little Debbie Christmas Tree Cakes are small, tree-shaped snack cakes: white-iced sponge with green-flavored coating and sprinkles, often with cream filling. Turning them into truffles means reducing them to fine crumbs and binding those crumbs into a pliable, creamy mass that’s dipped in chocolate or other coatings. The result is a concentrated flavor bomb—soft interior, chocolate exterior, and a festive appearance.

Little Debbie Christmas Tree Cake Truffles — Easy No-Bake Holiday Treats
- Total Time: 60 minutes
- Yield: 30 truffles 1x
- Diet: Vegetarian
Description
Transform Little Debbie Christmas Tree Cakes into decadent, no-bake truffles. Easy to assemble and perfect for holiday celebrations.
Ingredients
- 12 Little Debbie Christmas Tree Cakes
- 8 oz cream cheese, softened (or 1 cup store-bought vanilla buttercream)
- 12 oz semisweet or white chocolate for coating
- 1 tsp peppermint extract (optional)
- 2 tbsp unsalted butter, softened (optional)
- Colored sprinkles or crushed peppermint for garnish
Instructions
- Crumble the cakes in a food processor or zip-top bag until fine crumbs form.
- In a bowl, beat cream cheese (and butter if using) until smooth. Add peppermint or vanilla extract and mix.
- Fold cake crumbs into the cream cheese until uniform. Adjust consistency with more frosting or powdered sugar if needed.
- Scoop tablespoon-sized portions and roll into balls. Place on a parchment-lined tray.
- Refrigerate for 30–60 minutes until firm.
- Melt chocolate in a double boiler or microwave, stirring until smooth.
- Dip chilled truffles in chocolate, tap to remove excess, and place back on parchment. Decorate with sprinkles immediately.
- Allow coating to harden at room temperature or chill briefly. Store in an airtight container.
Notes
These truffles can be made ahead and stored in the refrigerator or frozen. Use tempered chocolate for a glossy finish.
- Prep Time: 25 minutes
- Cook Time: 0 minutes
- Category: Dessert
- Method: No-Bake
- Cuisine: American
Nutrition
- Serving Size: 1 truffle
- Calories: 180
- Sugar: 15g
- Sodium: 150mg
- Fat: 10g
- Saturated Fat: 5g
- Unsaturated Fat: 4g
- Trans Fat: 0g
- Carbohydrates: 22g
- Fiber: 1g
- Protein: 2g
- Cholesterol: 15mg
Keywords: Christmas, truffles, no-bake, holiday treats, Little Debbie
Why use the original boxes?
- Convenience: pre-baked, uniform flavor, inexpensive.
- Consistency: similar crumb texture across boxes ensures predictable mixing ratios.
- Nostalgia factor: the recognizable flavor and appearance are appealing at holiday gatherings.
Ingredient breakdown — what each component does and why it matters
Understanding ingredient roles will help you swap smartly and avoid common mistakes.
Little Debbie Christmas Tree Cakes (cake crumbs)
- Role: primary flavor, texture, and bulk. When crumbled, they create the truffle base.
- Science: cake crumbs absorb moisture and bind with fats. Too many crumbs relative to binder → dry, crumbly truffles; too few → overly soft, can fall apart.
- Tip: sift larger crumbs through a fork or use a food processor for a uniform texture.
Binder options (cream cheese, frosting, or ganache)
- Cream cheese: adds tang and stabilizes crumbs; cools the palate against sweet chocolate. Contains water and fat; if too wet, truffles will be soft.
- Ready-made frosting (buttercream): very forgiving, sweeter, good for kids. Buttercream has less water than cream cheese, so you may need more frosting for same consistency.
- Chocolate ganache (chopped chocolate + cream): richer, more chocolate-forward; gives a denser center and is excellent if you want to reduce sweetness.
Chocolate coating (white, milk, or dark)
- Role: creates the shell and seals the truffle, contributing texture contrast.
- Science: chocolate contains cocoa butter which crystallizes. How it’s melted and cooled affects snap and bloom.
- Tip: for shiny firm shells, temper chocolate or use compound coating (coating wafers) for convenience.
Add-ins and stabilizers
- Butter: useful for adding richness and smoothing texture.
- Corn syrup or glucose: improves pliability and sheen in ganache-based binders.
- Flavor extracts: peppermint, almond, vanilla; use sparingly—peppermint pairs especially well with Christmas Tree Cake flavor.
Equipment and prep
- Food processor (optional) or a sturdy zip-top bag + rolling pin for crushing.
- Mixing bowls, rubber spatula, electric hand mixer (if using cream cheese for smoother results).
- Baking sheet lined with parchment or a silicone mat.
- Candy thermometer (optional) for tempering.
- Dipping fork or two forks for coating.
Recipe card — Little Debbie Christmas Tree Cake Truffles (No-Bake)
Yields: about 30 truffles (depending on size)
Prep time: 25 minutes
Chill time: 30 minutes to 1 hour
Total time: ~1 hour
Ingredients
- 12 Little Debbie Christmas Tree Cakes (1 standard box usually contains 12)
- 8 oz (225 g) cream cheese, softened (or 1 cup store-bought vanilla buttercream)
- 12 oz (340 g) semisweet or white chocolate for coating (choose based on preference)
- 1 tsp peppermint extract (optional, or 1/2 tsp vanilla extract)
- 2 tbsp unsalted butter, softened (optional, for silkier center)
- Colored sprinkles or crushed peppermint for garnish
Optional for chocolate ganache binder alternative:
- 8 oz (225 g) white chocolate, 3 tbsp heavy cream, 1 tbsp corn syrup
Instructions
- Crumble the cakes: Place Little Debbie cakes in a food processor and pulse to fine crumbs. Or use a zip-top bag and rolling pin.
- Mix binder: In a bowl, beat cream cheese (and butter if using) until smooth. Add peppermint or vanilla extract and mix.
- Combine: Fold cake crumbs into the cream cheese until uniform. Check consistency: the mixture should hold together when pressed. Add more frosting if too dry, or a tablespoon of powdered sugar if too wet.
- Form truffles: Scoop tablespoon-sized portions and roll into balls. Place on a parchment-lined tray.
- Chill: Refrigerate for 30–60 minutes until firm.
- Melt coating: Gently melt chocolate in a double boiler or microwave in 20-second bursts, stirring between. If using tempering, bring to correct temps for glossy finish.
- Dip: Using a dipping fork, submerge chilled truffles in chocolate, tap to remove excess, and place back on parchment. Immediately decorate with sprinkles.
- Set: Allow coating to harden at room temperature or chill briefly. Store truffles in an airtight container.
Yield adjustment: double recipe for larger gatherings; freeze formed truffles before dipping if making ahead in bulk.
The method — step-by-step with chef insights
Step 1 — Crumbling and particle size
Consistency matters: aim for fine crumbs, but not powder. Fine crumb maximizes surface area for binder adhesion. If the texture is too coarse, you’ll find pockets of dry cake inside the truffle. Pulse in short bursts and stop before it becomes flour.
Step 2 — Choosing and preparing the binder
Cream cheese gives balanced sweetness and tang. Bring cream cheese to room temperature so it blends smoothly and doesn’t create lumps. If you prefer buttercream, choose a stiffer frosting to avoid overly soft centers. For a chocolate-forward center, make a ganache binder: heat cream, pour over chopped chocolate, add corn syrup, and cool until spreadable.
Step 3 — Mixing and checking consistency
Work with a spatula for control. The ideal ball forms without shedding crumbs and doesn’t feel greasy. If mixture is crumbly, add 1 tbsp frosting or softened butter at a time. If too soft, chill and then add more crushed cake crumbs until desired firmness.
Step 4 — Forming uniform truffles
Use a small cookie scoop for consistent sizing. Lightly oil your hands to prevent sticking. Roll smoothly—overworking can heat the mixture and make it sticky. Chill before dipping so the center doesn’t ooze when coated.
Step 5 — Chocolate dipping technique
Double boiler for gentle melting. If using a microwave, heat in 20-second increments at 50% power and stir thoroughly. For a glossy snap, temper chocolate (heating and cooling to specific temperatures). Alternatively, use compound coating wafers that don’t require tempering—faster but less authentic flavor.
Step 6 — Final finishing and storage
Apply decorations while the coating is wet. If you want a drizzle, thin extra melted chocolate with a teaspoon of neutral oil for smoother lines. Cool until firm but don’t over-chill; condensation can form when moving between cold and warm environments.
Pro tips and common mistakes to avoid
- Too dry or crumbly centers: add more binder (cream cheese or frosting) a tablespoon at a time. Patience is key—chill and reassess.
- Too soft/oozy centers: chill the mixture longer before forming; reduce liquid in binder or add more crumbs.
- Chocolate bloom or dull coating: use tempered chocolate or high-quality couverture; avoid rapid temp swings—cool slowly.
- Sticky hands during rolling: keep a bowl of warm water nearby to briefly wet your hands or lightly coat them with neutral oil.
- Overworking the mixture: roll gently. Excess pressure warms the fat in the binder, making centers sticky.
- Using melted butter or warm ingredients: always use room-temperature or chilled binders when combining with crumbs to maintain structure.
Creative variations and swaps
Mint-chocolate truffles
- Add 1/2–1 tsp peppermint extract to the binder and dip in dark chocolate. Garnish with crushed peppermint candy. This enhances the festive green decoration of the original Little Debbie cake.
Pistachio-crunch truffles
- Fold in 1/3 cup finely chopped salted pistachios for texture. After dipping in white chocolate, roll in crushed pistachios to echo the tree color and add crunch. For a richer inside, consider a small dollop of [pistachio-ganache], or use pistachio paste.
Caramel apple twist
- If you like fruit + sweet combos, drizzle salted caramel on top or incorporate a tablespoon of caramel into the binder for a caramel-laced center. (If you want an entire dessert in that flavor profile, check this caramel apple cheesecake for inspiration on pairing caramel and tart apples.)
Chocolate-dipped with ganache core
- For a more decadent texture, swap cream cheese for a stabilized ganache (cool ganache until thick but still pliable). This makes the truffle richer and less tangy.
White chocolate and sprinkles (kid-friendly)
- Use white chocolate for dipping and top with colorful sprinkles for a playful presentation that kids love.
Alcohol-infused truffles (adult)
- Add 1 tbsp of liqueur (peppermint schnapps, Irish cream, or amaretto) to the binder for adult truffles. Reduce other liquids accordingly.
Gluten-free adaptation
- Use gluten-free snack cakes with similar texture and flavors, or make a custom sponge cake and follow the same truffle logic.
Swapping the festive cake
- You can generally make truffles from any excess cake: birthday cake, red velvet, or even leftover pound cake. For breakfast-to-dessert mashups, consider flavor pairings with quick bakes like this blueberry breakfast cake—a blueberry crumb center dipped in white chocolate makes an elegant brunch sweet.
Storage, gifting, and freezing
Short-term storage
- Refrigerate in an airtight container for up to 7 days. Keep in single layers separated by parchment to prevent sticking.
Long-term freezing
- To freeze, pre-freeze dipped truffles on a tray until solid, then transfer to a freezer-safe container with parchment between layers. Freeze up to 3 months. Thaw in the refrigerator overnight before serving to avoid condensation.
Gifting tips
- Pack in a rigid tin or box with tissue between layers. Include a note about refrigeration if you used cream cheese binder.
- For mail-safe gifts, freeze the truffles and ship on dry ice following carrier guidelines.
Nutrition insights — making an informed choice
Estimate per truffle (based on 30 servings, cream cheese binder, semisweet coating):
- Calories: ~160–220 kcal
- Fat: 10–14 g (saturated fat from chocolate and cream cheese)
- Sugar: 12–20 g
- Protein: 1–2 g
Ways to lighten them up
- Use reduced-fat cream cheese or a lighter frosting, recognizing this changes texture and mouthfeel.
- Use dark chocolate (70% cocoa) which typically has less sugar and more antioxidants than white or milk chocolate.
- Make smaller truffles (use a 3/4 tsp scoop) to reduce per-serving calories.
Health note
These truffles are an indulgent holiday treat—not a daily snack. If you need lower-sugar dessert options, consider fruit-based recipes or lighter bakes like the recipes in our breakfast and dessert sections.
Plating and presentation — how to make them look professional
- Uniform size: use a small cookie scoop for consistent portions.
- Mirror sheen: temper chocolate for a glossy finish and clean snap.
- Accents: fine sea salt, edible gold dust, or crushed candy cane on top adds a finishing touch.
- Tray arrangement: alternate coated and uncoated truffles; add spruce sprigs or edible holly for seasonal charm.
Troubleshooting quick guide
Problem: Truffles crumble when rolled
- Fix: Add binder by the tablespoon and chill. Reassess.
Problem: Chocolate shell cracks or looks dull
- Fix: Use tempered chocolate or higher-quality coating. Avoid refrigerator condensation—cool slowly.
Problem: Centers leak after dipping
- Fix: Ensure centers are chilled and firm. Thicker centers (more crumbs) help contain moisture.
FAQ (schema-ready Q/A)
Q: Are these Little Debbie Christmas Tree Cake Truffles gluten-free?
A: Not when made with the standard Little Debbie cakes—they contain wheat. To make gluten-free truffles, use gluten-free cake or sponge crumbs with similar texture.
Q: Can I substitute frosting for cream cheese?
A: Yes. Frosting will make the truffle sweeter and slightly denser. Use a thicker frosting for better structure and reduce quantity if the mixture becomes too soft.
Q: How do I prevent condensation on the chocolate shell after chilling?
A: Avoid moving truffles directly from cold to warm conditions. Cool at room temperature for a short period after dipping or move chilled truffles to a cool dry location to set. If you must chill, place them in an airtight container first.
Q: Can I make these ahead for holiday parties?
A: Yes. Make truffle centers, form and freeze them. Dip in chocolate on the day of the party or dip frozen centers and allow coating to set—then store chilled. Properly stored, dipped truffles keep in the fridge for up to a week or frozen for several months.
Q: What’s the best chocolate to use?
A: For flavor and texture, use high-quality couverture or chocolate bars with at least 30–32% cocoa butter. For convenience and glossy ease, coating wafers (compound chocolate) work but may have a different taste profile.
Q: Can these be made vegan?
A: Substitute vegan “cream cheese,” dairy-free chocolate, and use vegan-friendly sponge cake if available. Results will vary but are doable.
Final chef advice before you start
- Taste as you go. If the cake flavor is very sweet, counter with a touch of acid (a teaspoon of lemon juice) in the cream cheese binder.
- Make a small test truffle first: shape, chill, dip one, and evaluate texture and balance. Adjust binder ratios before committing the full batch.
- Keep tools and workspace cool when working with white chocolate or butter-rich binders—warm kitchens make truffle work harder.
resources and related recipes
- If you enjoy converting boxed or leftover pastries into new desserts, check our quick banana pancakes recipe for another quick, crowd-pleasing breakfast-to-dessert idea.
- Love holiday and brunch fusions? Try turning leftover cake flavors into a brunch centerpiece like this blueberry breakfast cake.
- For flavor inspiration that pairs well with caramel drizzle variations on truffles, review our caramel apple cheesecake write-up.
Conclusion
Little Debbie Christmas Tree Cake Truffles are proof that a simple store-bought snack can become an elegant, giftable confection with minimal effort. Whether you keep them classic with cream cheese and dark chocolate or experiment with pistachios, mint, or caramel, the technique stays the same: fine crumbs + the right binder + a cold center + glossy shell.
If you want another step-by-step example or a slightly different take on the same conversion technique, see this detailed guide to making Little Debbie Christmas Tree Cake Truffles with visuals: Little Debbie Christmas Tree Cake Truffles (Easy No-Bake Recipe …). For an alternate how-to with variations and plating ideas, check Little Debbie Christmas Tree Cake Truffles – My Incredible Recipes.
Encouragement: make a small test batch tonight—taste, tweak, and then scale up for your holiday party. These truffles are a fast way to make something memorable from something familiar. If you try the recipe, save it, share it with friends, or gift a tin—they disappear faster than you think.
Ready to make them? Scroll up to the recipe card and start with the crumb test—it’s the reliability trick every pastry chef uses.


2 thoughts on “Little Debbie Christmas Tree Cake Truffles”