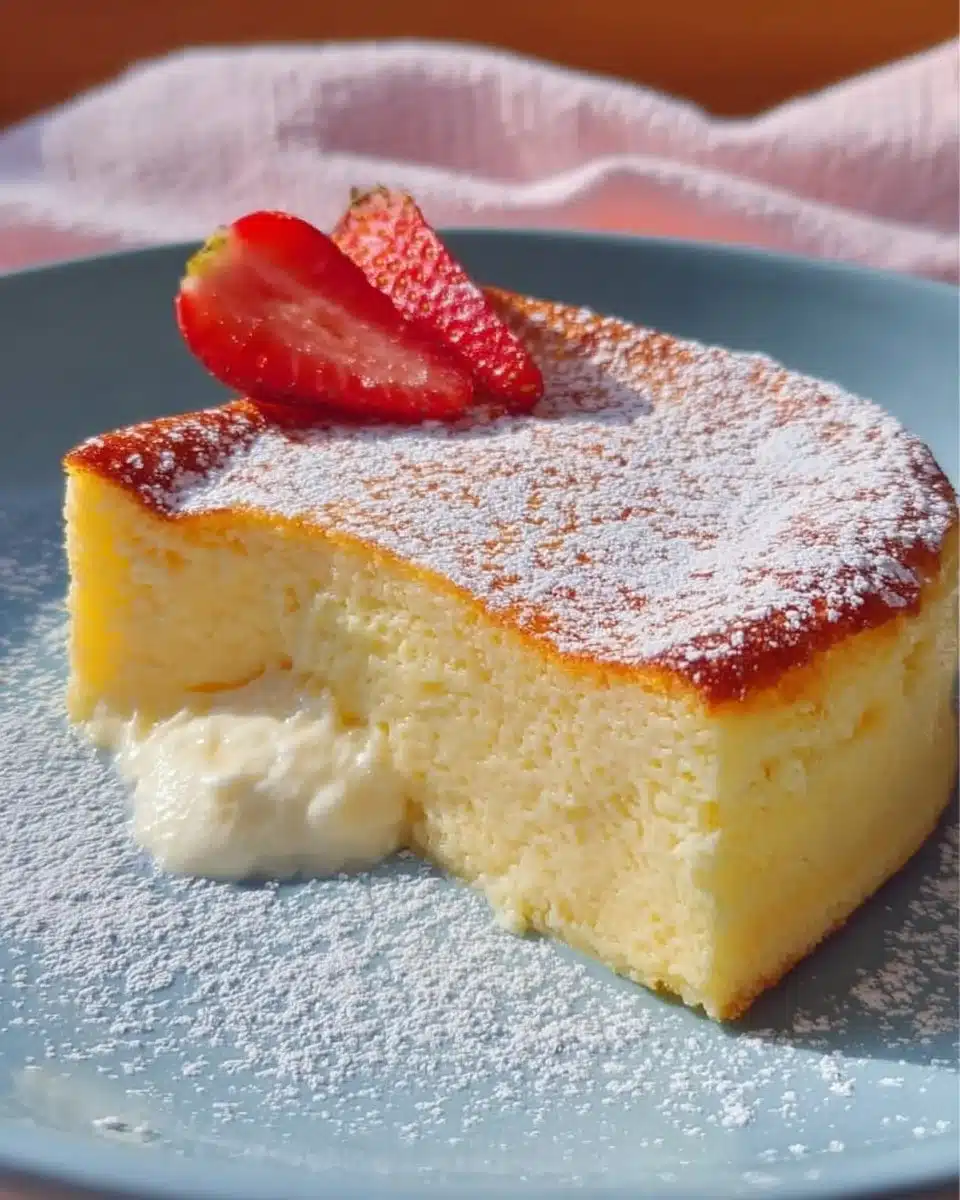
Welcome to the world of Magic Custard Cake, a recipe that has enchanted many dessert lovers with its beauty and taste. This unique cake merges three distinct textures—cake on the top, creamy custard in the middle, and a delicate, slightly crispy base, all in one delightful bite. If you’ve ever dreamt of a dessert that is as magical in its simplicity as it is in its layers, then this cake is sure to dazzle both your taste buds and your guests.
Why Magic Custard Cake?
Cooking can often feel overwhelming, especially when it comes to baking. With numerous components and layers to construct, it’s easy to feel intimidated. But this Magic Custard Cake offers a streamlined solution. It’s designed to create a multi-textured dessert without the fuss typically associated with more complex recipes. Each slice promises a decadent experience that reflects hard work in the kitchen but is surprisingly easy to pull off.
As we delve deeper into this recipe, we will cover the ingredient breakdown, step-by-step methods, tips for success, and variations to cater to your taste. Whether it’s for a family gathering, a festive occasion, or a simple weeknight treat, this cake has you covered.
Print
Magic Custard Cake
- Total Time: 75 minutes
- Yield: 9 servings 1x
- Diet: Vegetarian
Description
A stunning dessert featuring three unique textures: a top cake layer, a creamy custard in the middle, and a delicate base, all in one delightful slice.
Ingredients
- 4 large eggs
- 1 cup (200g) granulated sugar
- 1/2 cup (115g) unsalted butter, melted
- 2 cups (475ml) whole milk, lukewarm
- 1 teaspoon vanilla extract
- 3/4 cup (90g) all-purpose flour
- A pinch of salt
Instructions
- Preheat your oven to 325°F (160°C). Lightly grease a 9×9-inch baking dish and place it in an oven-safe tray filled with water.
- Separate the egg whites from the yolks, placing them in two different mixing bowls.
- Whisk the egg yolks and sugar together until pale and fluffy.
- Add melted butter, lukewarm milk, and vanilla to the egg yolk mixture, mixing until combined.
- Sift in the flour and salt, stirring until no lumps remain.
- Whip the egg whites in a clean bowl until stiff peaks form.
- Gently fold the whipped egg whites into the batter.
- Transfer the batter to the baking dish and smooth the top.
- Bake for 50-60 minutes, until golden brown and slightly jiggly in the center.
- Cool to room temperature, refrigerate for a few hours, slice, and serve.
Notes
For best results, ensure ingredients are at room temperature and avoid overmixing the batter.
- Prep Time: 15 minutes
- Cook Time: 60 minutes
- Category: Dessert
- Method: Baking
- Cuisine: French
Nutrition
- Serving Size: 1 square
- Calories: 220
- Sugar: 14g
- Sodium: 120mg
- Fat: 11g
- Saturated Fat: 6g
- Unsaturated Fat: 4g
- Trans Fat: 0g
- Carbohydrates: 28g
- Fiber: 1g
- Protein: 5g
- Cholesterol: 200mg
Keywords: cake, custard, dessert, baking, easy recipe
Understanding the Ingredients
To craft a truly spectacular Magic Custard Cake, it’s essential to understand the ingredients that play pivotal roles in creating the unique texture and flavor. Here’s a rundown of the key components and their contributions:
Eggs
Eggs are the backbone of this recipe. The yolks and whites work in harmony to create structure and contribute to the rich flavor profile. The proteins in the eggs will help in forming the layers during baking, allowing the cake to rise while allowing the custard to settle below.
Milk
Milk brings moisture and richness, helping to develop the creamy custard feel in the middle. Whole milk is preferred for its high fat content, which results in a velvety texture. It’s a crucial ingredient that allows the cake to maintain stability while enhancing flavor.
Sugar
Sugar not only sweetens the cake but also plays a role in browning. During baking, it caramelizes slightly, giving the top a beautiful golden, appealing finish.
Flour
All-purpose flour serves as the gluten structure that keeps the cake intact. While it’s minimized in quantity compared to traditional cakes, it’s essential for creating the top layer and stabilizing the custard.
Butter
Butter adds richness and flavor while also contributing to the overall moistness of the cake. Using unsalted butter allows you to control the sodium levels, accentuating the sweetness.
Vanilla
Vanilla extract elevates the dessert by providing aromatic qualities that enhance the overall flavor. The choice of either natural or artificial vanilla will affect the intricacies of taste, so choose based on preference.
Salt
Even a pinch of salt can intensify the flavors and balance the sweetness in a custard cake. Don’t skip this essential ingredient!
Step-by-Step Recipe for Magic Custard Cake
Now that we’ve discussed the roles of each ingredient, let’s dive into the process. Below is an easy-to-follow recipe that will guide you to creating your own Magic Custard Cake.
Ingredients:
- 4 large eggs
- 1 cup (200g) granulated sugar
- 1/2 cup (115g) unsalted butter, melted
- 2 cups (475ml) whole milk, lukewarm
- 1 teaspoon vanilla extract
- 3/4 cup (90g) all-purpose flour
- A pinch of salt
Instructions:
Preheat the Oven: Start by preheating your oven to 325°F (160°C). Lightly grease a 9×9-inch (or similar size) baking dish and place it in an oven-safe tray filled with water to create a steam bath—a crucial step for even baking.
Separate the Eggs: Carefully separate the egg whites from the yolks, placing them in two different mixing bowls.
Mix Egg Yolks with Sugar: ADD the sugar to the egg yolks and whisk together until the mixture is pale and fluffy. You can use a handheld mixer for better results.
Incorporate Ingredients: INTO the egg yolk mixture, add melted butter, lukewarm milk, and vanilla extract. Mix until fully combined.
Add Flour and Salt: SIFT the flour and salt into the wet mixture, stirring until no lumps remain.
Beat Egg Whites: In a CLEAN bowl, whip the egg whites until stiff peaks form. This step is critical as it allows for a light and airy cake.
Fold Whites Into Batter: GENTLY fold the whipped egg whites into the batter using a spatula. Be careful not to deflate the egg whites; this is key to achieving the magical layer effect.
Pour into Baking Dish: Transfer the batter into the prepared baking dish, making sure to smooth the top.
Bake: PLACE the baking dish into the preheated oven and allow it to bake for approximately 50-60 minutes, or until the top is golden brown and the center is set but slightly jiggles.
Cool and Serve: Once done, remove from the oven and let it cool to room temperature. For best flavor, refrigerate for a few hours before serving. Cut into squares and enjoy!
Pro Tips and Cooking Insights
Temperature Matters: Ensure that your milk is lukewarm—not cold—not only helps in dissolving the sugar but also ensures the eggs don’t curdle when combined.
Whipping Egg Whites: For best results, use a clean bowl to prevent any grease from affecting the volume of whipped egg whites. Adding a pinch of cream of tartar can help stabilize your whipped egg whites.
Butter Temperature: Melted butter should be slightly cooled before adding to the egg yolks to prevent cooking the eggs.
Testing for Doneness: Because oven temperatures can vary, check the cake periodically after about 45 minutes of baking. The cake should be firm and bounce back slightly when touched.
Common Mistakes to Avoid
Overmixing the Batter: Once the egg whites are added, mix only until just combined. Overmixing can deflate the bubbles created by whipping, leading to a denser cake.
Skipping the Water Bath: This technique helps maintain moisture, yielding a smoother custard layer. Avoid baking without it as your custard may crack.
Baking at Too High a Temperature: Baking at high temperatures can cause the top to brown too quickly without setting the custard. Following the recommended temperature is key to achieving that magic layer.
Variations and Swaps
Although the classic Magic Custard Cake is delightful as is, here are some variations for a different twist:
Cocoa Magic Custard Cake: Substitute 1/4 cup of flour with cocoa powder for a chocolate-flavored version. You can also drizzle melted chocolate on top for added decadence.
Citrus Burst: Add a teaspoon of lemon or orange zest to the batter to invigorate the flavor profile and add a hint of freshness.
Mix-ins: Consider folding in blueberries, raspberries, or chocolate chips for an extra layer of flavor and texture.
Storage and Reheating
To maintain optimal freshness, store your Magic Custard Cake in an airtight container in the refrigerator. This cake will last for about 3-4 days. For serving, simply chill the cake and serve it cold or at room temperature—the choice is yours!
If you prefer a warm slice, gently reheat a portion in the microwave for about 20-30 seconds. It’s important not to overheat, as this will alter the custard’s texture.
Nutritional Insights
Understanding the nutritional composition of your Magic Custard Cake can help make more informed dietary choices, especially if shared with family or friends. A typical serving (1 square, based on the recipe above) contains approximately:
- Calories: 220
- Fat: 11g
- Carbohydrates: 28g
- Protein: 5g
- Sugars: 14g
While this dessert isn’t designed to be “light,” it’s a wonderful treat for special occasions and allows you to enjoy a delightful slice of indulgence.
FAQs About Magic Custard Cake
Q: Can I make Magic Custard Cake in advance?
A: Yes, you can prepare the cake a day before serving. In fact, the flavors meld beautifully when allowed to sit overnight in the refrigerator.
Q: What if my custard layer didn’t form?
A: This can often happen from overmixing, incorrect baking temperature, or inadequate egg white folding. Ensure to follow the mixing instructions carefully for best results.
Q: Can I freeze this cake?
A: While freezing is possible, it may alter the texture of the cake. If you do freeze it, make sure it’s properly wrapped to avoid freezer burn, and consume it within 1-2 months.
Final Thoughts
The Magic Custard Cake is truly a marvel of baking, combining simple ingredients to create a stunning dessert. This recipe empowers you in the kitchen, offering a taste of elegance that’s accessible to all levels of home bakers. Whether served warm or chilled, garnished with fresh fruit, or enjoyed plain, each bite transports you to a world where cooking becomes truly magical.
Now that you have all the tools, techniques, and insights at your fingertips, it’s time to don your apron and create a masterpiece. Don’t forget to save this recipe, share it with friends, and spread the joy of baking!
Now, roll up your sleeves and let the baking adventure begin!


2 thoughts on “Magic Custard Cake: A Delightful Culinary Experience”