I still remember the first time I made 4-Ingredient Mint Oreo Bark for a chilly weekend visit from my sister. The kitchen smelled like chocolate and peppermint, and the kids clustered around the counter with sticky fingers and big grins. That night we crumbled bark into mugs of hot cocoa and listened to the rain on the roof while simple bites made the house feel small and full. If you love that warm, easy treat, you might also enjoy this riff on other minty sweets I make for the holidays: peppermint bark brownies.
Why 4-Ingredient Mint Oreo Bark Still Feels Like Home
This bark is the kind of recipe that wraps itself around a memory. It is not trying to be fancy. It is built from comfort, quick joy, and the kind of crunchy, creamy contrast that makes mouths slow down and taste. The first time I layered melted chocolate and crushed cookies with a whisper of peppermint, my kids declared it better than candy canes. That moment made me keep the recipe in the top drawer of my mind.
I like recipes that fold into family life the way this one does. You do not need special tools or a long afternoon. You only need the willingness to stir, to listen to the chocolate hiss as it melts, and to let the white chocolate make a pretty swirl. These small acts make home feel cared for and present.
The bark also fills a role in our holiday box of treats. It shows up on cookie plates, tucks into little jars for neighbors, and sneaks into lunchboxes for a happy surprise. It has the calm power of something simple done well. If you want more small, sweet ideas to share, try a batch of my kids favorite peppermint Oreo balls for a different shape and a similar heart.
Bringing 4-Ingredient Mint Oreo Bark Together
“Every time I stir this pot, it smells just like Sunday at home.”
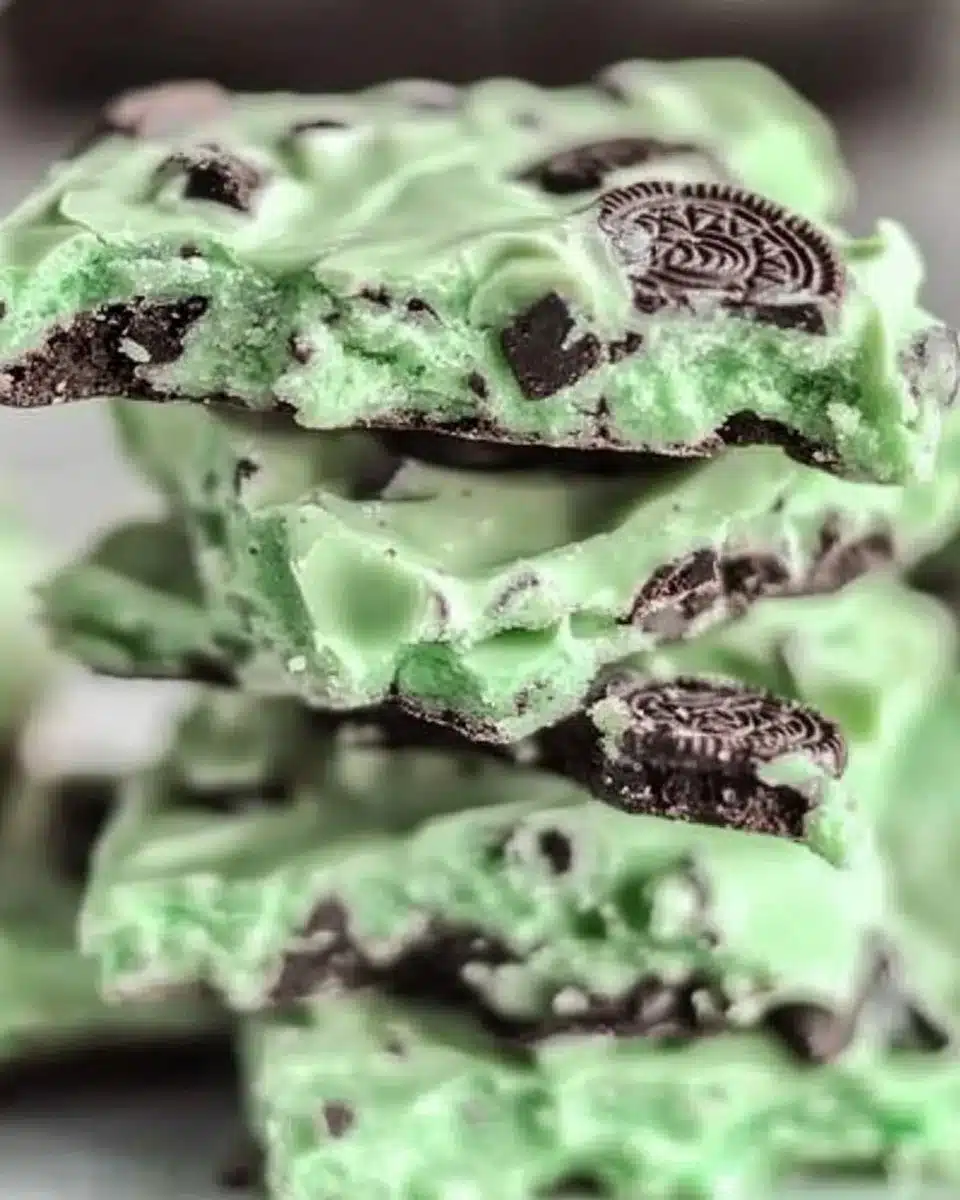
Making this bark is a friendly rhythm. Melt, stir, fold, pour, and wait. The melted chocolate shines like dark glass and the crushed Oreos give a charcoal confetti that pops against the chocolate. The peppermint lifts it all with a bright breathy note that makes each bite feel clean and crisp.
When I make the bark, I tell the kids to stand back until the chocolate cools a bit. They hover with marshmallow hands and hopeful eyes. Meanwhile, I use a small spoon to drizzle white chocolate in lazy lines and then pull a butter knife through to make veins of color. That little motion always makes me smile like a quiet artist.
The beauty lies in how forgiving it is. If the chocolate warms too much or the swirls look messy, it still tastes like home. The textures of the crunchy cookie and the smooth chocolate make every bite satisfying. Once you hear the small snap when you break a piece, you know you did it right.
Print
4-Ingredient Mint Oreo Bark
- Total Time: 20 minutes
- Yield: 4 servings 1x
- Diet: Vegetarian
Description
A delightful and simple recipe for Mint Oreo Bark that combines creamy chocolate, crushed Oreos, and a hint of peppermint for a comforting treat.
Ingredients
- 1 package Oreos, crushed
- 1 cup creamy chocolate, melted
- 1 teaspoon peppermint extract
- 1/2 cup white chocolate, melted
Instructions
- Line a baking sheet with parchment paper.
- Melt the creamy chocolate and mix in crushed Oreos and peppermint extract.
- Spread the mixture onto the prepared baking sheet.
- Drizzle melted white chocolate on top and swirl to create a marbled effect.
- Refrigerate until set, then break into pieces and serve.
Notes
For a cozier aroma, add a splash of vanilla extract to the melted chocolate. You can also vary the chocolate type for different flavors.
- Prep Time: 15 minutes
- Cook Time: 5 minutes
- Category: Dessert
- Method: Chilling
- Cuisine: American
Nutrition
- Serving Size: 2 pieces
- Calories: 200
- Sugar: 18g
- Sodium: 115mg
- Fat: 10g
- Saturated Fat: 5g
- Unsaturated Fat: 4g
- Trans Fat: 0g
- Carbohydrates: 26g
- Fiber: 1g
- Protein: 2g
- Cholesterol: 5mg
Keywords: Mint Oreo Bark, Dessert, Easy Recipes, Holiday Treats, Family Recipes
What Goes Into 4-Ingredient Mint Oreo Bark
Crushed Oreos
Creamy chocolate
Peppermint extract
White chocolate
A few warm notes as you gather your items. Use Oreos with the filling; that sweet center adds a soft chew and extra flavor. Pick creamy chocolate that melts smoothly and tastes good on its own. A little peppermint extract goes a long way, so choose a brand you like. For the white chocolate, real white chocolate chips give a softer melt and a truer white for pretty swirls.
If you want to make the aroma cozier, add a tiny splash of vanilla into the creamy chocolate. It is a gentle trick that makes the chocolate smell like a bakery. If you buy fresh butter cookies instead of Oreos you will get a different, more tender crunch. Those small choices make the bark feel personal.
I often keep an eye on the chocolate quality. If your creamy chocolate has a hint of salt, the contrast to the cookie will sing. If it tastes flat, add a pinch of fine salt to lift the flavors. Little adjustments like this turn a quick snack into something you might gift.
How to Make 4-Ingredient Mint Oreo Bark
Line a baking sheet with parchment paper.
Line the sheet so you can lift the bark out easily later. Press the paper flat into the corners and smooth the surface with your hands. This step saves you time and keeps edges neat when you break the bark into pieces.Melt the creamy chocolate and mix in crushed Oreos and peppermint extract.
Melt the chocolate slowly until it is glossy and smooth, then stir in the cookie bits and a careful splash of peppermint extract. Mix until the cookies are evenly distributed and the chocolate holds them together. Breathe in the sweet, cool smell and stop when the chocolate looks thick and shiny.Spread the mixture onto the prepared baking sheet.
Use an offset spatula or the back of a spoon to spread the chocolate mixture in an even layer across the parchment. Aim for a thickness that will give you a good crunch and a clean snap, about a quarter inch to half an inch. Take a moment to smooth the top so the white chocolate will sit nicely.Drizzle melted white chocolate on top and swirl to create a marbled effect.
Melt the white chocolate until silky and use a small spoon to drizzle it in lines over the dark layer. Use the tip of a knife or a toothpick to pull through the lines and make a marbled pattern. Work quickly while the chocolate is warm so the colors blend but do not melt together completely.Refrigerate until set, then break into pieces and serve.
Chill the tray for about 20 to 30 minutes so the bark becomes firm and easy to snap. When it is set, lift the parchment off the tray and break the bark into pieces with your hands or a bench scraper. Arrange the pieces on a plate and listen for the bright snap when someone takes a bite.

Serving 4-Ingredient Mint Oreo Bark With Family Warmth
We eat this bark in small, proud ways. I like to nestle pieces on a simple white platter in the middle of the table and let people pass the plate around while the coffee brews. The kids take two, check the best pieces, and tuck a few into napkins to save for later. That sharing is what this treat is about.
For a cozy party, I set the bark beside bowls of nuts and dried fruit so guests can mix textures on a dessert plate. It also pairs well with a scoop of vanilla ice cream if you want a grown up afternoon treat. When I bring it to afternoon tea, I add a few mint leaves as a nod to the flavor inside.
If you want to try another shape for a buffet, press the mixture into small paper cups to make little cups of crunchy bark. They look festive and make passing treats easier. For a different twist that still keeps the same heart, try serving alongside soft peppermint cookie cups I love to bake at home: chocolate peppermint cookie cups.
A Few Simple Tips That Make a Big Difference
Warm your bowl before melting the chocolate to avoid sudden temperature changes that might seize it. Use a low heat and stir often if you melt on the stove. If you use the microwave, heat in short bursts and stir between each one until the chocolate is just smooth. These small moves keep the chocolate glossy and forgiving.
Break the Oreos with your hands or pulse them in a food processor for different textures. Coarser chunks give more crunch and visual contrast. Finer crumbs melt into the chocolate and give an even, cookie flecked look. Think about how you want the bark to feel in your mouth and pick a texture with that in mind.
Keep your peppermint extract measured with a small spoon. A drop too much can feel sharp and medicinal. Taste as you go. The cooling lift of peppermint should brighten the chocolate, not overwhelm it. If you ever go too far, a little extra melted chocolate will mellow the mint.
Simple Variations for Different Moods
If you want a darker, richer bark, use high quality dark chocolate instead of the creamy chocolate. It will taste deeper and pair beautifully with the sweet cookie pieces. For a lighter, sweeter bar, use milk chocolate. Both versions keep the same sense of home and crunch.
To make a layered look, add a thin layer of crushed candy canes over the white chocolate before it sets. It adds a chilly crunch and a festive look. You can also sprinkle sea salt flakes on top for a sweet and salty finish that wakes up the flavors.
For a kid friendly twist, press chopped mini M&M candies into the top before the white chocolate sets. They add color and a playful texture that all ages love. These small changes keep the recipe familiar while letting you play in the kitchen.
Kid Friendly Kitchen Moments
This is a recipe I trust with little helpers. Give them a small bowl of crushed Oreos and a spoon and you will have serious moral support. Let the kids drizzle the white chocolate with guidance, and you will get silly swirls and proud faces. They learn about heat, speed, and patience in simple, safe ways.
If the children are old enough, teach them how to measure peppermint extract so they learn restraint and taste. Making bark becomes a game of balance and senses. The reward comes when they taste the final pieces and beam because they helped make something important.
Wrap a small parcel for each child with three pieces in tissue and watch the way their chest swells with ownership. Small rituals like that build love of cooking and comfort with family food.
Common Mistakes and How to Fix Them
If your chocolate seizes and becomes grainy, it usually means it got too hot or a drop of water slipped in. Move the bowl off the heat and stir in a spoon of warm oil or a teaspoon of warm cream if you eat dairy. That sometimes brings it back to smooth. If not, start with a fresh bowl and melt slowly next time.
If the peppermint feels too strong, stir in a little more melted chocolate to dilute the flavor. If it is too weak, whisk in a few drops more peppermint until it tastes right. Always add tiny amounts, taste, and then add again. The same rule goes for salt and vanilla.
If the white chocolate refuses to melt smoothly, try low heat and frequent stirring. White chocolate is more sensitive, so it needs gentle care. You can also add a small splash of neutral oil to help it melt.
How to Save the Leftovers
Store the bark in an airtight container at room temperature if your kitchen is cool and dry. If the house is warm, store it in the fridge to keep the chocolate firm. Put parchment between layers so the pieces do not stick together. Wrapped this way, it keeps for a week or two.
You can also freeze the bark in a single layer first, then move pieces to a freezer bag for long term storage. Thaw at room temperature for about 15 minutes before serving so the chocolate regains its snap. Freezing will keep the bark good for a month or more.
If you plan to make it ahead for a party, I like to prepare it two days before. The flavors settle and the mint and chocolate get to know each other, which makes each piece taste a touch deeper. Tell your guests you made it earlier and they will think you were thoughtful and calm.
Gifting and Wrapping Ideas
Small clear bags tied with twine make the simplest, prettiest gifts. Tuck a note inside that says when it was made and a warm line about sharing. I pair a few pieces with a small jar of hot cocoa mix and send them to friends who need a little lift. It is an easy way to practice kindness.
For a fancier touch, arrange pieces in a small box with tissue and a sprig of rosemary or mint. The green looks pretty against the chocolate. If you wrap a stack of bark between waxed paper and tie with ribbon, you will have a portable, loving gift anyone will enjoy.
Label jars if you keep several flavors in your pantry. Family and friends always appreciate knowing what they are tasting. A little note about the four gentle ingredients makes people smile at how something so simple can taste so special.
A Few Thoughts on Ingredients and Sourcing
Oreos are a small joy, but you can use a good sandwich cookie from your local bakery for a different texture. If you buy chocolate bars instead of chips, chop them finely so they melt evenly. Real chocolate with cocoa butter will melt smoother and taste richer than candy coating.
For peppermint extract, choose pure extract rather than imitation if you can. The pure kind smells fresher and tastes cleaner. If you cannot find it, crushed peppermint candies work in a pinch. Put them on top so they keep their crunch.
If you have dietary needs, you can find vegan chocolate and dairy free white chocolate alternatives. Test the flavors first to find brands that taste pleasing on their own. This bark is forgiving and will still make a warm memory even when you swap things out.
Celebrations and Small Traditions
We keep a jar of bark for unexpected guests. When someone drops by, I pull a few pieces from the jar, set them on a small plate, and pour tea. The welcome feels practiced and true. The bark is part of how we show we notice people and want them to linger.
At holiday time, the kids help decide whether to add candy canes or leave the bark classic. We vote, we taste, and then we make the plan together. These small rituals teach patience, taste, and how to make choices that include others.
When the year feels busy, a simple plate of bark on the counter can calm us. It is not the dessert that shows off the most. It is the one that says stay a while and share what you have been doing. That is worth more than any sparkly display.
Troubleshooting Texture and Look
If your bark is too thin and breaks into tiny slivers, next time make a thicker layer. A thicker layer gives a satisfying chew and a clean snap. If it is too thick and seems hard to bite, spread the layer thinner or chill a touch less next time so it is easier on the teeth.
If the white chocolate streaks do not show up, try using a higher contrast white chocolate or cool the dark layer slightly before drizzling. A cool base helps the white chocolate hold lines rather than sink in. For more dramatic marbling, drizzle in a zigzag and then pull a knife once down the center for long veins.
If your pieces look dull, let them sit at room temperature for a while and the bloom will recede. Chocolate sometimes whitens when it meets cold air. That does not change the flavor. It will still taste like the memory you wanted to make.
My Favorite Ways to Share This Bark
I like to tuck a few pieces into lunchboxes as a small hello from home. The kids find them like little treasure and always come home lighter. I also bring a shallow tin to neighbor visits with a note to say thanks for being nearby. It becomes a small, easy offering that opens conversations.
On quiet nights after the kids go to bed, I break three pieces and pair them with a strong black coffee. The contrast feels grown up and tender. Those tiny rituals help me remember that food is about comfort and pause, not just feeding.
If you host a cookie swap, cut the bark into uniform rectangles and tie each stack with ribbon. It looks pretty and shows you cared enough to make each piece neat. People always ask for the recipe when you do that.
Final Thoughts Before You Start
This recipe invites you into a warm, hands on kitchen moment. It asks you to melt, to listen, to let a child stir, and to gift without fuss. Making 4-Ingredient Mint Oreo Bark is a small ceremony of family life that feeds more than hunger. It feeds the feeling that home is a place of welcome.
If you are nervous, begin with small batches and keep the mood light. A perfect bark is not the point. The point is the hands that made it and the people who share it. That is the work I return to again and again.
Conclusion
For more inspiration and another version that captured my attention, I recommend this lovely take on Mint Oreo Bark at Simple Joy. You can find it here: Mint Oreo Bark – Simple Joy.


