I can still smell the candy canes from that first batch I made with my little one, the peppermint filling the house like a handful of holiday lights come to life. We crushed peppermint until little white and red flecks dusted our hands, and the chocolate warmed in the pan until it looked like a soft night sky. That first tray of Peppermint Bark Cookies landed on the table with a clatter of giggles and sticky fingers, and from that moment on they became the cookie I reach for when I want my kitchen to feel like a hug. If you like thin, crisp edges and a soft center with a bright peppermint snap, you might also enjoy my notes inspired by some of my other favorite treats, such as these peppermint chocolate chip cookies that share the same spark of cool candy and warm dough.
Why This Peppermint Bark Cookies Means So Much
When I bake these cookies, I am baking a story. The sound of a wooden spoon tapping the side of a bowl, the sight of sugar crystals catching the light, and the slow, steady swirl of melted chocolate all remind me of nights when the whole family gathered to make something together. We did not always have everything perfect. Some cookies cracked, some peppermint clumps were bigger than planned, and a few went missing before they cooled. Still, every imperfect bite tasted like memory.
My mother used to set out a tin of cookies and tell stories as if each cookie carried its own little history. I started making Peppermint Bark Cookies because I wanted a cookie that tasted like that tin. I wanted peppermint to cut through rich chocolate, and I wanted white chocolate to make the whole thing feel soft and bright. These cookies do that, and they also hold up to being shared and wrapped and passed from hand to hand at school plays and neighborhood potlucks.
There is a practical side to why these cookies became part of our family ritual. They travel well in a tin layered with parchment. They stay fresh for a few days without any fuss, and the candy bits give a little crunch that children and grownups both love. When we bring a tray over to a neighbor, the sound of the wrapper being opened is often the start of conversation. Food, to me, is a gentle way to build connection, and these cookies are reliable company for moments that matter.
I like working with ingredients I know and trust. The butter should be real, the vanilla a small indulgence, and the peppermint either crushed from candy canes or a measured extract if you prefer a cleaner look. If you ever want to lean into a deeper chocolate note, try a recipe in the family of chocolate sweets, like this chocolate peppermint cookies, which take a slightly richer turn but keep the same cheerful spirit.
The Story Behind Our Favorite Peppermint Bark Cookies
The first time I made these, I followed a family note and then wrote my own adjustments on the margin. I learned how to read cookie dough the way a gardener reads soil. If it looks too dry, it probably needs a touch more butter. If it feels too sticky, a short rest in the refrigerator makes all the difference. There is a rhythm to baking that calms me, like hums of a familiar song, and Peppermint Bark Cookies fit into that rhythm as a song that always sounds good.
Children notice small things when we bake together. They ask why the dough is cold, why we sift flour, and why we must wait for things to cool. Those questions become part of learning. I answer simply, show them where the flour goes, and hand them the bowl to stir. They end up tasting the same spoonfuls I once tasted, and the pleasure of teaching something small becomes as sweet as the candy on top.
Over time I collected small tips from friends and neighbors. One friend swears by tossing the dough in the fridge for thirty minutes so the cookies spread less. Another presses extra candy on top right out of the oven so it melts in and sets like a glaze. I tried both, blended them, and found a middle ground that keeps the texture tender and the peppermint crisp. If you are curious about variations that play with the peppermint and chocolate balance, you may find a version you love in these peppermint bark brownies, which fold the same idea into a denser, more fudgy treat.
Bringing Peppermint Bark Cookies Together
“Every time I stir this pot, it smells just like Sunday at home.”
Making these cookies feels like setting a small stage. The dough comes together in soft, pale waves. When you stir in the peppermint and chocolate, the colors move across the dough like confetti. I want you to notice the way the peppermint flecks scatter and the chocolate chips tuck into pockets of dough.
As the oven preheats, the kitchen takes on a different mood. You can hear the thermometer click, the oven light glow, and the faint exhale of the timer. Cookies need a forgiving touch. Let the dough be warm enough to spread, but not so warm that it runs into one giant sheet. A neat tip is to chill the dough slightly if your kitchen is humid.
Once you place the tray in the oven, the smell starts to tell its own story. The sugar browns a little at the edges, the butter loosens and breathes into the flour, and the chocolate softens without losing form. Watch the tray through the oven window. You will see the edges set first, then the rest of the cookie will follow. When they come out, they look like tiny winter moons dusted with peppermint.
Ingredients You’ll Need
1 cup unsalted butter, softened
1 cup granulated sugar
1 large egg
1 teaspoon vanilla extract (a little extra vanilla if you love a cozy aroma)
2 1/4 cups all-purpose flour
1/2 teaspoon baking soda
1/2 teaspoon salt
1 cup crushed peppermint candies (fresh candy canes crushed for a bright snap)
1 cup semisweet chocolate chips (rough-hewn chips give good pockets of chocolate)
1 cup white chocolate chips (melt these for the drizzle to make the cookie sing)
I like to bring each ingredient out and set it on the counter so nothing is a surprise. Fresh butter gives this its richness, and measuring flour with a light hand keeps the cookie tender. If you prefer a softer feeling in the center, shave a tablespoon or two from the flour and add it back if the dough seems too loose. The crushed peppermint can be coarser or finer depending on whether you like a dramatic crunch or a gentle peppermint dust.
If you ever want to switch the chocolate mix, try half bittersweet and half milk, or stir in chopped baking chocolate for a rustic bite. If white chocolate feels too sweet, a darker drizzle gives a nice balance. I keep a small jar of extra crushed candy on the side for pressing on the tops once they leave the oven. The little red specks make the cookies look celebratory without much fuss.
The Simple Process Behind It
Making these cookies follows simple, steady steps. You will cream, mix, fold, and bake. Each action is a chance to notice how ingredients change and come together. I like to move slowly for this part, paying attention to how the butter and sugar turn fluffy, how the dough holds its shape, and how peppermint and chocolate scatter through the batter.
When you fold the chips and candy into the dough, do so gently. You do not want to crush the chocolate chips or grind the peppermint into dust. Instead, fold just until everything looks evenly distributed. The dough should still feel soft, with clear pockets of chips and tiny flecks of peppermint, ready to morph into something warm and aromatic in the oven.
Small rituals help here. Line your baking sheets, scoop with the same spoon, and give each cookie a little space. This cookie loves turning into a neat round with edges that brown just a touch. If the first tray gives you a clue that they spread too much, chill the next tray for ten minutes. Baking is partly science and partly feel, and these steps gently guide you through both.
Step-by-Step Directions
Preheat the oven to 350°F (175°C). In a large bowl, cream together the butter and sugar until light and fluffy.
Work with softened butter so the sugar dissolves and the mixture becomes airy. You should see it turn paler and feel it lighten under your spoon. This is where the cookie gets its lift, and you can breathe in a sweet, buttery scent that feels like home.Beat in the egg and vanilla extract.
Crack the egg into a small bowl first, then beat it into the butter and sugar until smooth. The mixture will look glossy and a little looser when the egg is fully mixed. The vanilla adds a warm, familiar note that will come through in every bite.In another bowl, whisk together the flour, baking soda, and salt. Gradually add the dry ingredients to the wet mixture.
Add the flour in two or three additions, stirring until just combined after each. You want the dough to come together without overworking it. When it feels soft and holds a shape, you are ready for the next step.Fold in the crushed peppermint candies and chocolate chips.
Use a spatula to gently fold until peppermint flecks and chips are evenly scattered. Take a moment to notice the red and white candy against the pale dough and the dark chips tucked inside. Keep the fold light so the chips stay whole and the peppermint keeps a little crunch.Drop spoonfuls of dough onto ungreased baking sheets.
Give each spoonful a few inches of space so they can spread without touching. I like to press a few extra chips or bits of crushed candy on top for a pretty finish. This also helps the cookies look homemade and inviting.Bake for 10-12 minutes or until edges are lightly golden.
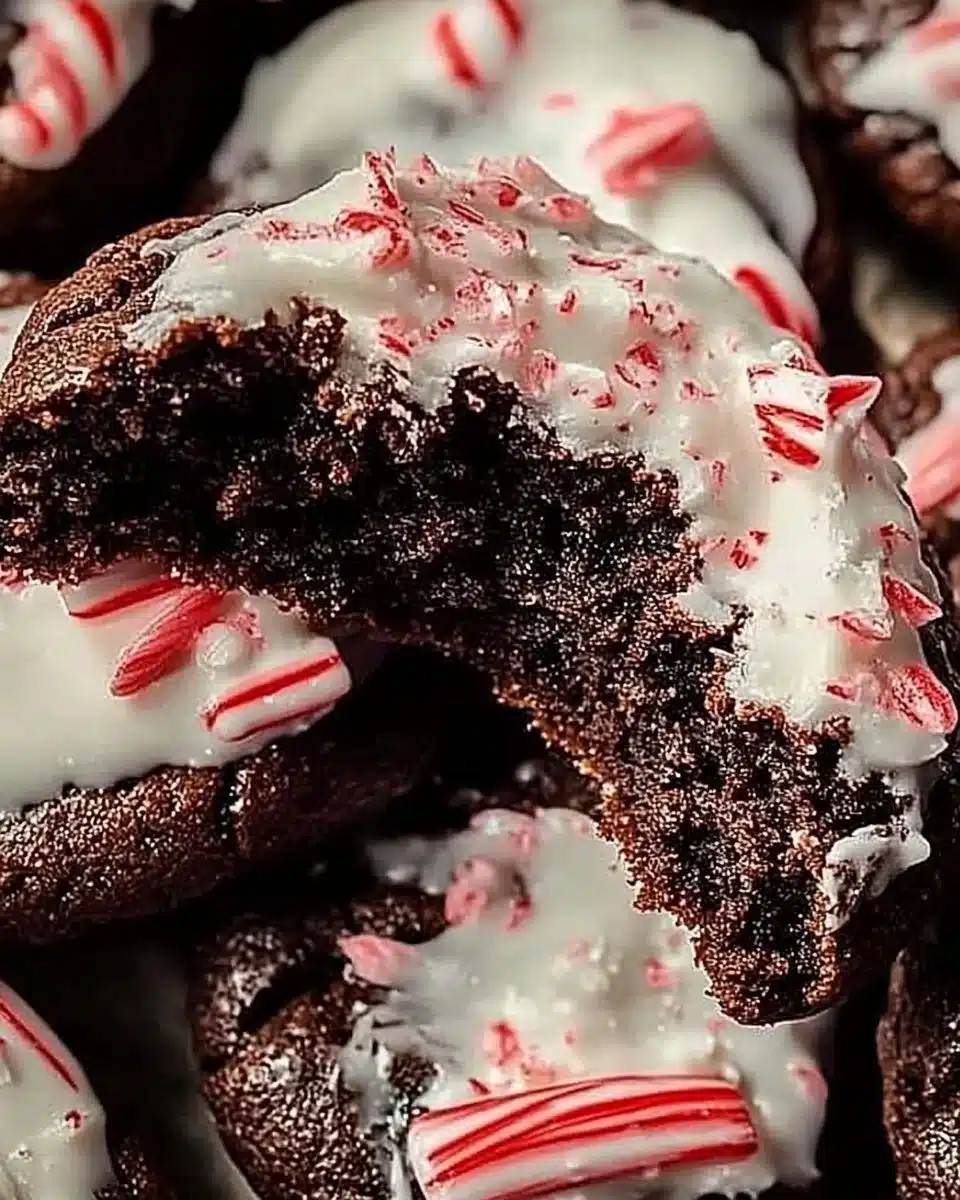
Watch for the edges to set and for a tiny golden rim to appear. The centers will still look a little soft and that is fine. Pull them when the edges are golden and the centers have a slight give so they finish tender after cooling.Allow cookies to cool completely. Melt the white chocolate and drizzle over the cooled cookies, then sprinkle with additional crushed peppermint if desired. Let set before serving.
The white chocolate drizzle should be smooth and shiny, and when it sets with the peppermint on top, the cookies look like little winter cookies. Wait until the drizzle firms so the topping does not slide off. Once set, stack them or arrange them on a plate and watch how they bring a room together.

Serving Peppermint Bark Cookies With Family Warmth
We tend to serve these cookies on a plain white plate because the contrast makes the red and white specks pop. I like to place a small jar of extra crushed peppermint nearby so guests can add a little more if they wish. Pair them with hot cocoa or a bold coffee so the peppermint stands out and the chocolate gets a moment to shine.
For holiday gatherings, I arrange them in rows and tuck a sprig of evergreen on the side. For a casual Sunday, they go straight from the baking sheet to a plate, and someone always asks for a second. When I pack them to bring to friends, I layer them with parchment so they do not stick together and tie the box with a baker’s twine. It feels like giving a small, edible letter.
Kids love decorating these cookies with extra candy. Lay out a few bowls of sprinkles, extra chips, and colored sugar and let them go. The cookies will not look perfect, but their faces will glow with pride at what they helped make. If you want a simple grownup presentation, drizzle extra dark chocolate in a thin zigzag and finish with a pinch of sea salt.
When I bring these cookies to a potluck, I often place a small card that says something like, “From our kitchen to yours.” It is a modest way to remind people that the best recipes are meant to be shared, and that a single batch can hold many small stories. If you are assembling a dessert board, pair these with something creamy like a simple vanilla pudding or a soft cheese to contrast the peppermint snap.
Little Tricks and Gentle Tips
If your dough feels too soft to scoop, rest it in the fridge for fifteen minutes. The chill firms the butter and helps the cookies spread less. If your kitchen is cool and the dough seems stiff, give it five minutes at room temperature so the butter loosens. Baking is as much about reading dough as it is about following steps.
Crush peppermint candies in a plastic bag with a rolling pin for uneven, pretty pieces. For a finer dust, pulse briefly in a food processor but watch closely so it does not turn to powder. The larger pieces make a bolder crunch and a prettier look on top, while the dust can melt into the cookie for a gentler peppermint kiss.
If you prefer a chewier cookie, pull them from the oven a touch earlier. For crispier edges, let them bake a minute longer. Keep the oven door closed as much as possible so heat stays even. A warm oven gives a consistent bake and a reliable edge to the cookie.
I often melt a little white chocolate in a small glass bowl set over barely simmering water. Stir until smooth, then let it cool slightly so it thickens before drizzling. Use a fork or a small piping bag for a neat drizzle. Press a bit of crushed peppermint on top before it sets to make the decoration permanent.
How to Save the Leftovers
Store these cookies in an airtight container layered with parchment to keep them from sticking. They will stay fresh at room temperature for about four days, and the peppermint flavor will settle in and taste even more familiar. If you want to extend the time, freeze them in a single layer on a tray first, then stack in a freezer-safe container with parchment between layers.
When you pull frozen cookies out for later, let them thaw at room temperature. Resist the urge to microwave them as that can soften the chocolate and melt the peppermint. Instead, warm them gently in a 300°F oven for five minutes if you want a just-baked feel. The white chocolate drizzle might soften a touch, but the cookie will taste revived and comforting.
If you have extra dough, form it into balls, flash-freeze on a tray, and then store in a bag. Baked straight from frozen, these cookies will need an extra minute or two in the oven and will spread a bit differently. This is a handy trick when you want fresh cookies without the full prep.
A little note about flavor: peppermint will mellow slightly over time and the chocolate will settle into the dough. Some people prefer them the day they are baked, when the peppermint sings most bright. Others like them a day later when chocolate and peppermint have had a chance to meet and become something softer. Both ways feel right to me.
Small Variations We Love
Try half semisweet and half milk chocolate chips for a sweeter, creamier bite. If you fancy a nuttier note, fold in a handful of chopped toasted almonds or pecans. For a richer, more grownup version, replace some of the white chocolate drizzle with a sweep of dark chocolate and a pinch of flaky salt.
If you want a prettier finished look, press extra pieces of candy into the tops right after they come out of the oven. The heat will slightly melt the candy so that it glues itself to the cookie, and the result looks very festive. If you prefer a marble look, swirl a little melted dark chocolate into the white chocolate before drizzling.
There is also a fast and simple version for busy afternoons. Take store-bought sugar cookie dough, fold in peppermint and chips, and bake as directed. It will not be the same as homemade from scratch, but it will carry the same bright flavors and the same sense of being shared and loved.
If you are drawn to tiny changes, consider adding a teaspoon of finely grated orange zest. That citrus note plays beautifully with chocolate and peppermint and makes the cookie taste slightly warmer, like sunlight through a window.
Baking With Kids: A Small How-To
If you bake with children, give them safe, small tasks that make them feel helpful. Measuring sugar and stirring dry ingredients are perfect jobs for little hands. Let them press extra peppermint on top and count chocolate chips as they place them. The kitchen becomes a classroom where patience and care are the lessons.
Keep a wet towel nearby and wrappers in a small bowl so their space stays tidy. If a bit of dough drops on the floor, turn it into a treat for the family dog or melt it into a small test cookie for the baker. I always let them taste a small spoonful of dough when it is egg-free, or a tiny end-of-batch piece, because food taught in love tastes better.
Use timers and small rewards. When a timer dings, make a ritual around it. We used to do a “little dance” for every tray that came out of the oven, which made waiting fun. Children remember rhythm and ritual more than recipes, and those rituals are what make a recipe a family memory.
If an experiment fails, talk about what happened and try again. Baking is a safe place to learn that small mistakes are not the end of the world. We retaste, retuck, and start again with a smile. Over time, those remade batches become the ones you reach for when you want comfort.
How We Pack and Gift Them
When I give these cookies as gifts, I choose simple brown boxes or clear bags. I tuck a sprig of rosemary or a tiny card inside that says the bake date and a short note. People notice the little details and feel remembered. You can make a dozen look like a feast with just a bit of styling.
For long trips, use parchment between layers and store in a rigid tin so the cookies do not crack. If you plan to ship, consider a small packet of silica gel to prevent moisture and wrap cookies gently. The person who opens the box should smell peppermint and feel like someone took care to make their day brighter.
If you are giving to a neighbor, drop by with a small stack and a warm word. Food is a reason to pause and connect. We have made neighbors into friends that way, and a single batch of cookies has started more than one conversation at our front steps.
Final Tips for Texture and Flavor
If you want a softer center, slightly underbake and let them cool on the tray. For a crisp finish, bake a touch longer and cool on a wire rack. Pay attention to the oven as soon as the tenth minute approaches. Ovens vary, and your watchful eye makes the difference between good and great.
Rotate trays halfway through baking if you have an oven that runs hot on one side. I once lost a favorite batch to uneven heat and learned the value of gentle rotation. Also, room temperature ingredients mix together more evenly, so take butter out a little early if you remember.
Taste as you go with small spoonfuls of dough when it is safe to do so. If it tastes a little flat, a pinch more salt can lift everything. A bit more vanilla can make the dough smell like a kitchen memory. These are small adjustments that change the way your final cookie feels in your hands.
How to Keep the Tradition Alive
Bake these cookies once a season or once a week if that makes you happiest. Keep the recipe written on a card or in your phone and add notes about what you changed. Invite friends and children to bake with you so the ritual passes on. The best recipes evolve with hands and hearts passing through them.
When I teach someone to make these cookies, I always tell them this: make it yours. Add a note here, press a bit more candy there, and make a small ritual of how you cool and plate them. Over time the recipe will become part of your story, and that is the sweetest outcome.
If you want to explore other ways peppermint and chocolate can meet, try a small detour and make a related treat. I keep a list of favorites to inspire different textures and forms. Sometimes we need a chewy square, sometimes a melt-in-your-mouth bar, and sometimes a crisp cookie is the perfect answer.
We have a soft spot for recipes that feel like a visit. These Peppermint Bark Cookies are one of those visits. They arrive with a familiar scent and the promise of shared moments. That is what keeps me coming back to the bowl.
Conclusion
If you would like a slightly different version or a source for inspiration, I recommend checking this lovely take on the idea at Peppermint Bark Cookies – Sugar Spun Run.
Print
Peppermint Bark Cookies
- Total Time: 27 minutes
- Yield: 24 cookies 1x
- Diet: Vegetarian
Description
Delightful peppermint bark cookies with a balance of rich chocolate and refreshing peppermint, perfect for sharing during the holidays.
Ingredients
- 1 cup unsalted butter, softened
- 1 cup granulated sugar
- 1 large egg
- 1 teaspoon vanilla extract
- 2 1/4 cups all-purpose flour
- 1/2 teaspoon baking soda
- 1/2 teaspoon salt
- 1 cup crushed peppermint candies
- 1 cup semisweet chocolate chips
- 1 cup white chocolate chips
Instructions
- Preheat the oven to 350°F (175°C). In a large bowl, cream together the butter and sugar until light and fluffy.
- Beat in the egg and vanilla extract until smooth.
- In another bowl, whisk together the flour, baking soda, and salt. Gradually add the dry ingredients to the wet mixture, stirring until just combined.
- Fold in the crushed peppermint candies and chocolate chips gently.
- Drop spoonfuls of dough onto ungreased baking sheets, spacing them a few inches apart.
- Bake for 10-12 minutes or until edges are lightly golden. Allow cookies to cool completely.
- Melt the white chocolate and drizzle over the cooled cookies, then sprinkle with additional crushed peppermint if desired. Let set before serving.
Notes
These cookies travel well in a tin layered with parchment. Store them in an airtight container for a few days to maintain freshness.
- Prep Time: 15 minutes
- Cook Time: 12 minutes
- Category: Dessert
- Method: Baking
- Cuisine: American
Nutrition
- Serving Size: 1 cookie
- Calories: 150
- Sugar: 10g
- Sodium: 100mg
- Fat: 7g
- Saturated Fat: 4g
- Unsaturated Fat: 2g
- Trans Fat: 0g
- Carbohydrates: 20g
- Fiber: 1g
- Protein: 2g
- Cholesterol: 30mg
Keywords: peppermint cookies, holiday cookies, dessert recipes, easy baking recipes


