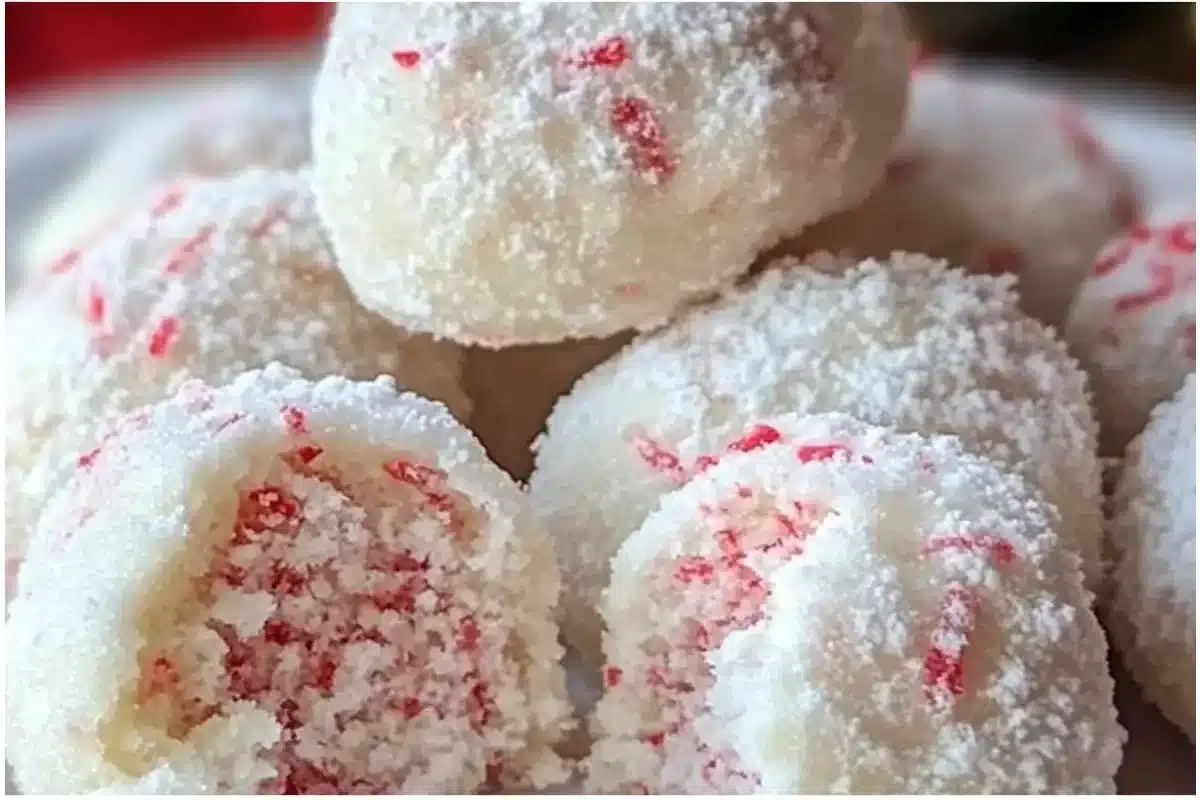
Peppermint Snowball Cookies are a fudgy, chocolate-tinged treat kissed with bright peppermint crunch. Soft, slightly crumbly centers give way to a crisp, powdered-sugar exterior while the room fills with a cool, minty aroma that screams holiday cheer. This recipe is special because it’s seasonal and sustainable—using pantry staples plus crushed candy canes for minimal waste—and easy enough for weekday baking or last-minute party trays; see other festive ideas in our snowball cookie collection.
Why You’ll Love This Recipe
Peppermint Snowball Cookies are perfect for holiday parties, cookie exchanges, or cozy nights with cocoa. They combine simple, familiar ingredients into a visually striking cookie—a pale, snowy exterior flecked with ruby candy-cane bits—that’s also easy to scale up for crowds. The texture balance (tender inside, slightly crisp outside) and the bright peppermint lift make them versatile: serve them with coffee, tuck them in gift tins, or add to a dessert board. They’re quick to prepare, forgiving for novice bakers, and a delightful seasonal staple.
Seasonal Ingredients Spotlight
Use fresh, seasonal ingredients when possible for the best flavor and sustainability. Look for high-quality unsalted butter—creamy, pale yellow and aromatic—which gives the cookies a rich mouthfeel. For the peppermint, choose crisp candy canes or artisan peppermint bark; when finely crushed they add both color and a refreshing, cool aroma. All-purpose flour provides structure with a neutral taste, while confectioners’ sugar creates that snowball look and delicate sweetness. Together, these components offer wintery whites and pops of red, a soft, melt-in-your-mouth texture and the lively scent of peppermint that feels both nostalgic and bright.
What You’ll Need
- 1 cup unsalted butter (softened to room temperature)
- ¾ cup confectioners’ sugar (plus more for coating)
- 1 teaspoon vanilla extract
- 1 teaspoon peppermint extract
- 2 ¼ cups all-purpose flour (spooned and leveled)
- ⅛ teaspoon salt
- ⅓ cup crushed candy canes (finely crushed)
Sensory notes: softened butter should feel pillowy and yield easily; confectioners’ sugar is silky and creates a cloudlike coating; crushed candy canes should be finely textured for even distribution and a satisfying crunch. Substitutions: use vegan butter and powdered sugar made with a plant-based starch for a dairy-free version (texture will be slightly different). For gluten-free, swap in a 1:1 gluten-free flour blend and chill a bit longer to prevent crumbling. If you prefer less mint, reduce peppermint extract to ½ teaspoon or omit candy canes and try chocolate chips—see similar peppermint chocolate chip variations for inspiration.
How to Make This Recipe
Cream the Butter — In a large mixing bowl, beat the softened butter on medium speed until creamy.
Beat until the butter is pale and airy, about 1–2 minutes; this traps air for lighter cookies. Stop and scrape the bowl to avoid streaks.Sweeten and Fluff — Add ¾ cup confectioners’ sugar and beat until smooth and fluffy.
The mixture should look like whipped cream—silky and snowlike. If grainy, beat a little longer or sift the sugar first.Add Flavor — Mix in vanilla extract and peppermint extract.
Stir until fully incorporated; the room will smell faintly of mint and vanilla. Adjust peppermint to taste—too much can be overpowering.Add Dry Ingredients — Gradually beat in flour and salt on low speed until a soft dough forms.
Mix just until combined to keep cookies tender; overmixing develops gluten and makes them tough.Fold Candy Canes — Fold in crushed candy canes gently, being careful not to overmix.
Aim for even speckles of red and white; folding preserves the dough’s tender texture and distributes peppermint crunch.Chill the Dough — Cover and refrigerate the dough for at least 30 minutes to firm up.
Chilling solidifies the butter so cookies keep their shape and have a delicate crumb; up to 2 hours is fine.Preheat & Prep Sheets — Preheat oven to 350°F (177°C) and line two baking sheets with parchment paper.
Using parchment prevents spreading and gives a pale, evenly baked bottom.Portion the Dough — Scoop 1 tablespoon of dough and roll into balls. Place 2 inches apart on the baking sheets.
Use a cookie scoop for uniformity; if dough sticks, chill scoops on a tray briefly.Bake — Bake for 15 minutes, or until the bottoms are lightly golden. Tops should remain pale.
Watch closely near the end—the goal is tender centers with lightly set edges, not deep browning.First Sugar Roll — Cool on the baking sheet for 5 minutes, then roll warm cookies in confectioners’ sugar.
Rolling warm helps the sugar adhere and creates the first snowy coat.Cool Completely — Transfer to a wire rack to cool completely, then roll in confectioners’ sugar again before serving.
The second coating seals the look and gives that classic snowball finish.Serve and Store — Arrange on a platter and enjoy.
Cookies keep their texture best at room temperature in an airtight container for up to a week.
Step Examples
Prepare the Base
Crush candy canes in a zip-top bag with a rolling pin until finely ground—listen for the bright, glassy snap. Measure and spoon flour to prevent packing; it should feel light and powdery.
Mix the Ingredients
Cream butter and sugar until pale and whipped; this yields a tender crumb. Add extracts and beat briefly—aromas should be noticeable but not overpowering.
Shape or Cook
Use a tablespoon scoop for even cookies, spacing them 2 inches apart. Bake until bottoms are lightly golden; tops will stay soft and pale—this indicates a tender interior.
Finish or Garnish
Roll warm cookies in confectioners’ sugar for a smooth white coating. After cooling, a second roll creates the snowy appearance and balances peppermint sweetness.
Serve and Enjoy
Serve with hot cocoa or espresso. Each bite gives a soft, buttery center, a whisper of peppermint, and a gentle powdered-sugar crunch.
Essential Tools
- Stand mixer or hand mixer (for creaming)
- Mixing bowls (medium and large)
- Measuring cups and spoons (spoon-and-level flour for accuracy)
- Cookie scoop or tablespoon (for uniform balls)
- Baking sheets and parchment paper
- Wire cooling rack
Optional: food processor for crushing candy canes, silicone mat for nonstick baking. If you use affiliate gear, choose durable, easy-clean tools that make small-batch baking quicker and more sustainable.
Meal Prep & Storage Tips
Make dough ahead and refrigerate up to 48 hours for deeper flavor; freeze dough balls on a tray, then transfer to a freezer bag for up to 3 months. Baked cookies freeze well in an airtight container with parchment layers—thaw at room temperature. For travel, pack in a single layer to preserve the powdered sugar finish or re-coat with sifted confectioners’ sugar upon arrival. Follow basic food safety: don’t leave perishable items in the danger zone; these cookies are safe at room temperature for several days, but refrigeration helps in warm climates.
Perfect Pairings
These minty snowballs pair beautifully with hot beverages that contrast their sweetness: rich hot chocolate, espresso, or a bright peppermint tea. For holiday spreads, serve alongside dense gingerbread, orange shortbread, or a dark chocolate tart for contrast in color and flavor—try linking a chocolate-mint combo like our chocolate peppermint cookie ideas when planning a tray. Visually, arrange cookies on a white platter with sprigs of rosemary or small pinecones for a rustic, wintry look; sprinkle extra crushed candy cane for color and crunch.
Nutrition Facts
Estimated per cookie (one tablespoon scoop; ~24 cookies total):
- Calories: ~180 kcal
- Fat: 8 g
- Carbohydrates: 24 g
- Protein: 3 g
- Fiber: 1 g
- Sugar: 14 g
Values are approximate and will vary by ingredient brands and exact portion sizes.
Avoid These Common Pitfalls
- Dough Too Dry — Add a splash of milk (1 teaspoon at a time) until pliable; chilling can also help firm and hydrate the dough evenly.
- Chocolate Coating Breaks — If coating with chocolate, ensure melted chocolate is smooth and warm; temper or add a teaspoon of coconut oil to stabilize.
- Unevenly Shaped Balls — Use a cookie scoop and roll quickly between palms for consistent shape; if dough is sticky, chill briefly to firm.
H3: Examples
Dough Too Dry — Add a splash of milk until pliable.
Chocolate Coating Breaks — Ensure melted chocolate is smooth and warm.
Unevenly Shaped Balls — Use a cookie scoop.
Pro Tips for Best Results
Use room-temperature butter for proper creaming and a light texture—cold butter won’t aerate, and melted butter will flatten cookies. Sift confectioners’ sugar for the silkiest coating. Chill dough if your kitchen is warm to prevent spreading and to concentrate flavors. For uniform appearance, roll cookies twice in sugar (once warm, once cooled). When crushing candy canes, pulse briefly to avoid turning bits into dust; you want pleasant crunch and color flecks.
Recipe Variations to Explore
Swap crushed candy canes for finely chopped peppermint bark or white chocolate chips for a creamier bite. For extra richness, fold in 2 tablespoons Dutch-process cocoa for chocolate peppermint snowballs. Add a pinch of espresso powder to deepen flavor without making cookies taste like coffee. For a grown-up twist, soak a few raisins in peppermint liqueur and fold them in. Seasonal swaps: use orange zest and chopped candied orange for a citrus-snowball variation in winter.
Dietary Adaptations & Safety Info
Allergens: this recipe contains dairy and gluten. Dairy-free: use a vegan stick butter and check confectioners’ sugar for vegan status. Gluten-free: substitute a cup-for-cup gluten-free flour blend and slightly increase chilling time. Vegan: replace butter and ensure extracts and sugars are vegan. Always label cookies when serving to guests with allergies and store separately to avoid cross-contact.
Frequently Asked Questions
Q: Can I make the dough ahead of time?
A: Yes—dough can be refrigerated up to 48 hours or frozen for up to 3 months. Thaw in the refrigerator overnight before scooping.
Q: Why are my snowball cookies crumbly after baking?
A: Overbaking or too much flour can cause crumbliness. Measure flour by spooning into the cup and leveling; bake until just set and pale.
Q: Can I omit the peppermint extract?
A: Yes. Omit the extract and increase vanilla to 1 ½ teaspoons, or add finely chopped chocolate for a non-minty version.
Q: How do I keep the powdered sugar from melting off?
A: Roll warm cookies once, then let them cool completely and roll again. Ensure cookies are not oily and are fully cooled before storage.
Q: What’s the best way to crush candy canes?
A: Place canes in a zip-top bag and crush with a rolling pin or pulse briefly in a food processor. Aim for small shards and fine bits—avoid turning them into dust.
Q: Can I freeze baked cookies?
A: Yes. Freeze in a single layer until firm, then stack with parchment between layers in an airtight container for up to 3 months. Re-sift powdered sugar if needed after thawing.
Final Thoughts & Next Steps
These Peppermint Snowball Cookies bring festive color, cool mint, and a tender, snowy finish to any dessert table. Try the recipe, share photos, and tell us how you customized yours—we love reader tips and tweaks. If you enjoyed this, browse more desserts in our recipe collection for inspiration and new seasonal bakes.
Print
Peppermint Snowball Cookies
- Total Time: 45 minutes
- Yield: 24 cookies 1x
- Diet: Vegetarian
Description
Fudgy, chocolate-tinged cookies kissed with bright peppermint crunch, perfect for holiday parties.
Ingredients
- 1 cup unsalted butter, softened
- ¾ cup confectioners’ sugar (plus more for coating)
- 1 teaspoon vanilla extract
- 1 teaspoon peppermint extract
- 2 ¼ cups all-purpose flour, spooned and leveled
- ⅛ teaspoon salt
- ⅓ cup crushed candy canes, finely crushed
Instructions
- Cream the butter in a large mixing bowl until creamy.
- Add confectioners’ sugar and beat until smooth and fluffy.
- Mix in vanilla and peppermint extracts until fully incorporated.
- Gradually beat in flour and salt until a soft dough forms.
- Fold in crushed candy canes gently.
- Cover and refrigerate the dough for at least 30 minutes.
- Preheat oven to 350°F and line baking sheets with parchment paper.
- Scoop tablespoon-sized portions of dough and roll into balls, placing them 2 inches apart on baking sheets.
- Bake for 15 minutes or until the bottoms are lightly golden.
- Cool on the baking sheet for 5 minutes, then roll warm cookies in confectioners’ sugar.
- Transfer to a wire rack to cool completely, rolling again in sugar before serving.
- Arrange on a platter and enjoy.
Notes
Chill the dough well for the best texture; these cookies can also be frozen for up to 3 months.
- Prep Time: 15 minutes
- Cook Time: 15 minutes
- Category: Dessert
- Method: Baking
- Cuisine: American
Nutrition
- Serving Size: 1 cookie
- Calories: 180
- Sugar: 14g
- Sodium: 50mg
- Fat: 8g
- Saturated Fat: 5g
- Unsaturated Fat: 2g
- Trans Fat: 0g
- Carbohydrates: 24g
- Fiber: 1g
- Protein: 3g
- Cholesterol: 30mg
Keywords: cookies, holiday, peppermint, dessert, seasonal baking


