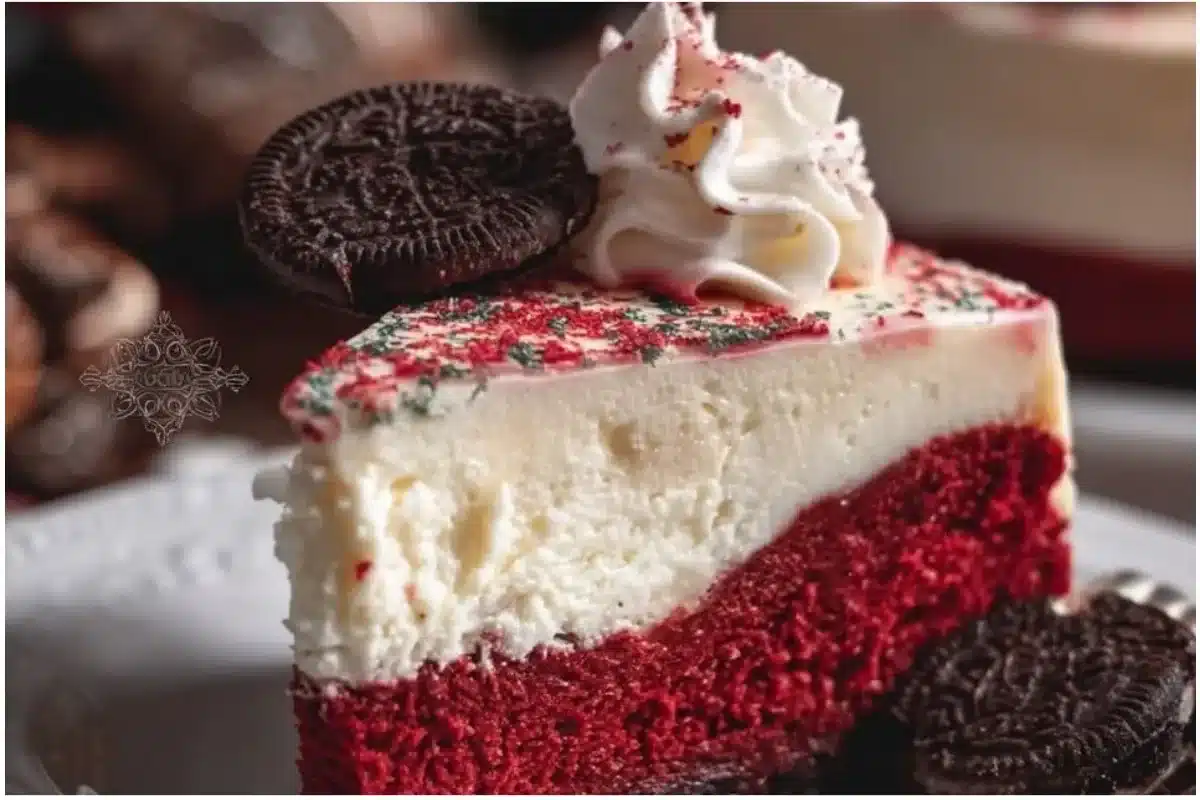
Make your holiday dessert table unforgettable with a Christmas Red Velvet Cheesecake — the perfect mashup of two classics: the moist red velvet cake and the silky New York–style cheesecake. This dessert answers the holiday crowd’s top pain points: it looks spectacular, feeds many, and can be made ahead so you can actually enjoy the party. If you’ve ever had a cracked or grainy cheesecake, or one where the red layer fades into muddy brown, this guide gives you the practical kitchen logic to fix that—and the full recipe to execute it reliably.
In this post you’ll get:
- A chef-tested recipe card for a 9‑inch Christmas Red Velvet Cheesecake
- The science behind red velvet and cheesecake ingredients (so your texture and color are consistent)
- Step-by-step instructions with pro-level timing, troubleshooting, and serving suggestions
- Variations (mini cheesecakes, Oreo crust, vegan options) and swaps for natural colorants
- Storage, reheating, and nutrition insights
If you love red velvet treats, you might also enjoy my twist on bite-size red velvet cookies like Red Velvet Blossoms for holiday platters.
Why this recipe works (quick chef’s overview)
This recipe balances acidity and fat to protect the delicate emulsion of a baked cheesecake while using the right cocoa, vinegar, and color strategy so the red remains vivid without tasting artificial. We use a chocolate or graham crust for contrast, room‑temperature ingredients and low, steady oven heat (with water bath option) to avoid cracks, plus chilling time that firms the custard so slices are clean and photogenic.

Christmas Red Velvet Cheesecake
- Total Time: 495 minutes
- Yield: 10–12 servings 1x
- Diet: Vegetarian
Description
Make a stunning Christmas Red Velvet Cheesecake with a tender red crumb or chocolate crust, silky cream cheese filling, and pro tips for a crack-free finish.
Ingredients
- 1 3/4 cups chocolate cookie crumbs (Oreo style, about 18 cookies, filling removed) OR graham cracker crumbs
- 5 tbsp unsalted butter, melted
- 2 tbsp granulated sugar (omit if using sweet cookie crumbs)
- 32 oz (900 g) full-fat cream cheese, room temperature (cut into cubes)
- 1 cup granulated sugar
- 1/2 cup sour cream, room temperature
- 1/2 cup heavy cream
- 3 tbsp unsweetened natural cocoa powder (not Dutch-processed)
- 2 tsp pure vanilla extract
- 2 tbsp distilled white vinegar or 1 tbsp lemon juice
- 3 large eggs + 1 large egg yolk, room temperature
- 2–3 tbsp red gel food coloring OR 2 tsp beet powder dissolved in 1 tbsp warm water
- 1 tbsp cornstarch or 2 tbsp all‑purpose flour (optional)
Instructions
- Preheat oven to 350°F (175°C). Mix cookie crumbs with melted butter and sugar.
- Press into the bottom of a 9‑inch springform pan. Bake for 8 minutes.
- Bring cream cheese to room temperature and beat until smooth. Add sugar gradually and beat until glossy.
- Stir in sour cream and heavy cream on low speed until integrated.
- Add cocoa powder and vanilla; mix until uniform.
- Add red gel food coloring or dissolved beet powder.
- Blend cornstarch if using. Add eggs one at a time, mixing on low speed just until blended.
- Reduce oven temperature to 325°F (160°C). Pour filling onto chilled crust and smooth the top.
- Bake 60–75 minutes. Check for doneness by gently shaking the pan.
- Turn off the oven and crack the door open. Let sit in the oven for 45–60 minutes to cool gradually.
- Cool to room temperature, then chill in the fridge for at least 8 hours.
- Top with whipped cream and additional toppings if desired before serving.
Notes
Make ahead for best texture; cheesecake benefits from overnight chilling. Store tightly wrapped in the fridge for up to 5 days.
- Prep Time: 35 minutes
- Cook Time: 75 minutes
- Category: Dessert
- Method: Baking
- Cuisine: American
Nutrition
- Serving Size: 1 slice
- Calories: 470
- Sugar: 34g
- Sodium: 400mg
- Fat: 35g
- Saturated Fat: 18g
- Unsaturated Fat: 10g
- Trans Fat: 0g
- Carbohydrates: 38g
- Fiber: 1g
- Protein: 7g
- Cholesterol: 120mg
Keywords: red velvet cheesecake, Christmas dessert, holiday cheesecake
Recipe card — Christmas Red Velvet Cheesecake
Yield: 10–12 servings
Prep time: 35 minutes (plus chilling)
Bake time: 60–75 minutes
Chill time: 8–24 hours
Ingredients
Crust (choose one)
- 1 3/4 cups chocolate cookie crumbs (Oreo style, about 18 cookies, filling removed) OR graham cracker crumbs
- 5 tbsp unsalted butter, melted
- 2 tbsp granulated sugar (omit if using sweet cookie crumbs)
Filling
- 32 oz (900 g) full‑fat cream cheese, room temperature (cut into cubes)
- 1 cup granulated sugar
- 1/2 cup sour cream, room temperature
- 1/2 cup heavy cream (or full‑fat Greek yogurt for tang)
- 3 tbsp unsweetened natural cocoa powder (not Dutch-processed)
- 2 tsp pure vanilla extract
- 2 tbsp distilled white vinegar or 1 tbsp lemon juice
- 3 large eggs + 1 large egg yolk, room temperature
- 2–3 tbsp red gel food coloring OR 2 tsp beet powder dissolved in 1 tbsp warm water (for natural color)
- 1 tbsp cornstarch or 2 tbsp all‑purpose flour (optional, for extra stability)
Topping (optional)
- 1 cup chilled whipping cream + 2 tbsp powdered sugar for whipped cream
- Sugared cranberries, crushed pistachios, chocolate curls, or edible gold dust
Equipment
- 9‑inch springform pan (2–3 inches tall)
- Food processor or zip-top bag + rolling pin (for crumbs)
- Electric mixer (stand or handheld)
- Roasting pan for water bath (optional)
- Instant-read thermometer (optional but helpful)
Full method with chef insights
Preparing the crust
- Preheat oven to 350°F (175°C). If using a chocolate cookie crust, remove the cream filling from the cookies (optional — some prefer leaving it) and crush into fine crumbs in a food processor. Mix crumbs with melted butter and sugar until evenly moistened.
- Press into the bottom (and slightly up the sides if you like) of a 9‑inch springform pan. Use the bottom of a measuring cup to compact the crust firmly and evenly. Bake 8 minutes, then cool on a rack while preparing the filling.
Chef note: Pre-baking the crust gives structure and prevents sogginess. For an Oreo crust, press firmly—chocolate crumbs create a striking contrast to the red interior.
Making the filling — the science
3. Bring cream cheese to room temperature: this is critical. Cold cream cheese lumps in the batter and traps air, which encourages cracks. Cut into cubes and beat on medium speed until smooth and creamy (about 2–3 minutes). Scrape the bowl frequently.
4. Add sugar gradually and beat until glossy. Over‑beating after eggs are added will incorporate too much air, so keep mixing efficient.
5. Stir in sour cream and heavy cream on low speed until integrated. Add cocoa powder and vanilla; mix until uniform. Cocoa contributes chocolate flavor and acidity. Use natural cocoa powder (not Dutch-processed) if you want a brighter red reaction with the vinegar and buttermilk.
6. Add red gel food coloring or dissolved beet powder. Gel coloring gives color without adding extra liquid. If using natural beet powder, test a small batter portion to ensure the color intensity is acceptable.
7. Blend cornstarch if using—this stabilizes the custard and reduces cracking.
8. Add eggs one at a time, mixing on low speed just until blended. Stop mixing the instant the streaks are gone. Finally, beat in the extra yolk for richness.
Chef tip: Eggs set the structure of a cheesecake. Incorporating them gradually and gently keeps the matrix smooth. Excess whipping makes the finished cake rise too much and collapse — which cracks the top.
Baking with confidence
9. Reduce oven temperature to 325°F (160°C). Pour filling onto chilled crust and smooth the top. Tap the pan gently on the counter to pop large air bubbles.
10. Optional water bath (recommended for crack-free top): wrap the outside of the springform pan with two layers of heavy-duty aluminum foil to prevent leaks. Place the pan in a deep roasting pan, then add boiling water to the roasting pan until it reaches halfway up the sides of the springform pan.
11. Bake 60–75 minutes. Check for doneness by gently shaking the pan: the center should jiggle like thick gelatin but not be liquid. An instant‑read thermometer should register about 150–155°F (65–68°C) at the center.
12. Turn off the oven and crack the door open. Let the cheesecake sit in the warm oven for 45–60 minutes to cool gradually—this prevents sudden temperature shifts that cause cracks.
13. Remove from oven, lift out of the water bath, remove foil, and cool to room temperature. Chill in the fridge for at least 8 hours, preferably overnight.
Finishing touches
14. Once chilled, release the springform and transfer to a serving plate. Top with whipped cream, sugared cranberries, pistachios, or a light dusting of cocoa. For a cleaner presentation, pipe rosettes of whipped cream around the edge.
Pro insights and common mistakes (and how to avoid them)
- Room temperature ingredients: This is non-negotiable. Cold cream cheese and eggs result in lumps and overworked batter. Remove ingredients 1–2 hours prior depending on your kitchen temperature.
- Overbeating after eggs: Stops the mixer when eggs are incorporated. Look for a glossy, silk-like batter.
- Water bath vs. no water bath: Water bath moderates oven temperature and adds humidity, both reducing cracks. If you’re confident with low oven temperature and slow cooling, you can skip it, but water bath is insurance.
- Cracking: Most cracks come from thermal shock or overbeating. Cool slowly and avoid opening the oven frequently.
- Soggy crust: Pre-bake the crust. Also ensure the bottom of the springform pan is well sealed so water bath won’t leak in.
- Browning top: If you want a pure white top, tent loosely with foil for the last 10–15 minutes of baking. Alternatively, embrace a light tan for rustic charm.
Ingredient breakdown with science and benefits
Cream cheese
- Role: Main structure and flavor. High fat content gives richness and smooth texture.
- Science: Cream cheese contains proteins and fat that coagulate during baking to form the custard structure. Using full‑fat ensures proper mouthfeel and prevents curdling.
Sugar
- Role: Sweetness and structure.
- Science: Sugar interacts with eggs and proteins to lower the coagulation temperature slightly, producing a creamier texture when properly balanced.
Eggs
- Role: Binder and structure.
- Science: Egg proteins coagulate as temperature increases, setting the custard. The yolk adds fat and emulsifiers (lecithin) for silkiness.
Sour cream and heavy cream
- Role: Adds tang, moisture, and fat.
- Science: Acidity from sour cream can tenderize proteins slightly, and the extra fat helps prevent a dry, curdled texture. Sour cream also supports the flavor profile of red velvet.
Cocoa + vinegar
- Role: Flavor and color chemistry.
- Science: Traditional red velvet uses natural (non‑alkalized) cocoa powder which reacts with acidic ingredients (buttermilk/vinegar) and food coloring to yield a brighter red. Dutch-processed cocoa has been alkalized and won’t react the same way, so it produces darker/browner results.
Red coloring (gel vs. natural)
- Gel food coloring gives vivid color without adding liquid. Natural beet powder provides color and a subtle earthy flavor; it will fade less when exposed to acid but can shift hue in the oven. If you prefer natural color, test small batches.
Cornstarch or flour
- Role: Stabilizer.
- Science: Small amounts of starch lock moisture and reduce the tendency for the custard to over-set and crack, yielding a velvety texture.
Variations and swaps
- Oreo crust (classic pairing): Replace graham crumbs with chocolate sandwich cookies for a darker contrast. For an extra indulgence, stir in 1/2 cup chopped pecans. (If you want a boxed inspiration for Oreo-crusted red velvet cheesecakes, see the external recipe in the conclusion.)
- No‑bake version: Combine softened cream cheese, whipped cream, sugar, cocoa, and gel color, stabilize with gelatin or agar, pour over chilled cookie crust, and set for 4–6 hours.
- Mini cheesecakes: Bake in lined muffin tins for 18–22 minutes, chill and top with cream cheese frosting. Great for parties and easier to transport.
- Vegan/egg-free: Use silken tofu or softened vegan cream cheese, agar-agar for setting, coconut cream for richness, and natural colorants like beet juice concentrated into a paste. Texture will differ but can be quite good for dietary needs.
- Festive flavors: Fold in a tablespoon of orange zest for a Christmas citrus note, or swirl melted white chocolate on top for elegance.
Serving and pairing ideas
- Serve with lightly sweetened whipped cream and a sprinkle of cocoa or crushed candy canes for a holiday look.
- Pair with rising earlier desserts on your menu: a palette-cleansing 2‑Ingredient Cottage Cheese Ice Cream makes a light, tangy counter to dense cheesecake slices for guests who want smaller portions.
- If you want a savory side for dinner before dessert, keep mains simple—e.g., buttery noodles from this comforting Buttered Noodles recipe won’t overshadow the sweet finale.
Presentation ideas
- Slice with a hot, dry knife: run under hot water, dry, then slice; wipe between cuts. This yields clean edges.
- Garnish: sugared cranberries add color and texture; crushed pistachios give contrast and a holiday green. Edible gold leaf or dust makes the cake festive for special gatherings.
Storage, reheating, and make‑ahead
- Make‑ahead: Cheesecake benefits from chilling. Bake the day before; chill overnight for best texture and clean slicing.
- Refrigeration: Store whole or sliced cheesecake wrapped tightly in plastic wrap or in an airtight container for up to 5 days. Keep whipped cream toppings separate until serving for best texture.
- Freezing: Cheesecake freezes well. Freeze individual slices on a tray until solid, then wrap tightly in plastic and foil. Store for up to 2 months. Thaw in the refrigerator overnight. Avoid freezing whipped cream toppings; make fresh when serving.
- Reheating: Cheesecake is best served chilled. If you prefer a slightly softer texture, let slices sit at room temperature for 20–30 minutes before serving.
Nutrition insights
A typical slice (1/12 of recipe) will be calorie-dense due to cream cheese, butter, and sugar. Approximate per-slice macros:
- Calories: 420–520 kcal
- Fat: 30–36 g (saturated fat significant)
- Protein: 6–8 g
- Carbohydrates: 30–45 g (sugars included)
Health-conscious swaps (affect texture)
- Lower-fat cream cheese reduces richness and may yield a looser structure; offset by adding a tablespoon of cornstarch to stabilize.
- Use erythritol or a monk-fruit blend as sugar replacements—expect slightly different browning and mouthfeel.
- For a lighter dessert, serve smaller slices or mini cheesecakes paired with fresh fruit.
Baking troubleshooting: Q&A within the how‑to
Q: My cheesecake cracked—what happened?
A: Usually due to overbeating (too much air), rapid temperature changes, or over-baking. Solutions: mix gently, use water bath, cool slowly in the turned-off oven with the door cracked open.
Q: The center sank after cooling—why?
A: Likely underbaked. The center should jiggle but not be liquid. Bake until set and use gradual cooling.
Q: My red velvet turned brown—how to keep the red color?
A: Use natural (non-Dutch-processed) cocoa and gel food coloring. Dutch-processed cocoa doesn’t react with acid, so the batter looks browner. Also, limited exposure to air and quick chilling help maintain bright red.
Q: Batter is lumpy—fix?
A: Start with room-temperature cream cheese and beat it thoroughly before adding other ingredients. Strain or press through a fine sieve only if lumps persist but be gentle.
Frequently asked questions (schema-ready style)
Q: Can I use Dutch‑processed cocoa?
A: You can, but expect a darker, less vibrant red. For classic red velvet hue, use natural (non‑alkalized) cocoa.
Q: Is a water bath necessary?
A: It isn’t strictly necessary, but it dramatically lowers the chance of cracks and produces a silkier texture—recommended for first-timers or if you want perfection.
Q: How long should I chill before serving?
A: At least 8 hours; overnight is ideal for texture and clean slices.
Q: Can this be made dairy‑free?
A: Yes—use vegan cream cheeses, coconut cream, and an appropriate gelling agent like agar. Texture will be slightly different.
Q: How do I transport this cheesecake?
A: Keep chilled in a sturdy, level container. Place non-slip matting under the pan in the cooler. Mini cheesecakes are easier for transport.
Kitchen timeline for holiday planning
- Day 3 before: buy ingredients and decorations (sugared cranberries, edible gold).
- Day 1 before: Make the cheesecake; bake, cool slowly in oven, then chill overnight. Make any garnishes the same day.
- Day of: Finish decorations, make whipped cream, slice and serve.
Holiday menu pairing suggestions
Pair your Christmas Red Velvet Cheesecake with lighter holiday beverages — a lightly spiced sparkling cider or a cranberry-lime mocktail cleanses the palate. If you’re serving a full meal, consider starting with a bright soup like an autumn squash soup or finishing with small bites like Red Velvet Blossoms to echo the theme in portioned treats.
Final chef tips for showstopping results
- Turntable for finishing: If you’re piping rosettes or smoothing whipped cream, a cake turntable makes this fast and tidy.
- Edible shimmer: A tiny amount of edible gold dust on sugared cranberries elevates presentation.
- Practice slice technique: Dip the knife in hot water and wipe clean between cuts for glossy slices.
- Label allergen information at parties: Cheesecake contains eggs and dairy; if you serve a vegan variation, separate it clearly.
Internal links (distributed naturally)
- For a festive bite‑size counterpart to your cheesecake, try making Red Velvet Blossoms for cookie platters or place settings.
- A lighter dessert palette cleanser after a rich slice can be a simple, surprising choice like 2‑Ingredient Cottage Cheese Ice Cream.
- If you’re feeding a crowd and want an easy savory main earlier in your menu, a comforting side such as Buttered Noodles keeps flavors simple and crowd-pleasing.
Conclusion
Thank you for reading this full guide to making a Christmas Red Velvet Cheesecake. If you want variations with an Oreo or cookie crust for inspiration, check out this classic take on Red Velvet Cheesecake with an Oreo crust at Red Velvet Cheesecake (with Oreo Crust) – Live Well Bake Often. If you’re exploring other festive red velvet ideas, the Merry Christmas! Red Velvet Cheesecake Cookies | droolfactor post shows how to turn the profile into fun cookies for holiday sharing.
Share, save, or bake — and tag photos of your results so others can recreate your holiday centerpiece.


